Prerequisites
We’ll need these items above to complete this entire process. Don’t worry, I’ll walk you through all the steps in obtaining these items.

macOS 11 Big Sur ISO
Ok first off we’ll need the macOS 11 Big Sur iso. Throughout the vast interwebs, you can search and find the Big Sur ISO all over the place to download.
So go get it! But…
…if you do go this route, make sure you look up how to validate the SHA1 and MD5 hash values of the iso before using it.
I, for one, like to create it myself using another macOS native machine like a Macbook. I know some of you don’t have access to a dedicated macOS environment and it’s probably the reason why you are following this guide. 🙂
I just like to know that the iso is clean and not injected with anything malicious.
With this…Can I use iCloud, iMessage, etc…?
Download macOS 11 Big Sur ISO
- On your macOS dedicated device, navigate to download the Big Sur official release here.
- Once you’ve clicked the link, the App Store App will open prompting you to Get Big Sur.
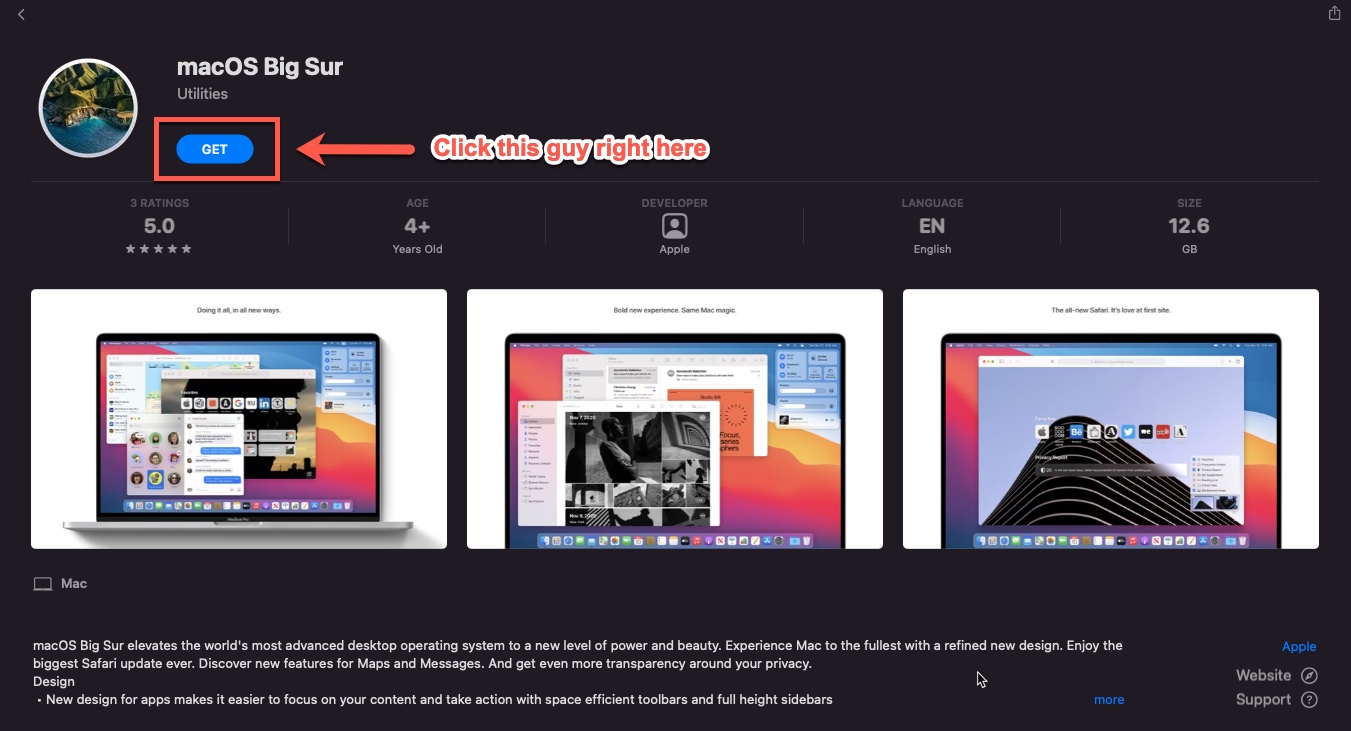
Once you’ve clicked on the Get button. Continue downloading Big Sur which sits at roughly 12.18 GB. Depending on your network connection the download time may vary.
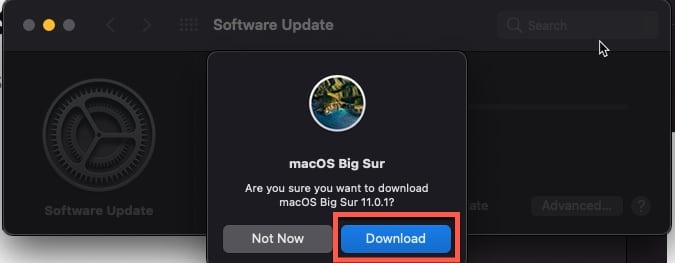
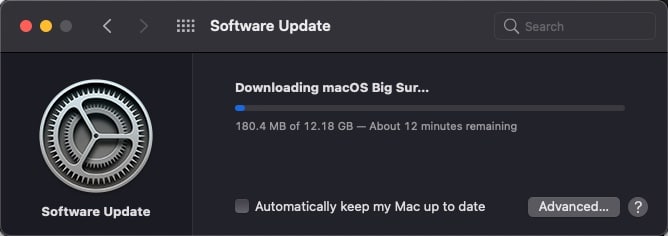
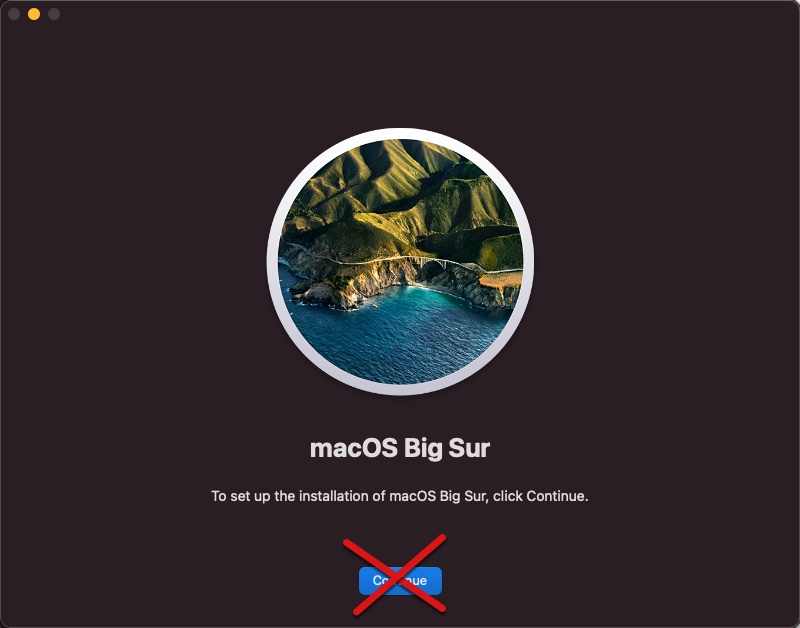
DO NOT CLICK CONTINUE!

Once the download completes, you’ll be prompted with the install window to Continue. Instead of continuing, simply click on Command + Q to close the window.
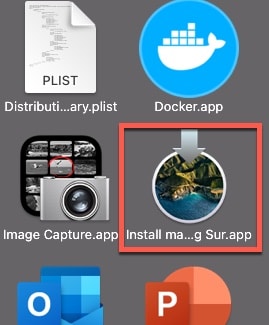
You’ll now have the Big Sur App listed under your application folder. This is what we’ll use to convert it into an iso in the next step.
Mount Installer then Convert to ISO
Next we’ll need to run a series of commands to mount the installer to ultimately convert to an iso to be used by ESXi.
Launch terminal and run the following command.
This command will then prompt you for the administrator password for your specific device. Once you enter it in, you’ll be logged in as the root user which is the account we’ll use to execute the rest of the commands.

From the root# prompt, enter the following command.
*Update 06/17/21* – A few of my readers in the comments below suggested changing the size of the image to 12900.1 & 13100.1 to account for all the current OS updates as this guide was written for the initial release of Big Sur. So please ignore the screenshot below that has a volume size of 12700.1m and follow the command above.
This will create the directory /tmp/bigsur.dmg

Next we are going to mount the dmg using the following command.
This should result in the following output below.

Then we’ll create the install media from our mount with this command.
The output below is what you should see while making the disk bootable.

Afterwards, eject the attached disk using the command below
This should result in the disk being ejected.

Then finally we need to convert the image to a .cdr with the following command. A .cdr is essentially a macOS version of an .iso. Not to be confused with a Compact Disc Recordable.
Make sure you change the /Users/erickdimalanta/Desktop/BigSur.cdr to your own username for the path you are working in. Once you run the command below you should see a BigSur.cdr file on your desktop which sits at about 13.32 GB.


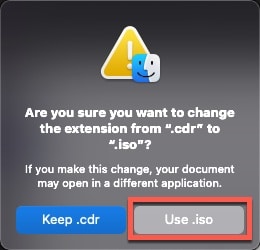
Now all we need to do is simply rename the file to .iso. I like running the mv(move) command in place below to essentially do a rename of the file.
Don’t forget to change the username path to your own username. Or you can simply rename the actual file by:
- Select file
- Press Return/Enter
- Rename .cdr to .iso
- Confirm the change to Use .iso
Clean Up
I hate leaving trails of data all over the place. So let’s cleanup after ourselves. If you remember initially we created the bigsur.dmg in the following path /tmp/bigsur.dmg. Let’s clean up this directory with the following command.
This command force removes everything in the directory specified without prompting for confirmation. So we are removing everything in the /tmp folder with anything that begins with bigsur.

Transfer ISO to Datastore
Next we need to navigate to the VMware homelab environment and transfer the newly created BigSur.iso to either a datastore or Content Library if you are running a vCenter. For purposes of this guide, I’ll simply upload it to a datastore.
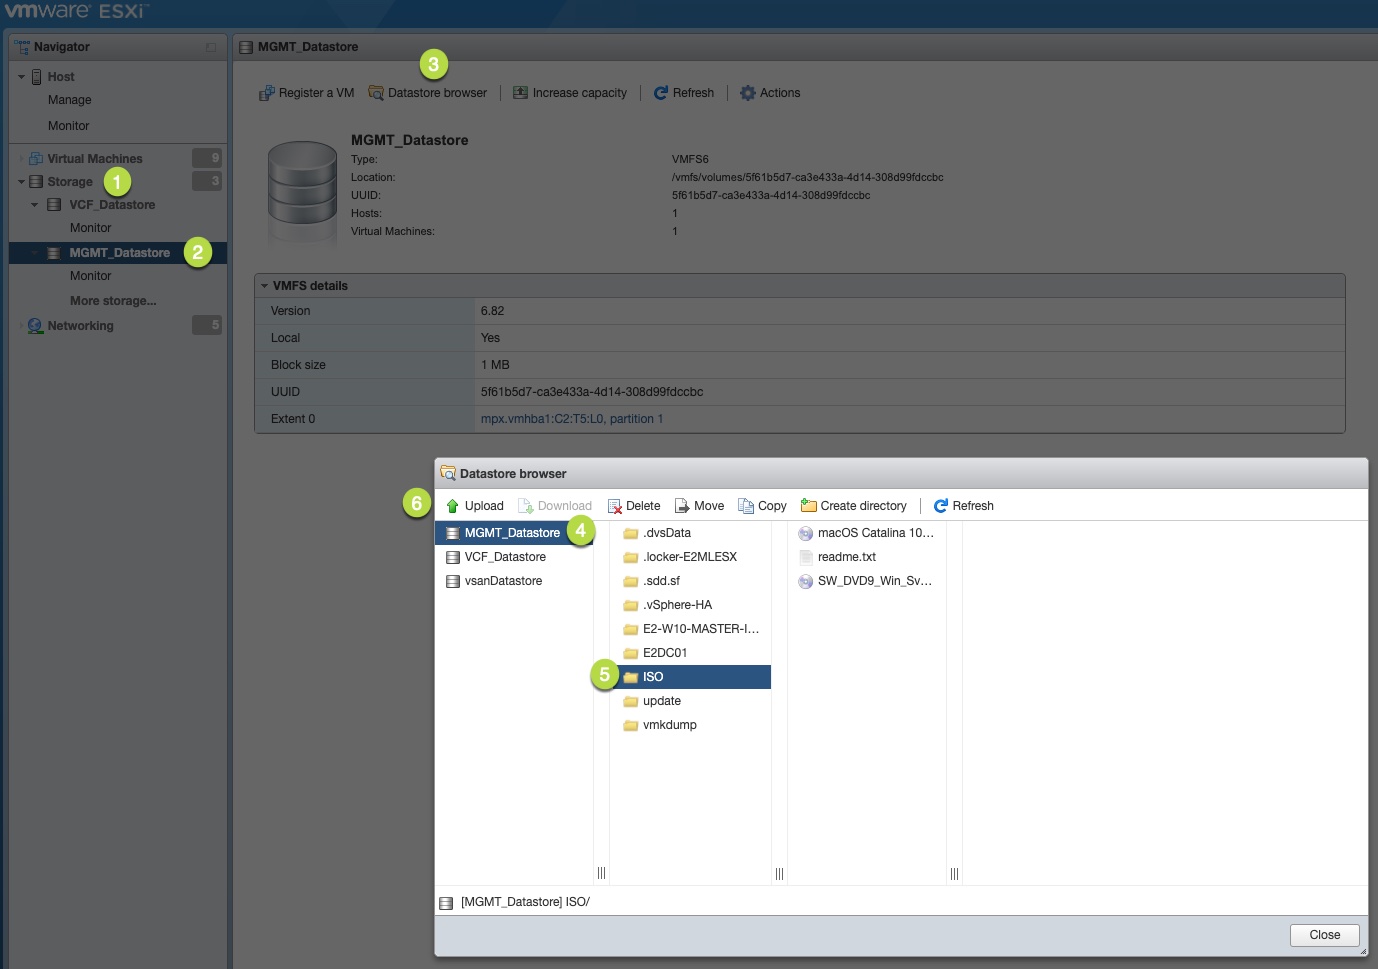
- Login to your ESXi host
- Navigate to Storage and select the Datastore you want to place the .iso in.
- Click on Datastore Browser
- Select the Datastore if not selected already
- Select the folder you’ll place the .iso in. I’ll use the ISO folder.
- Then click on Upload
Navigate to the directory of the BigSur.iso we created. Select the BigSur.iso and click on Open.
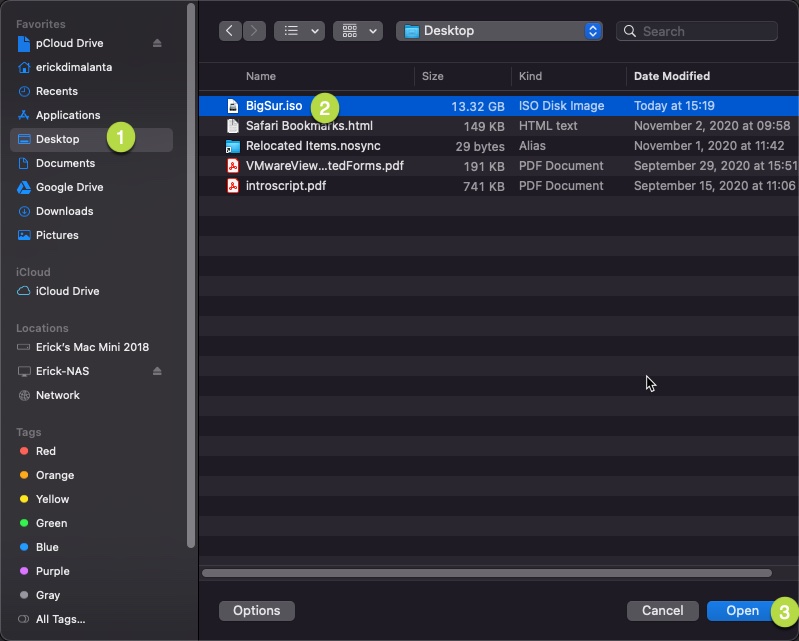
Review the Recent Tasks then monitor to completion.
macOS Unlocker Install
Now that the .iso is in the datastore, it’s time to prep the host to be able to run macOS in a VM. There is an unlocker written in python that modifies the vmware-vmx file to allow macOS to boot. Without this unlocker, it simply doesn’t work and just does a boot loop. It’ll show the Apple Logo loading screen and then ultimately displays an error.
Your computer restarted because of a problem. Press a key or wait
a few seconds to continue starting up.
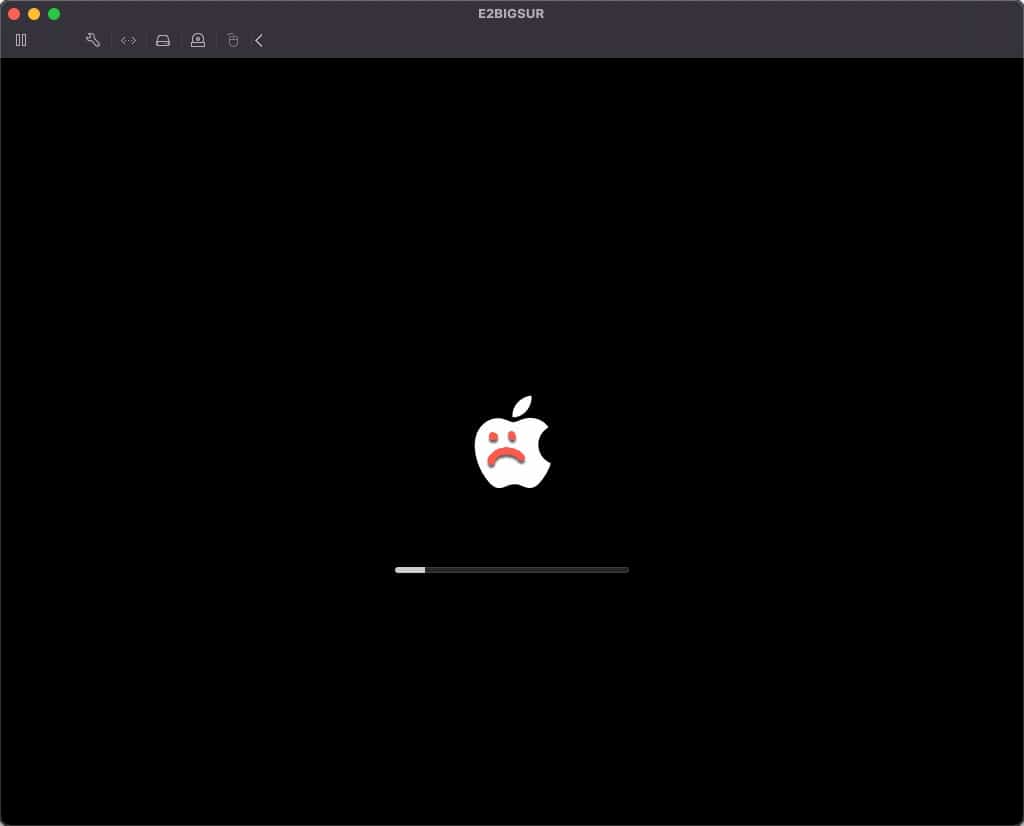
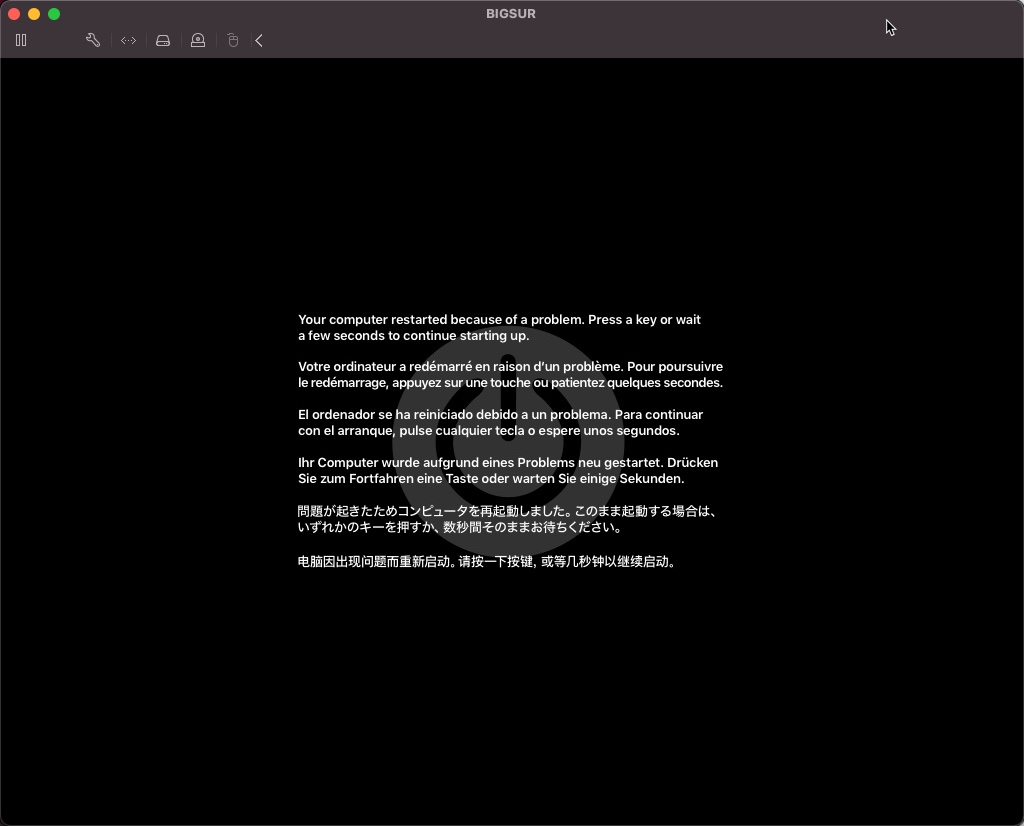
Disclaimer: This unlocker should not to be run in a production environment. This workaround is only to personally evaluate and have a macOS environment for purposes of testing.

Download the Unlocker
You’ll first need to download the unlocker zip file here if you didn’t do a git clone.
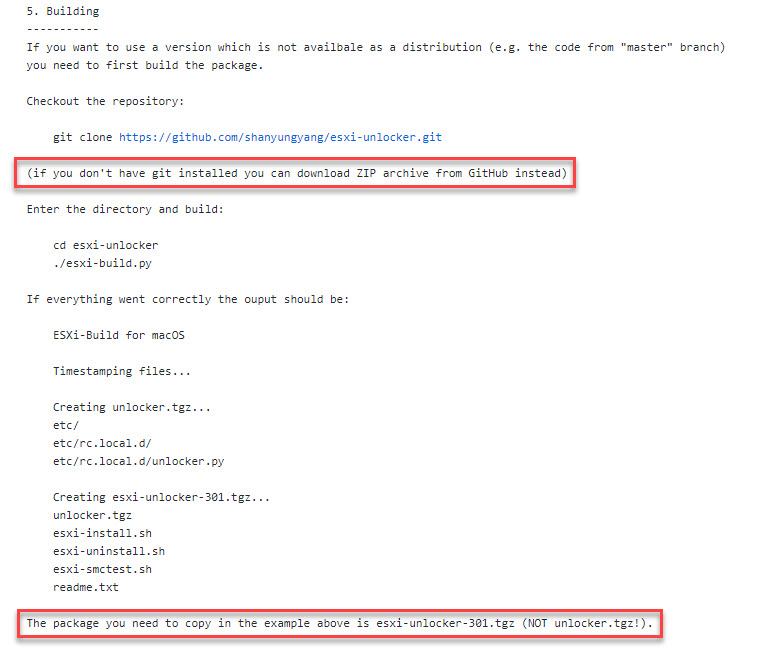
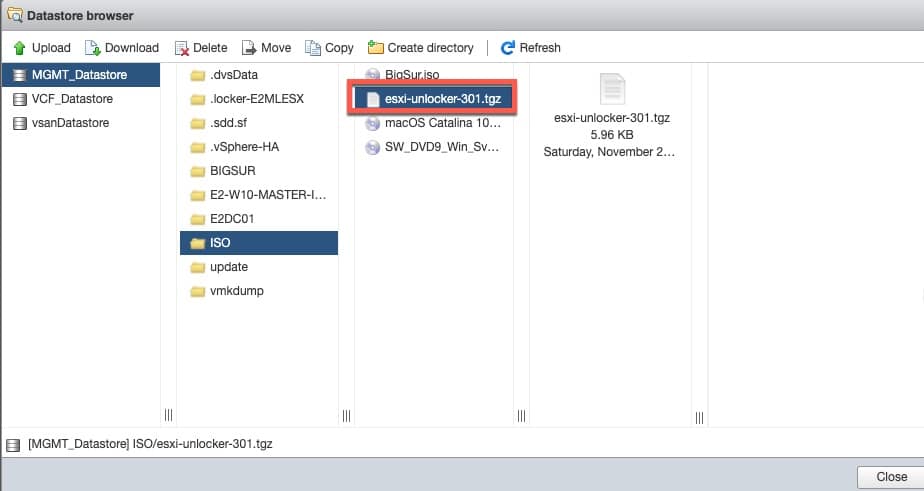
I ran the git clone to obtain the esxi-unlocker-301.tgz file.
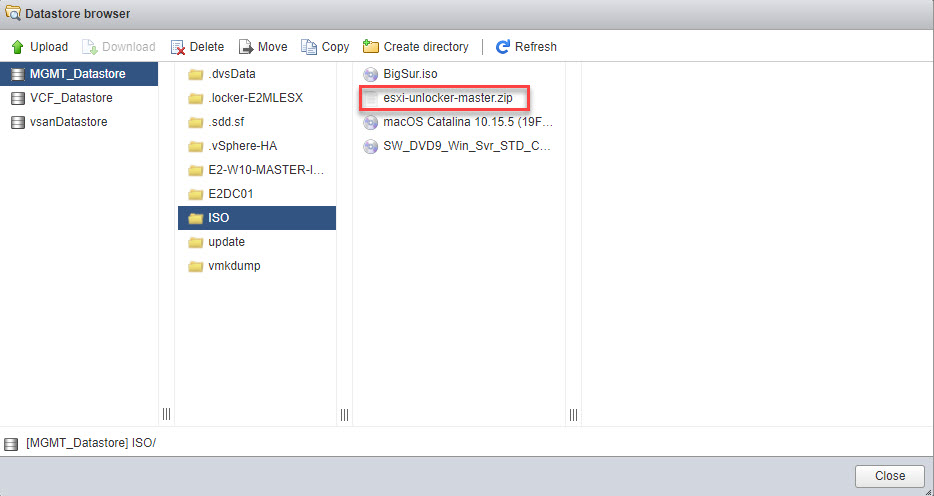
However, if you simply downloaded the unlocker zip file, your downloaded file should be named esxi-unlocker-master.zip
Upload to Datastore
Once you’ve obtained the esxi-unlocker-301.tgz or esxi-unlocker-master.zip. Upload this to the same location we uploaded the BigSur.iso in the steps above.
esxi-unlocker-301.tgz
esxi-unlocker-master.zip
SSH into ESXi Host to Install Unlocker
SSH into your host and navigate to the unlocker location. Once there, unzip the unlocker using the following command.
For esxi-unlocker-301.tgz
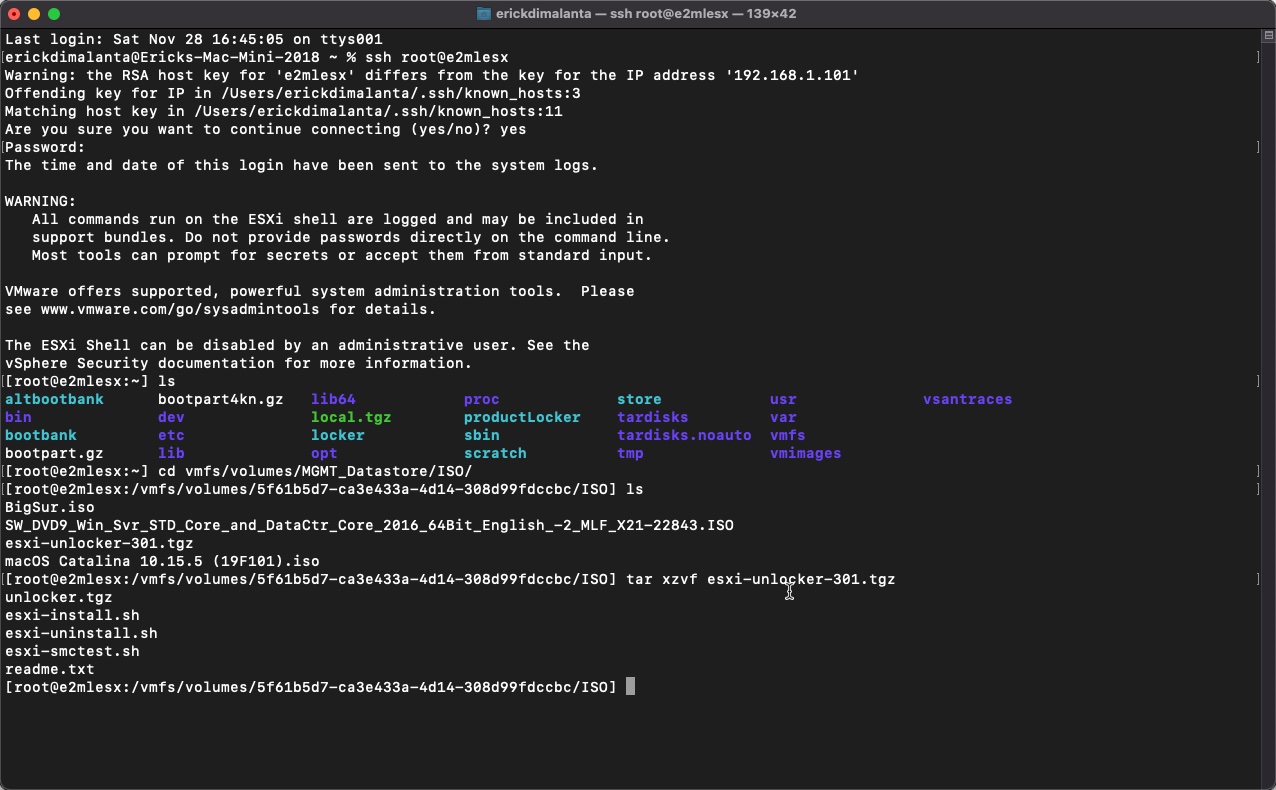
Uhh…the heck is a TAR or .tgz file?
For esxi-unlocker-master.zip (skip if you’ve done the above step)

Install Unlocker Patch
Now that we’ve extracted the archive, we can run the install patch. There is actually a validation checker to make sure the patch is successful when installed. Let’s do that first. Run the following command to validate.
We see the result obviously shows false since we’ve not yet installed the patch. Now let’s do that. Run the following command to install the patch.

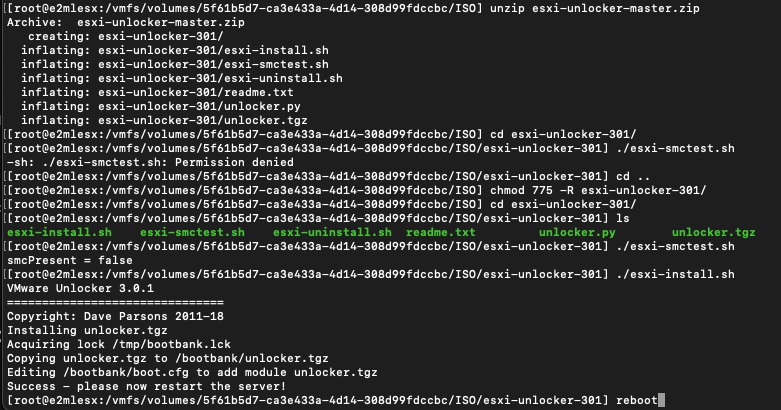
For the esxi-unlocker-master.zip version, you’ll need to navigate down to the extracted folder using the below command. From here you’ll be able to view all the above files to run the patch.

Before running the patch you may receive a “Permission denied” error. Simply navigate back one level using the command “cd ..” (without the quotes) and run the following command against the root folder to grant permissions to the folder and all the files recursively within.
After running the permissions command, we can navigate inside the folder again using “cd esxi-unlocker-301”
Once we’ve run the install “./esxi-install.sh“, we’ll need to now reboot the server for the configuration changes to take effect. In the same command window, you can simply type reboot then hit Enter.
Validate Successful Patch Install
Once the ESXi host is back up, ssh into the host and navigate to the same location where we unzipped the Unlocker file. We are going to want to run the validation command again to see the result.
Now we see the result is quite different. It now shows that smcPresent = true. We should now be able to install macOS without running into that boot loop.

macOS 11 Big Sur VM Install
Yey we’re almost there.

Now that the unlocker has been installed and verified, let’s now continue on to install Big Sur.
Create New Virtual Machine
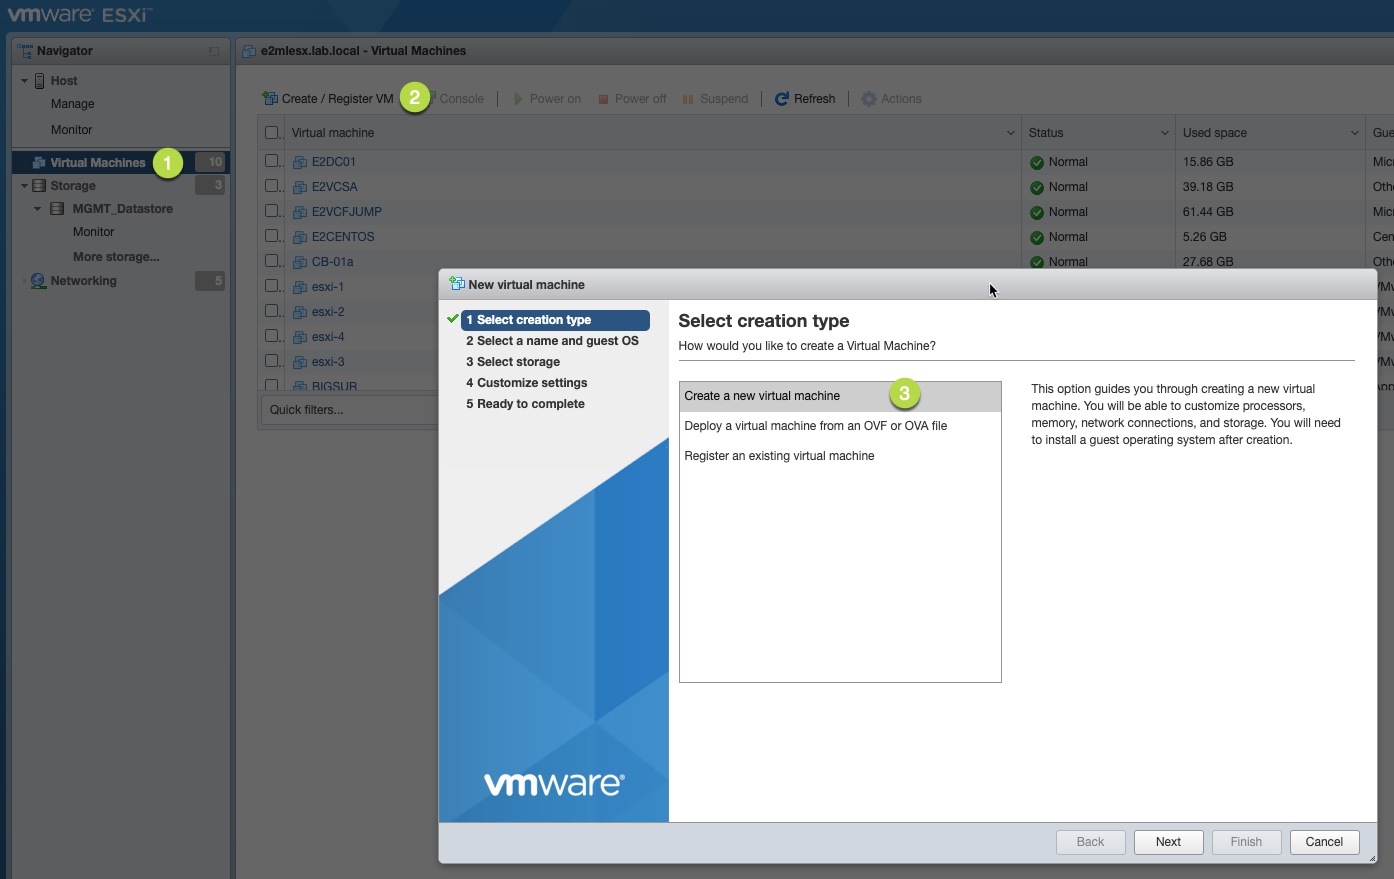
Let’s navigate to the Virtual Machine menu item on the left then click on Create / Register VM.
Then select Create a new virtual machine and click on Next
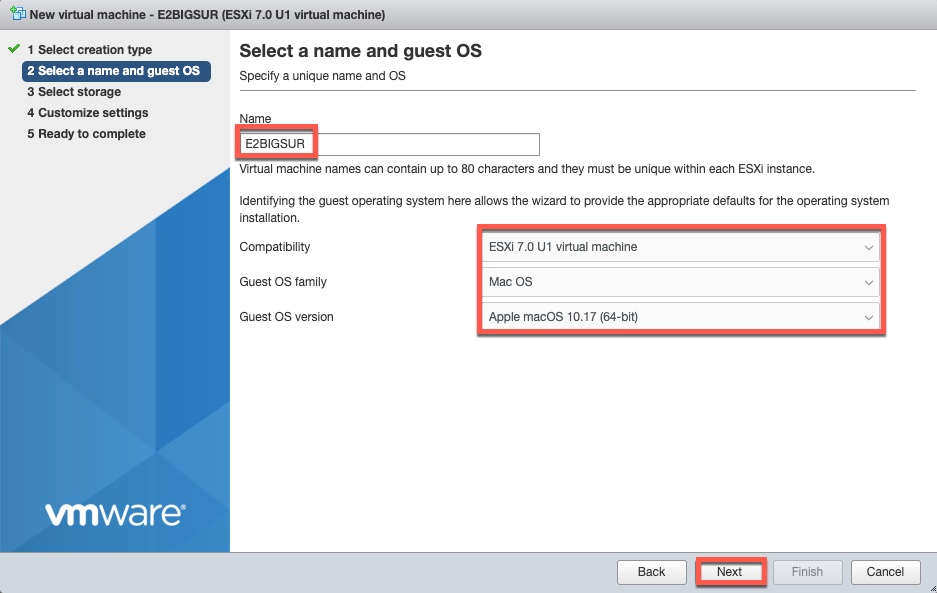
Next type out a name for your new VM. Select the following options from the drop down menu for the rest of the categories. When finished, click on Next.
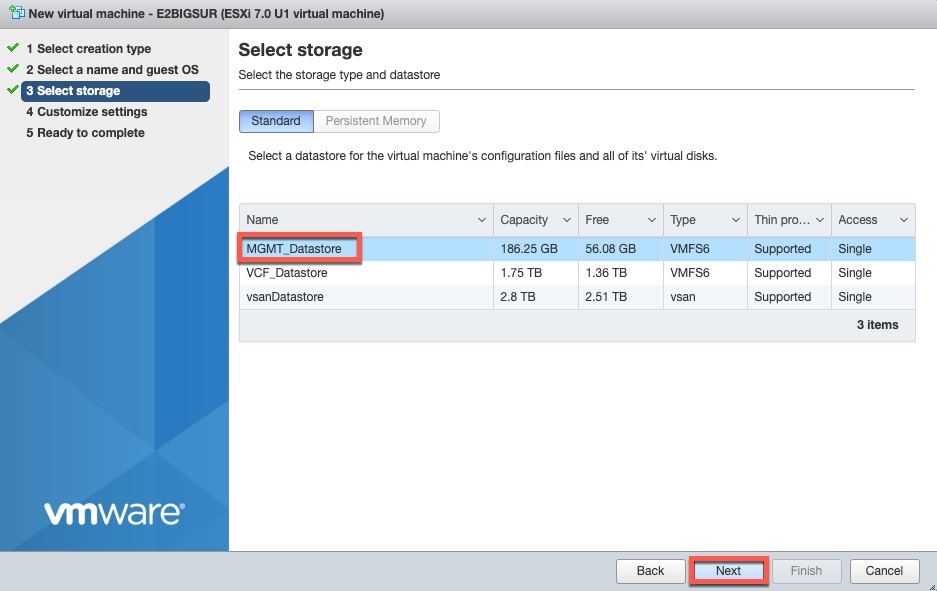
From here, you’ll want to select your storage on which datastore to place your machine.
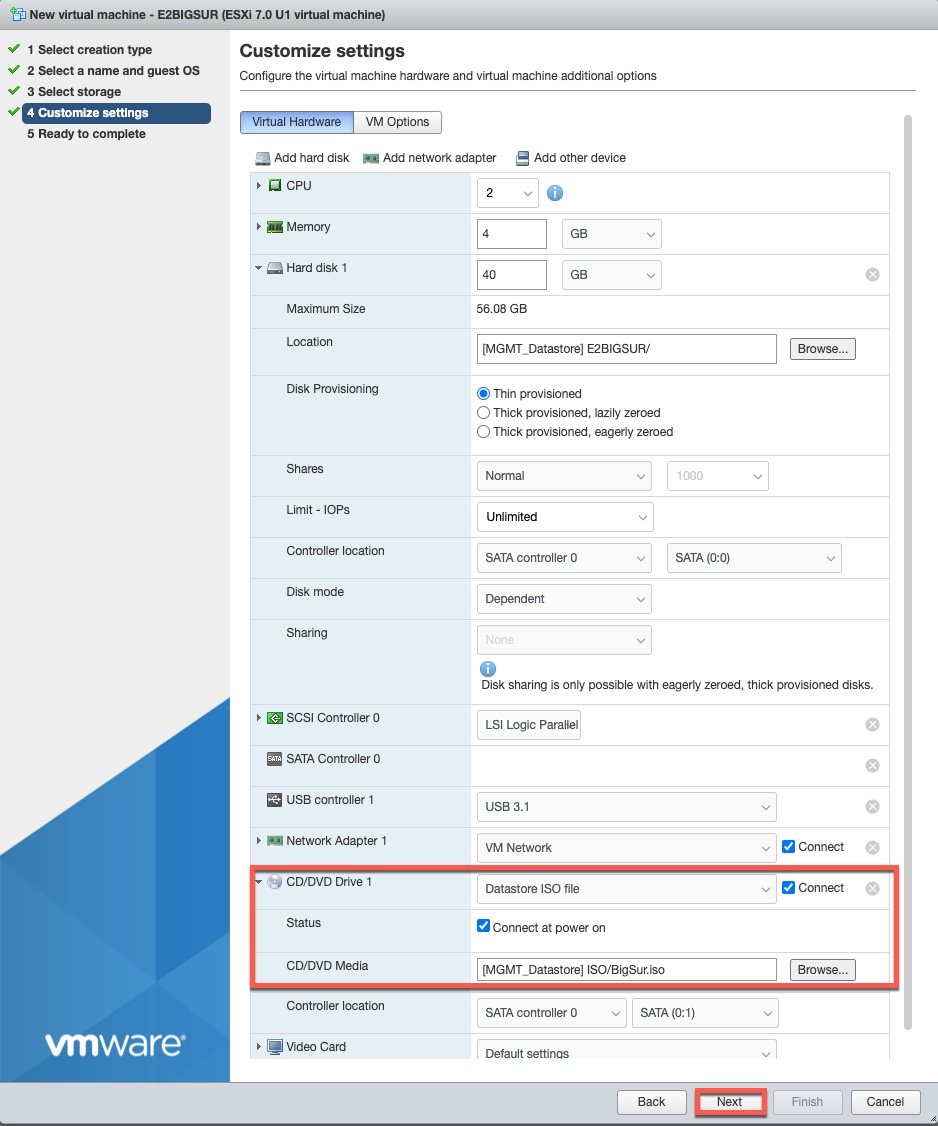
The next option is to configure the hardware specs of the VM.
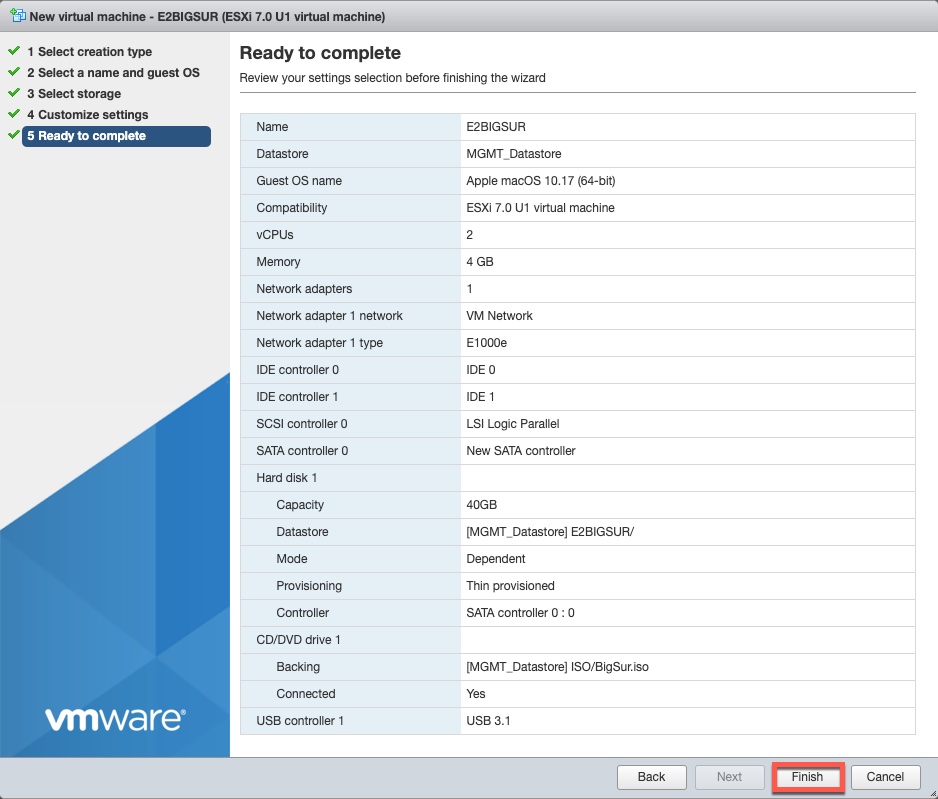
So set your CPU, Memory, Storage size, type of provisioning, Network, and most importantly configure your CD/DVD Drive to boot from the BigSur.iso we’ve created. Remember, this is located on the datastore we’ve uploaded it to in an earlier step. Once done, click on Next.
Then finally validate your settings, then click on Finish when complete.
Power On VM & Format Hard Disk
Finally, let’s power on our newly created VM to see if it bypasses the boot loop since applying the Unlocker patch.
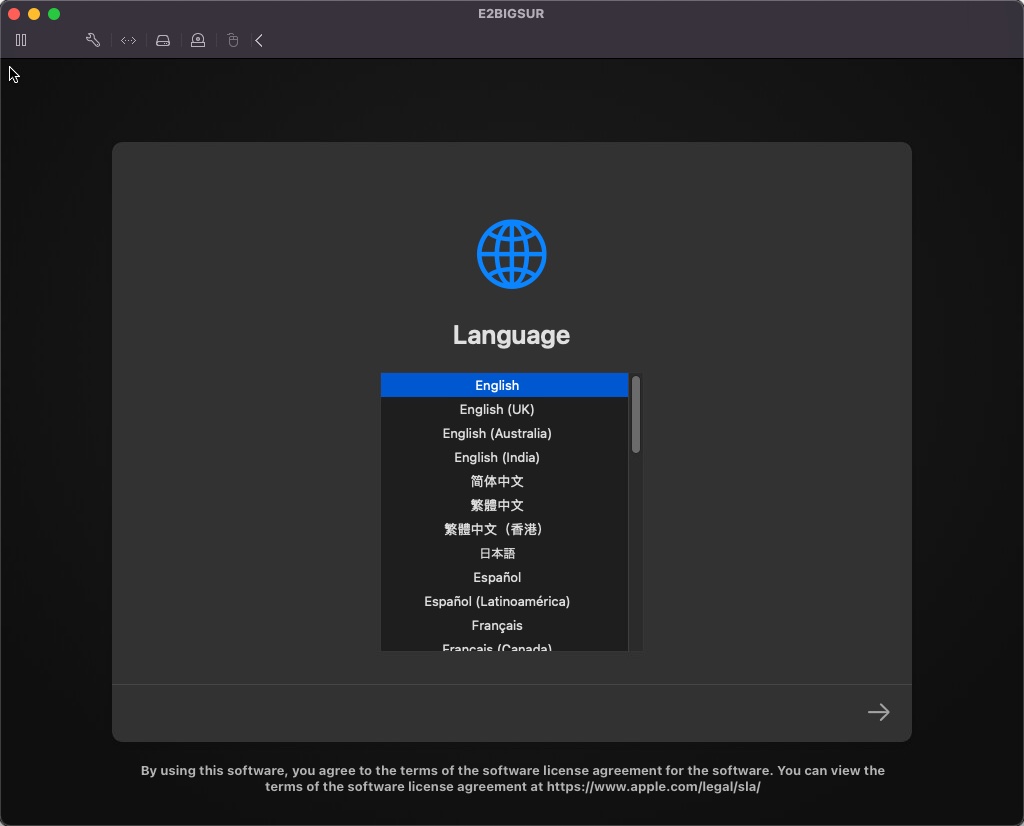
Woot! Success! No more boot loop. 😀

Ok so let’s continue on with the install. Choose your language of choice and click on the bottom right arrow.
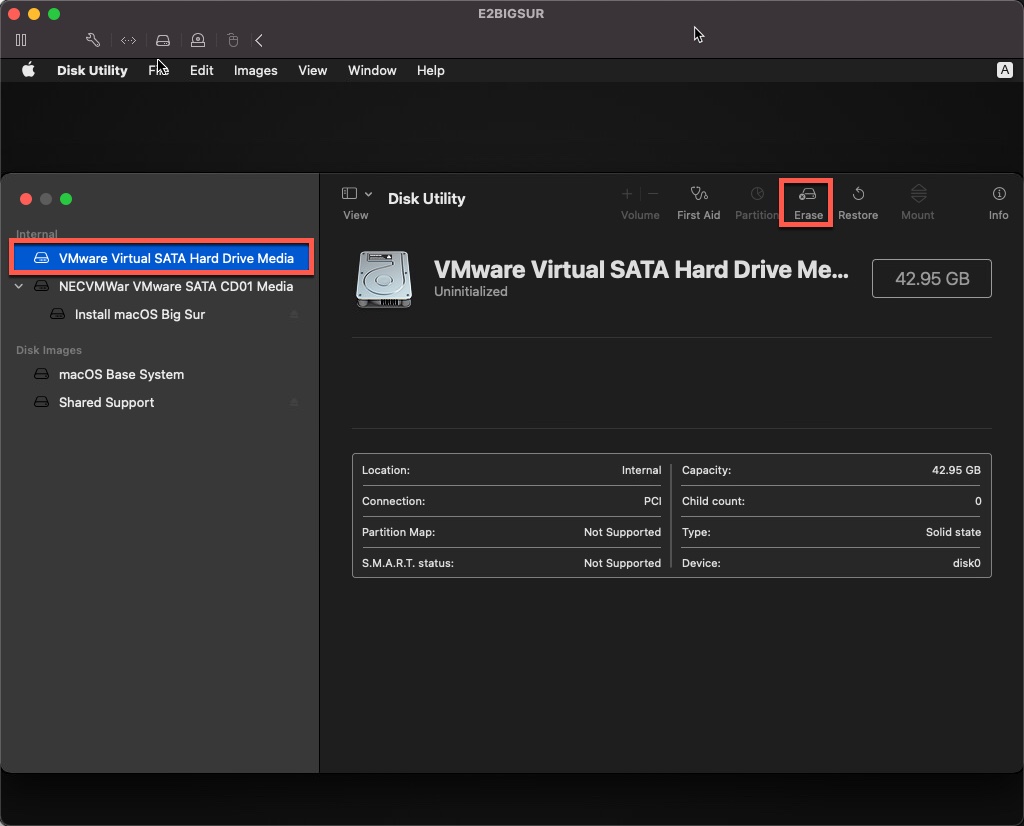
We’ll need to format the newly provisioned disk so that macOS can recognize the disk to install itself to.
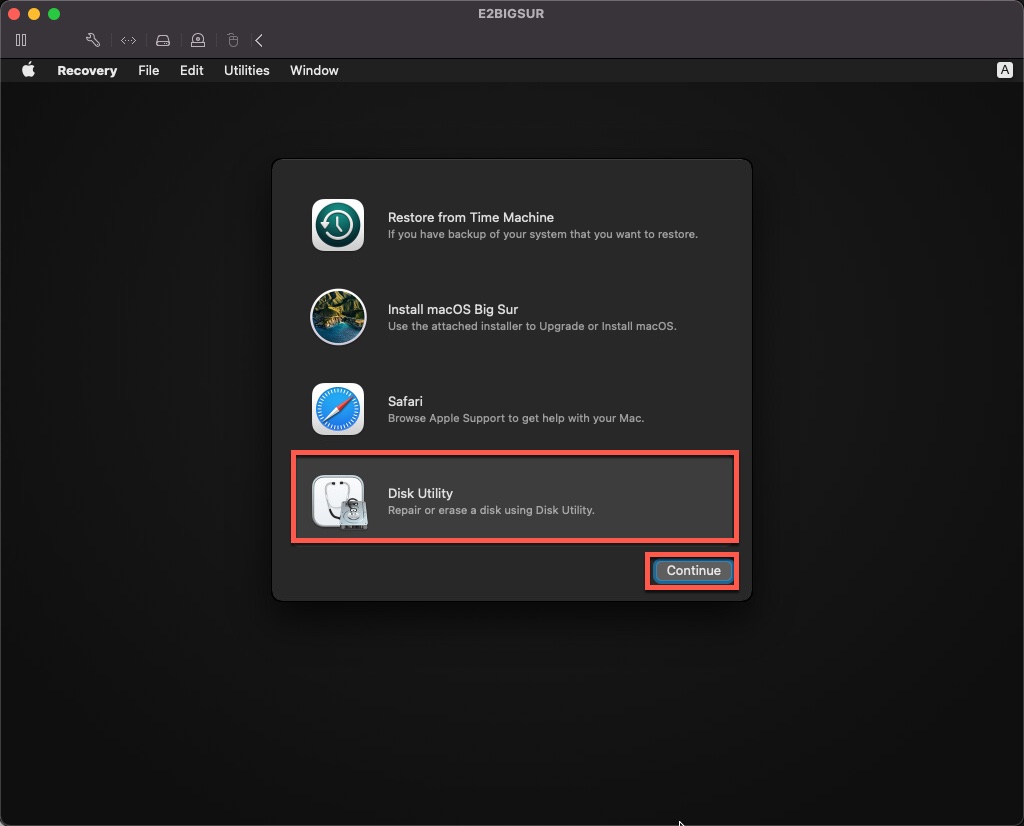
Select the Disk Utility and click on Continue
Highlight the VMware Virtual SATA Hard Drive Media and click on the Erase button.
Enter the Name for your Disk and keep the defaults for Format – APFS & Scheme – GUID Partition Map
Once done, click on Erase
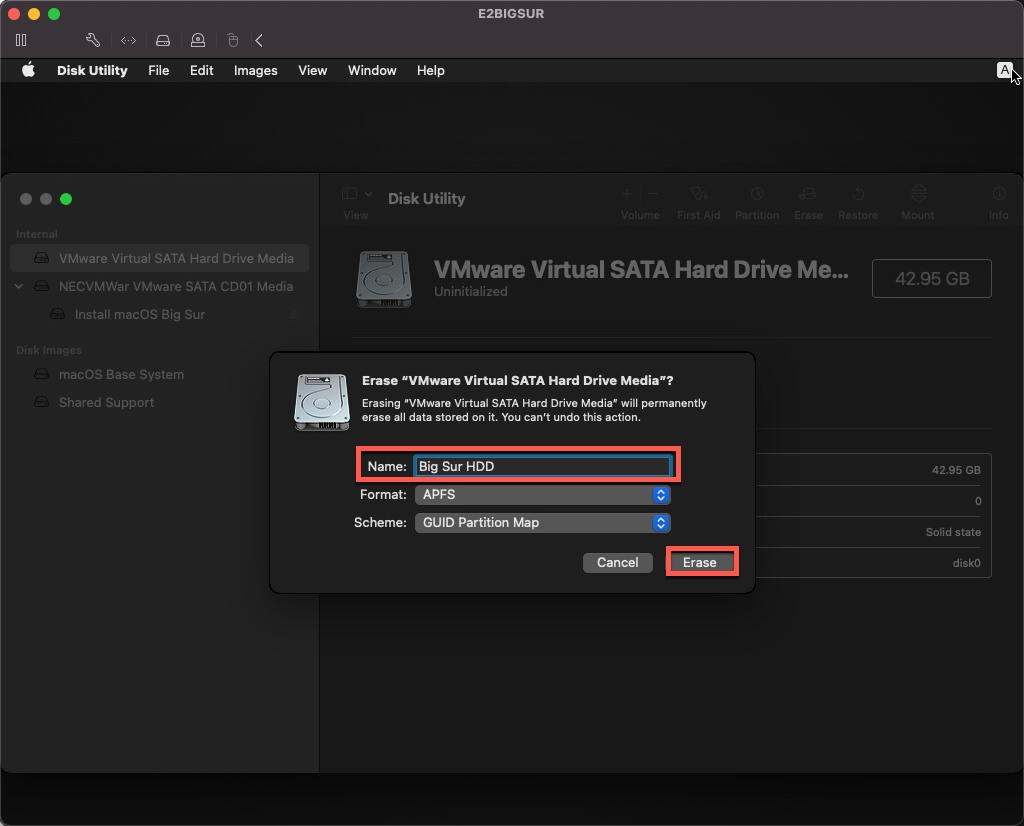
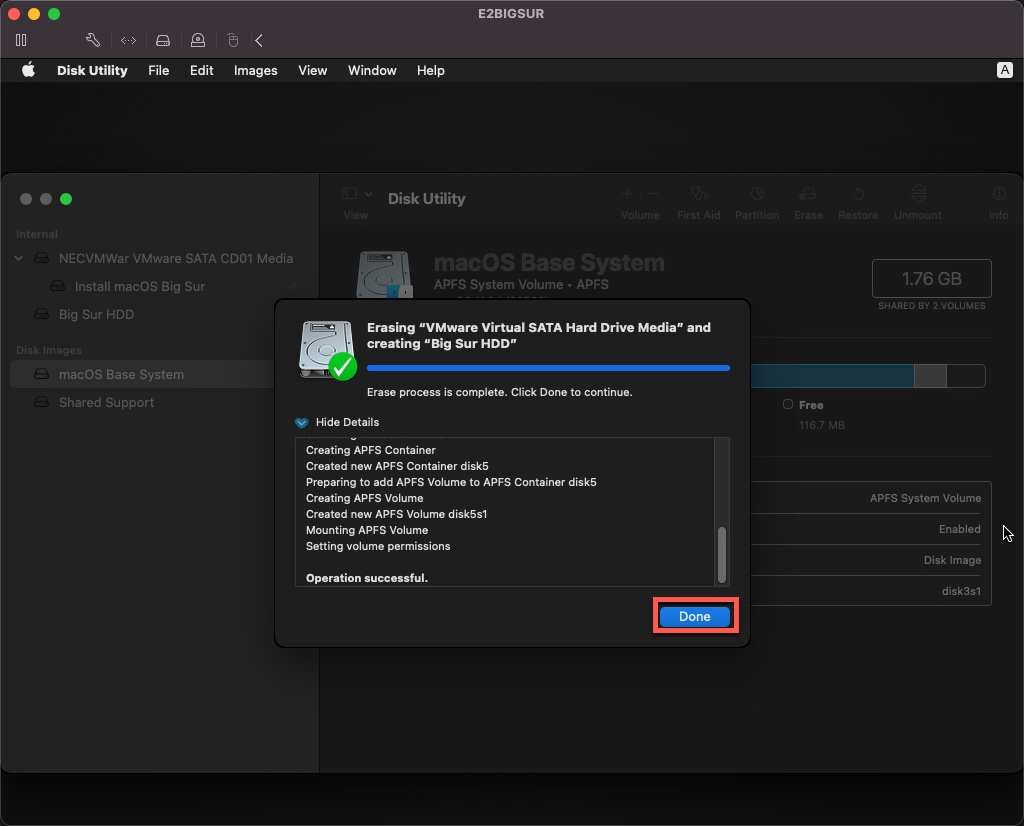
The formatting process will begin. Once complete click Done.
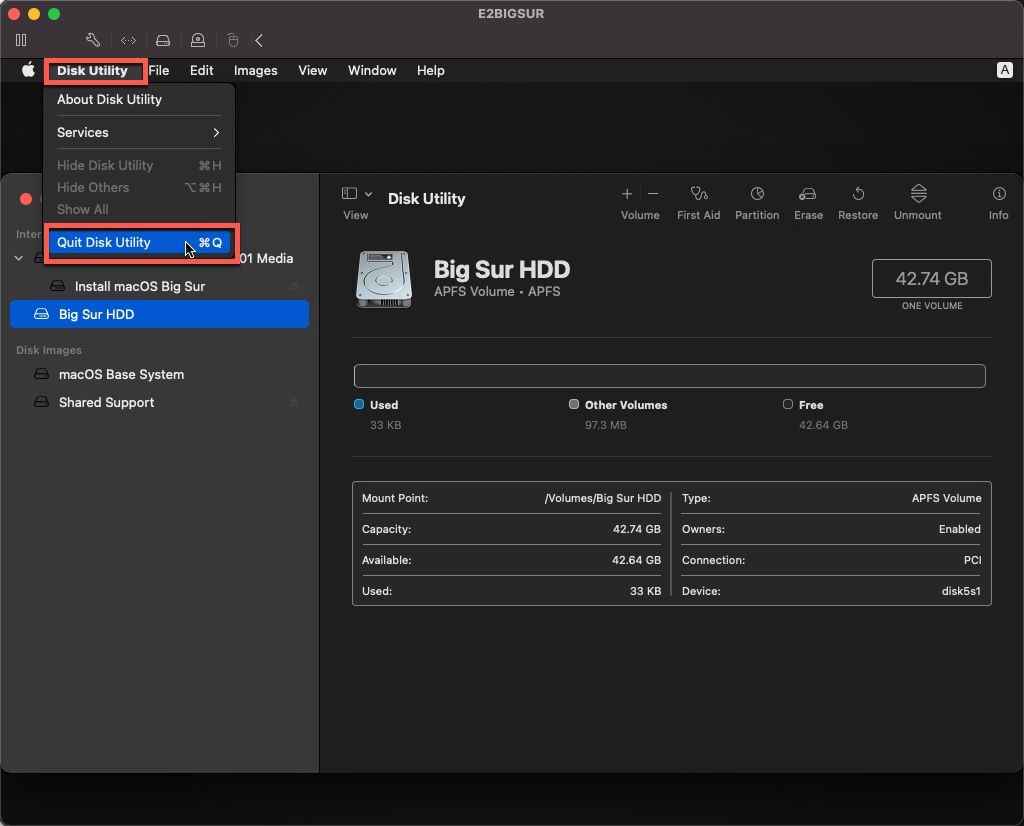
Now quit Disk Utility by navigating to the top menu and selecting Disk Utility > Quit Disk Utility
Install macOS 11 Big Sur
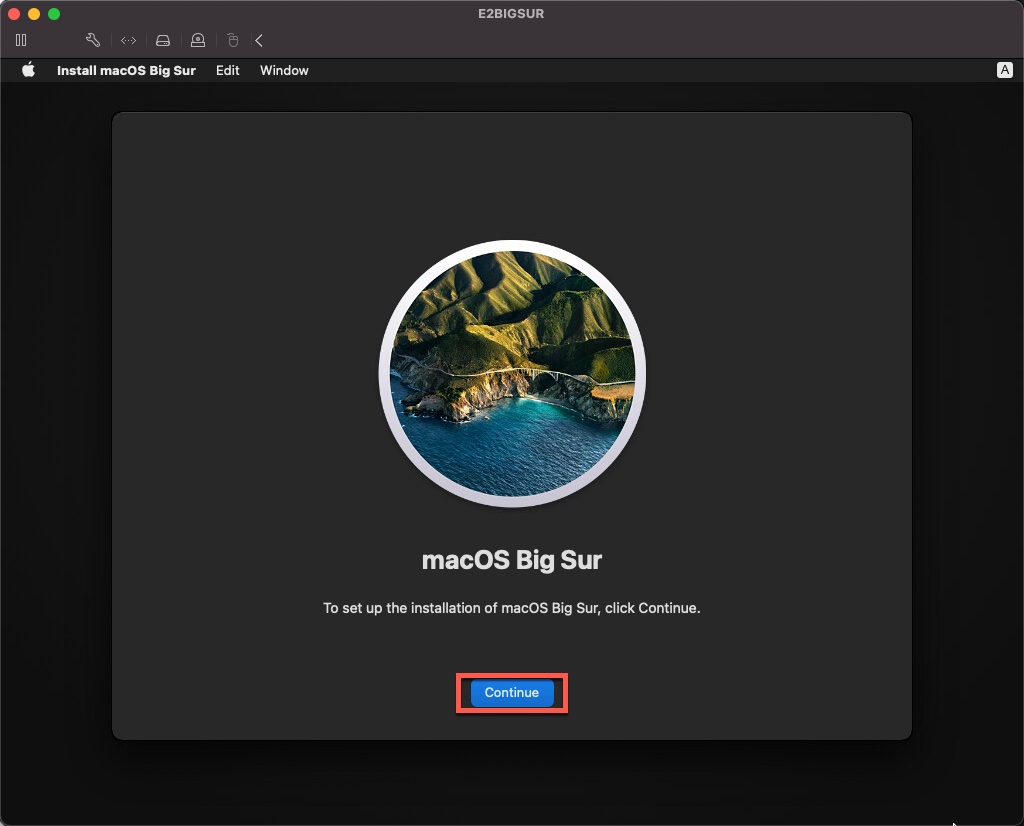
From here click on Install macOS Big Sur then click on Continue.
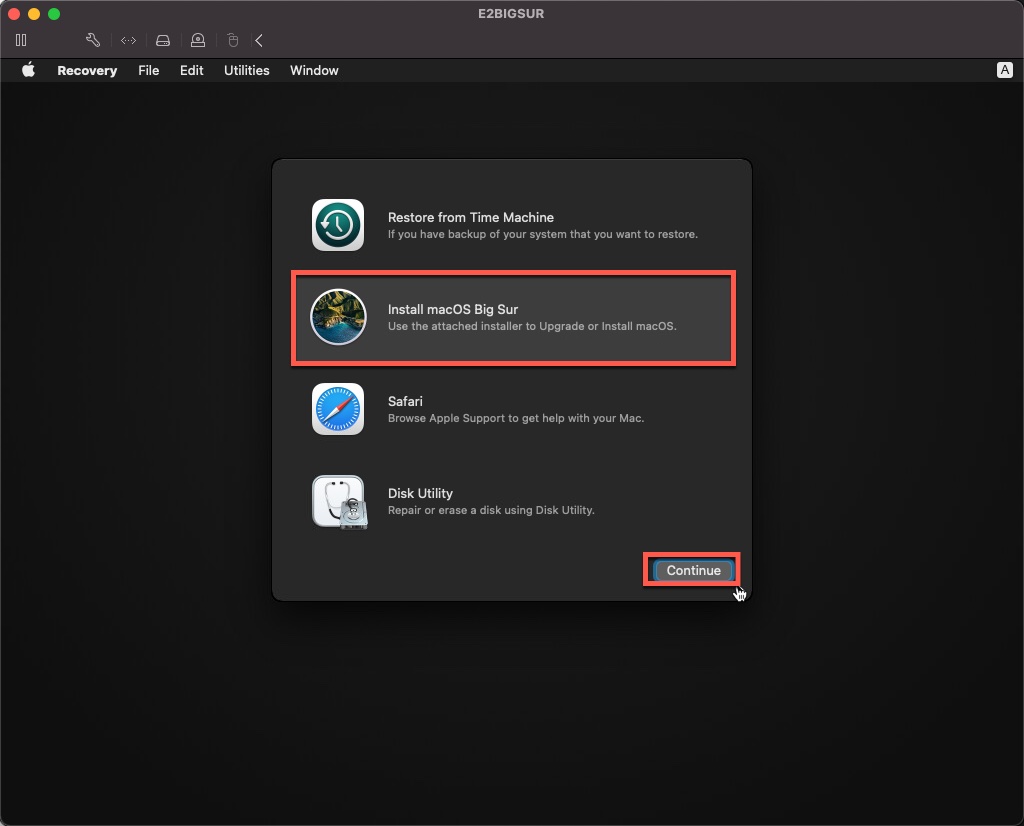
Click Continue here
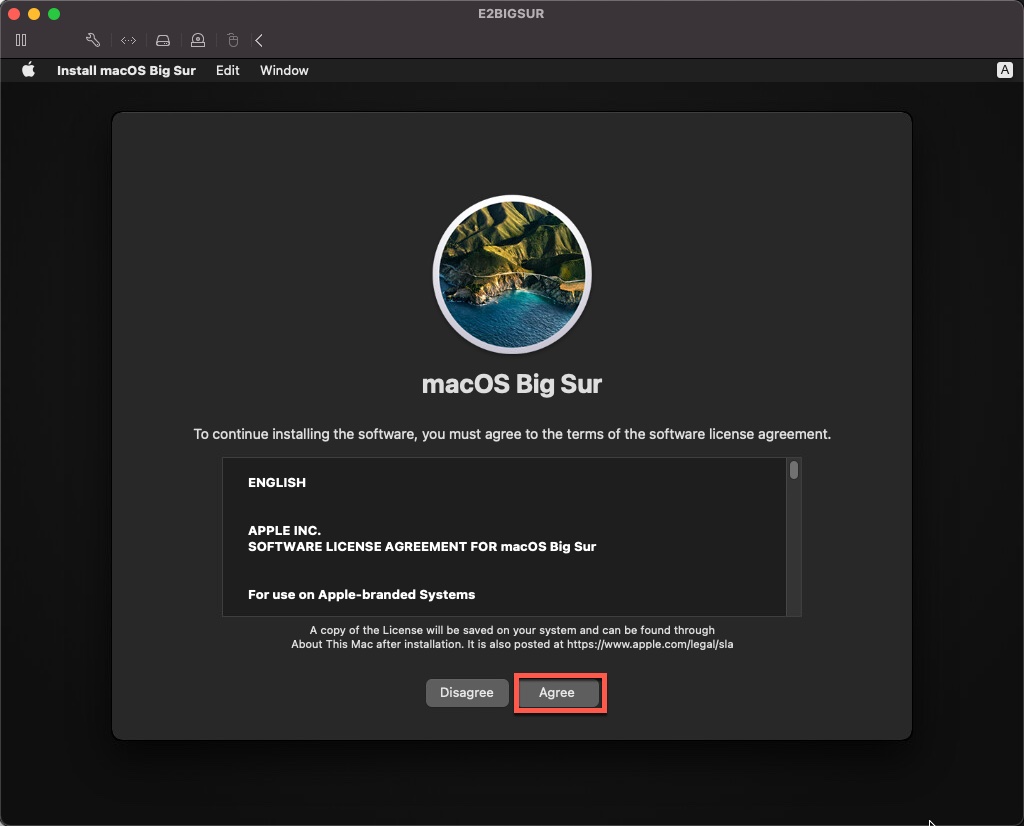
Click on Agree twice to Accept the Software License Agreement.
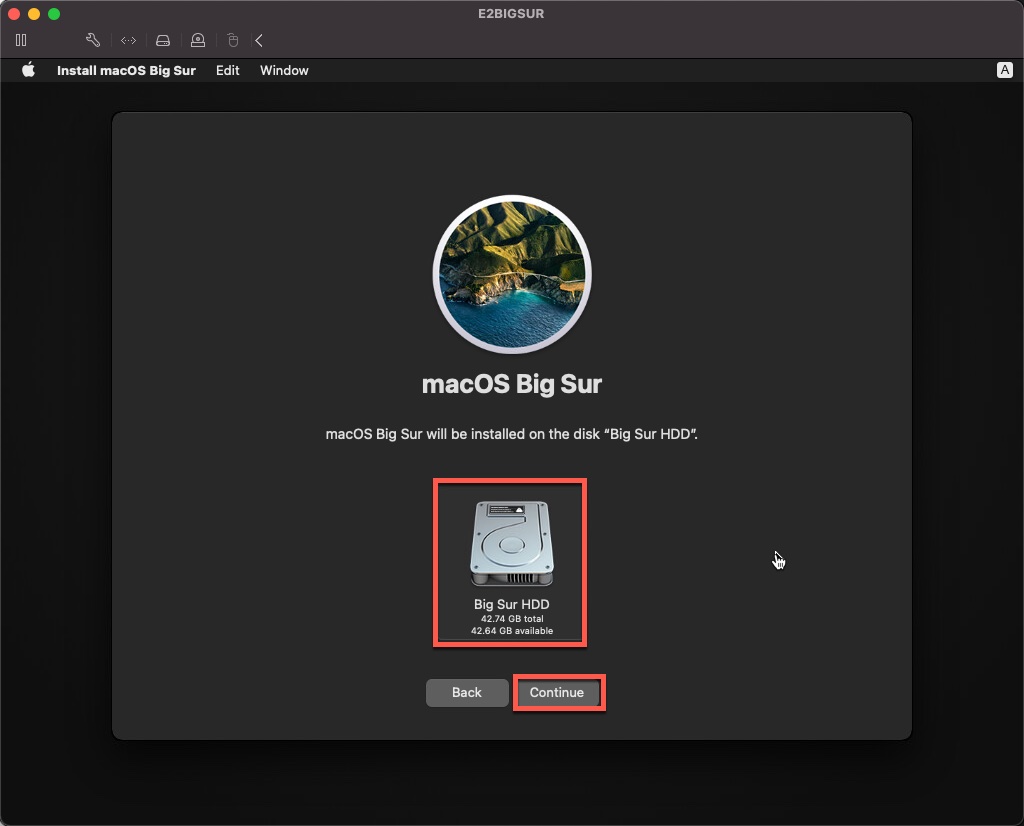
Select the newly formatted HDD then click on Continue.
Big Sur will now start to install…
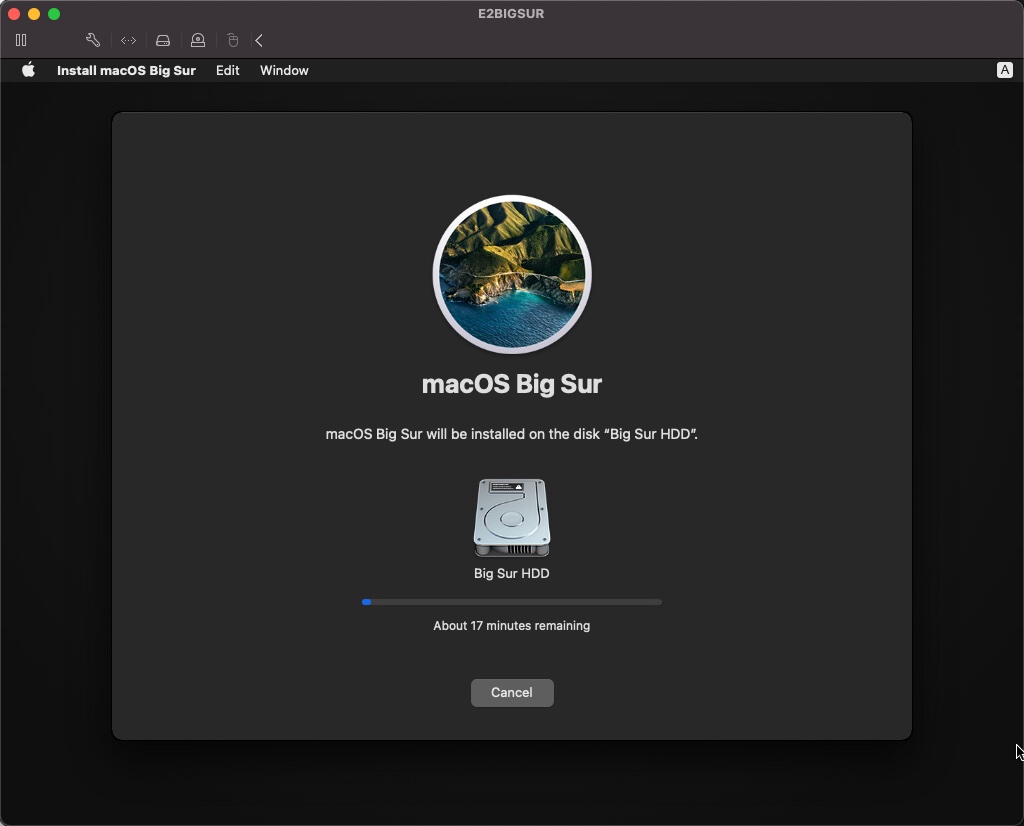
Don’t be fooled by the initial time it tells you the install will be done by. In reality it took over an hour or so.
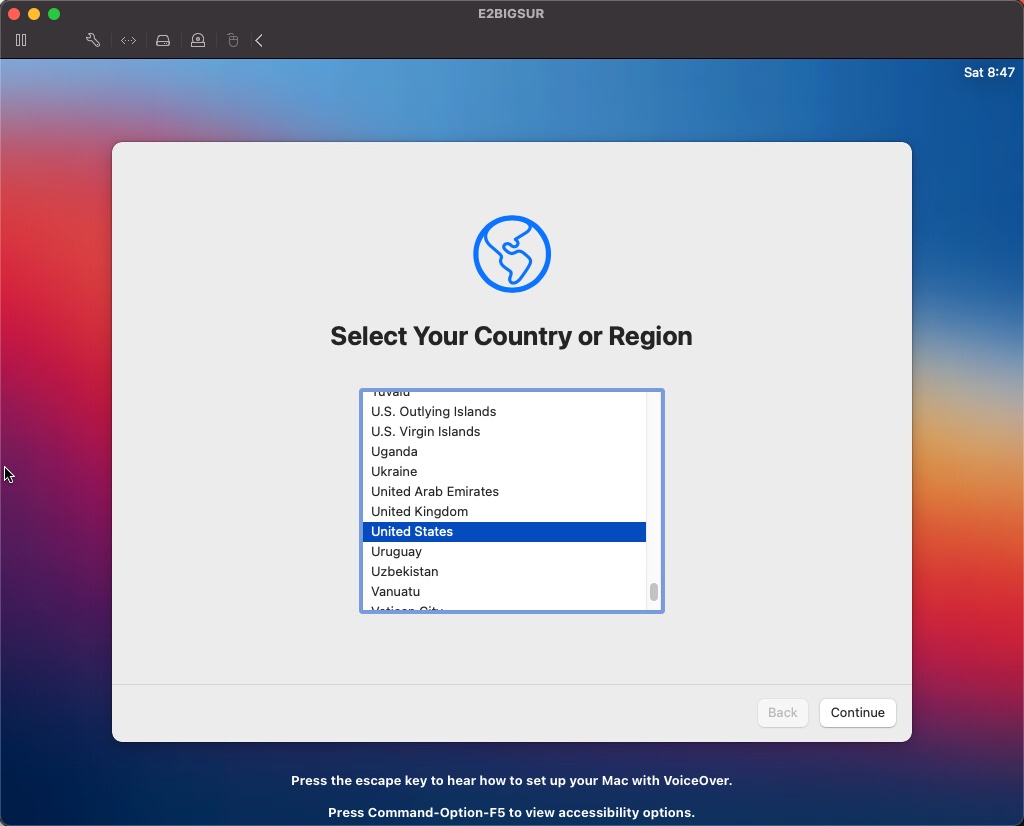
Anyway, install complete. I won’t go through the rest of the self-explanatory setup.
You now have your macOS 11 environment to play around in. Enjoy!