Apple Business Manager
Intro
I always recommend the use of Apple Business Manager. Why you could say, well Apple Business Manager is a free service provided by Apple that allows organizations to manage three things: devices, apps, and accounts. Simply put, if your organization owns Apple devices, you should be using Apple Business Manager (or its education-sector equivalent, Apple School Manager). There’s literally no downside to it. Apple Business manager offers many benefits—some well-known, others less so—and it doesn’t cost a thing.
First to define what we’re talking about: Apple Business Manager is an all-in-one portal designed to help organizations deploy Apple devices, manage organization-owned Apple IDs, and acquire apps and other content in volume. It coordinates closely with mobile device management solutions to automatically enroll and manage devices. Apple Business Manager is not an MDM solution itself, this just to be clear.
To use Apple Business Manager, your organization must first have an account. Applying is simple, and although it can take a couple of days for your application to be approved, it typically happens much faster. It just requires some basic information, including your DUNS number and contact information for someone at your company—not an IT admin, more likely someone higher up—who can vouch for you. Apple will then verify everything and, if it all checks out, confirm your account. (More information on all this can be found in Apple’s Getting Started guide.)
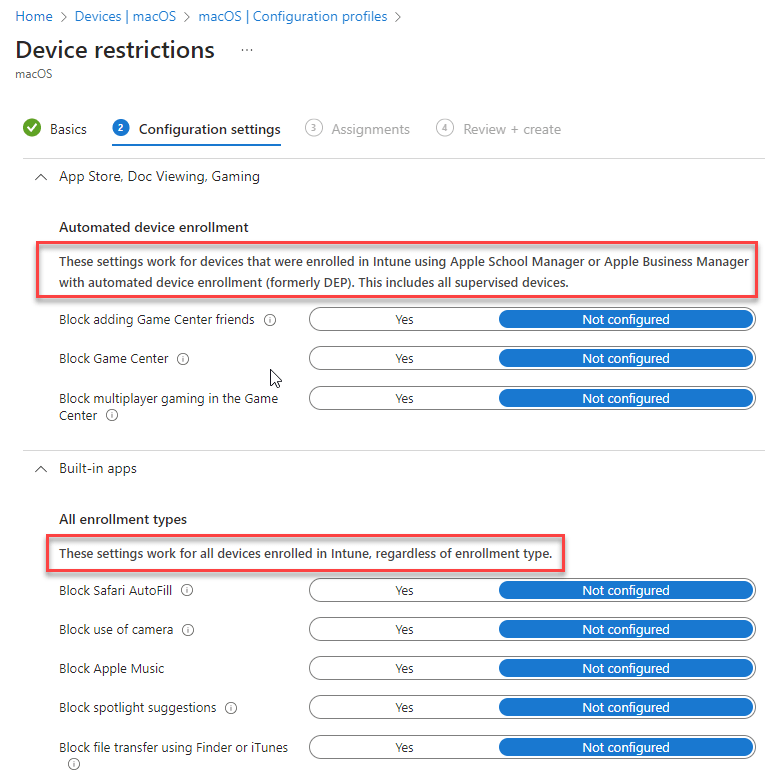
Why use Apple Business Manager, well some configuration can only be applied for supervised devices, only devices from Apple Business Manager are supervised devices, check table below

In the different Intune configuration profiles you will also notice that some settings only apply on supervised devices
This can be a lenghty process because you need to request the number and also Apple needs to do some verification. If you are planning to use Apple Business Manager and you have a deadline for your project please start early for the admin stuff that you cannot control.
Applying for Apple Business Manager
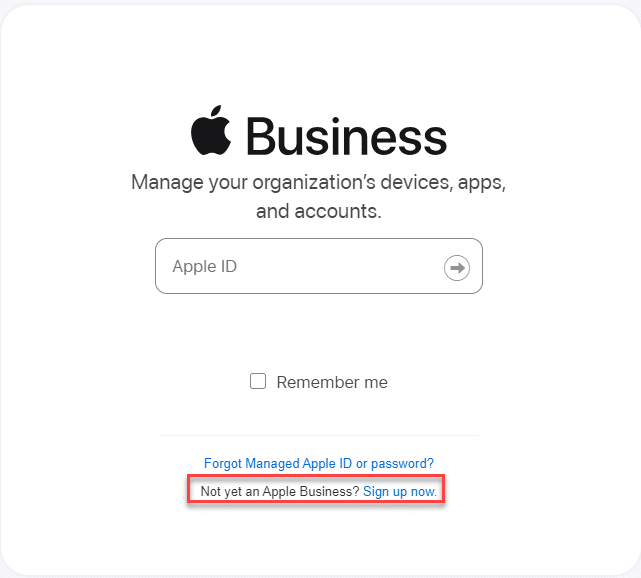
Go to https://business.apple.com/ and let’s assume you do not have an account here yet, click sign up now
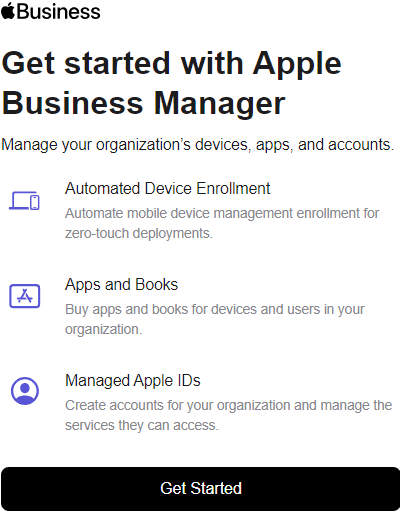
Click Get Started
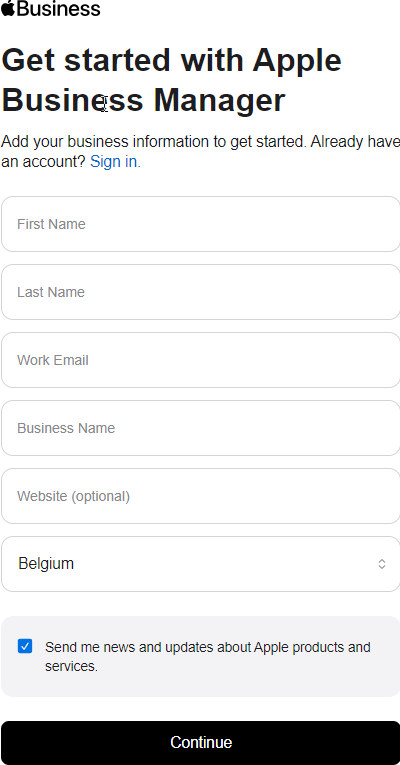
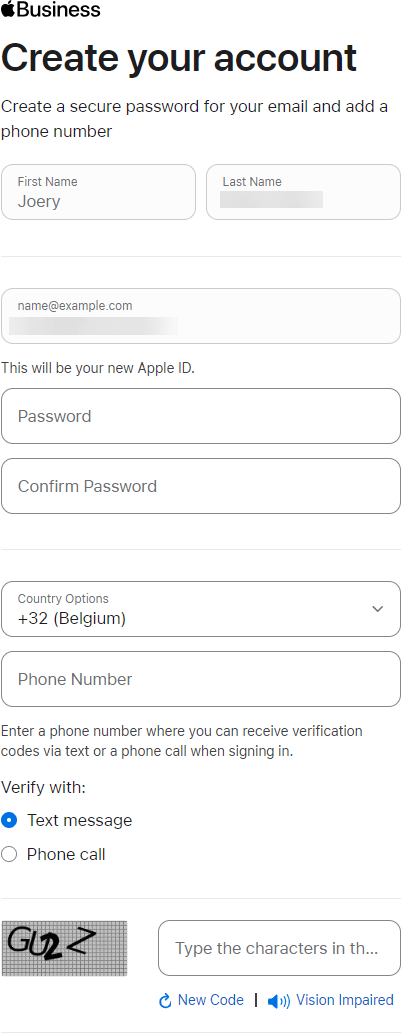
Fill in the necessary details and click continue
Create a password and enter a phone number for verification and click continue
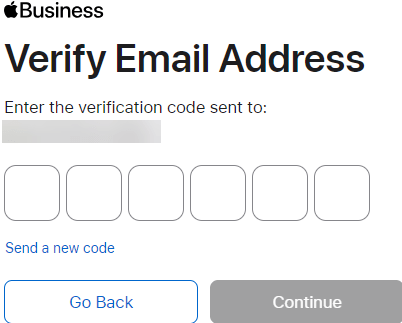
A verification code will be sent to your email address. Enter it and click continue
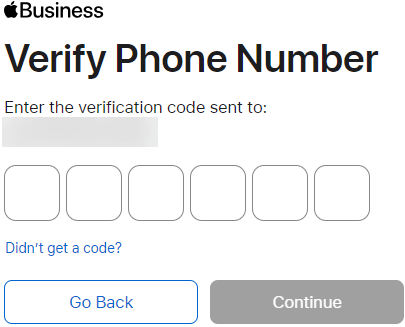
Now a code will be sent to your mobile device, enter it and click continue
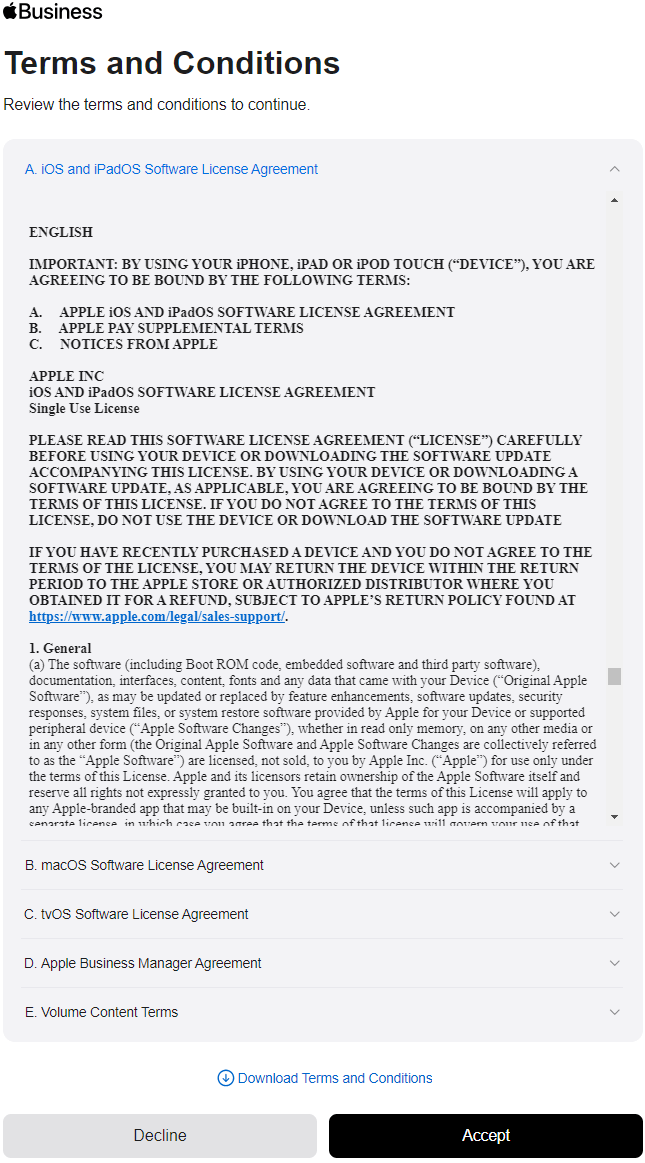
Accept the Terms and Conditions (You can always download them and read all the info, somebody has spent an aweful amount of time writing these down, so you would do him/her a big favor 😉 )
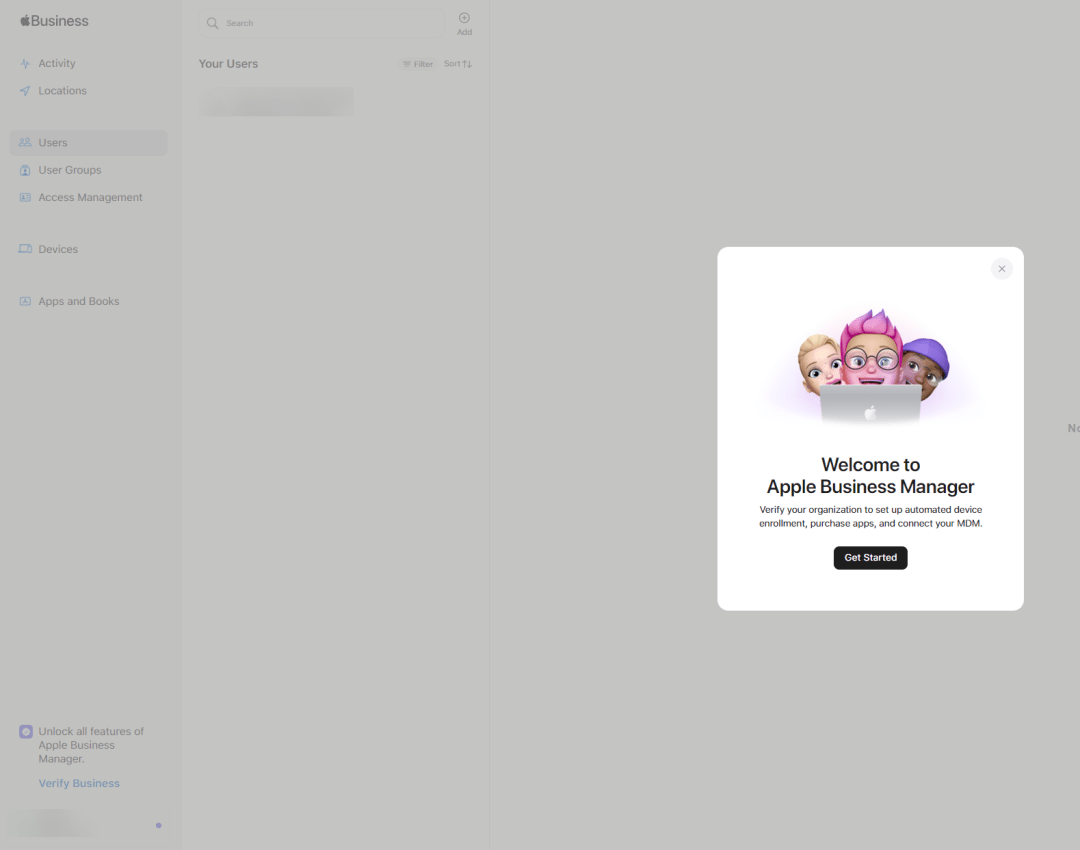
You will be presented with this screen, click Get Started
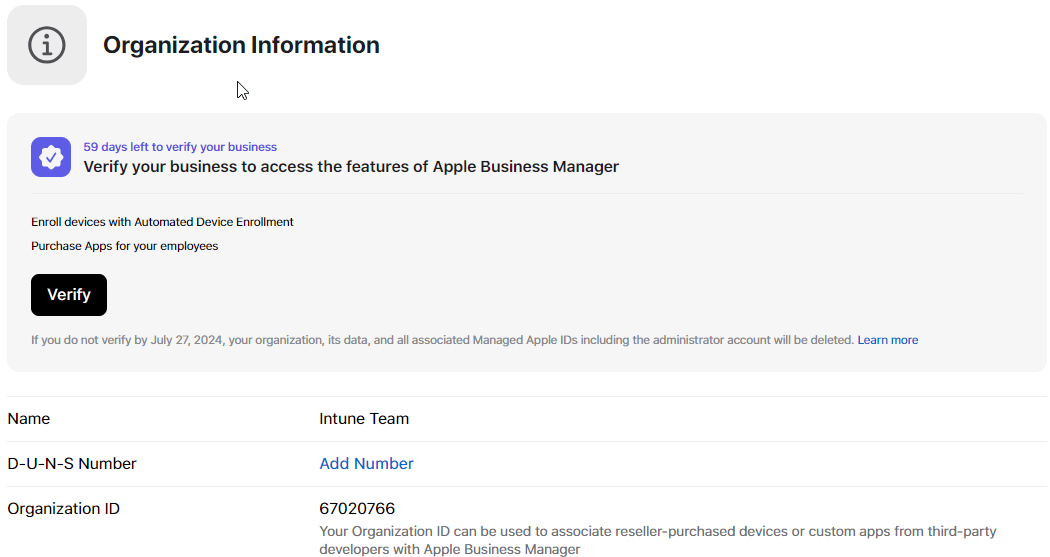
Now you have 59 days left to verify your business and you will now have to request your D-U-N-S Number, first do a look up here. If your organization was not found you can submit your information to request the number. I got my number in 48hrs
After you submit you request you will see this:

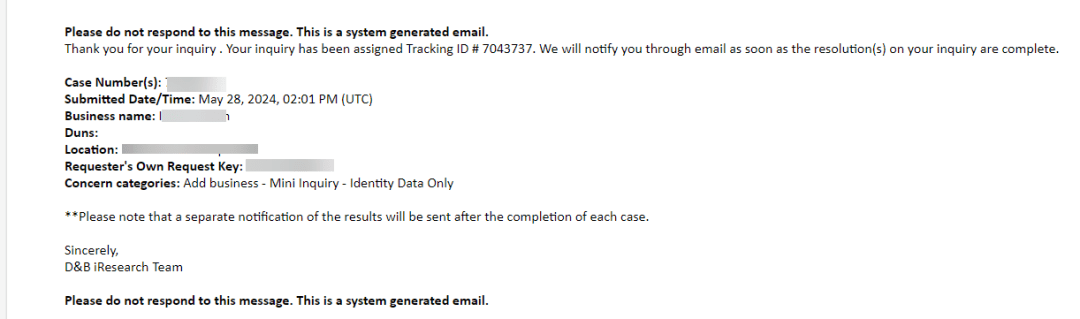
From now on you have to wait for your number to be received. After a few minutes you will receive an email like this
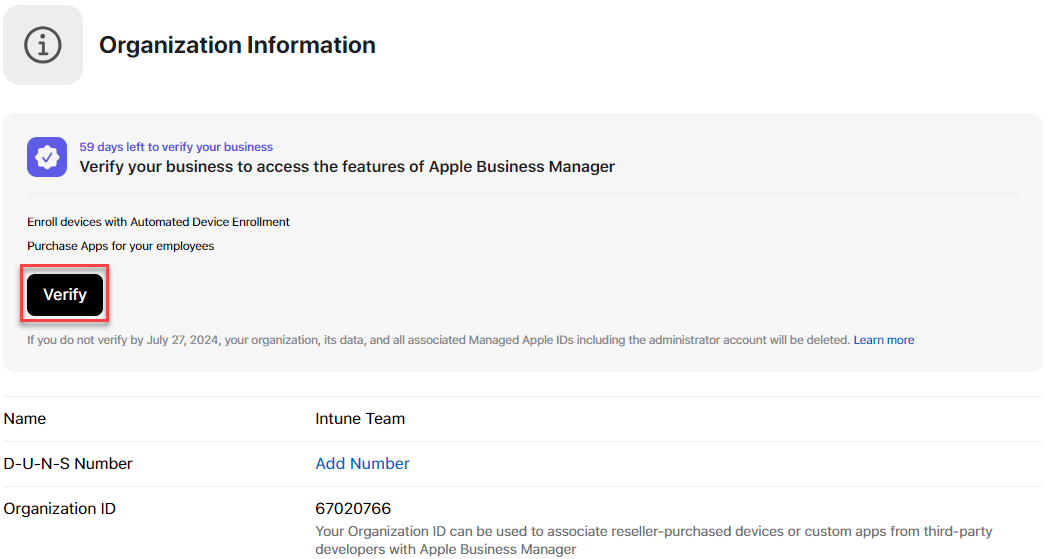
When you receive your D-U-N-S number click verify
Enter your details and click submit
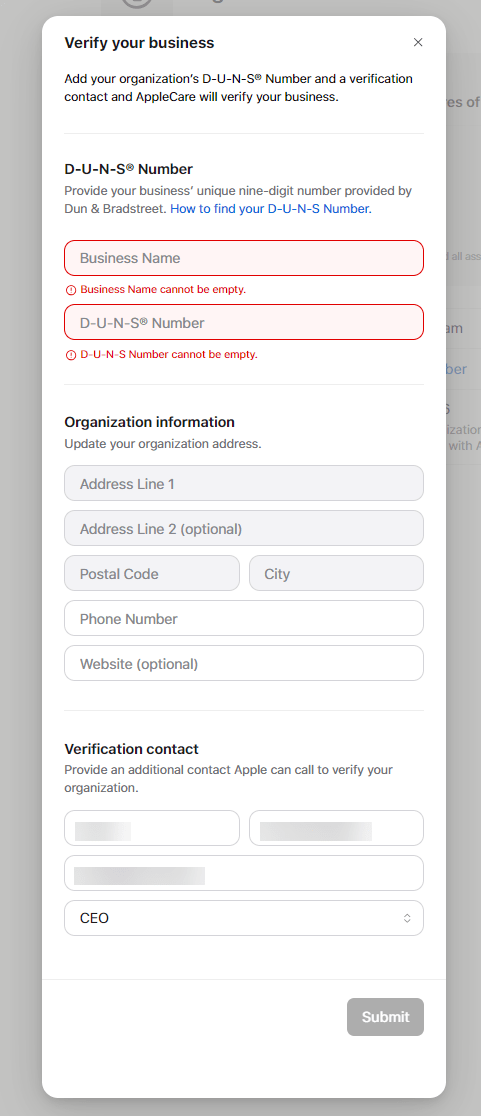
Now your verification is pending
You will also receive an e-mail regarding this
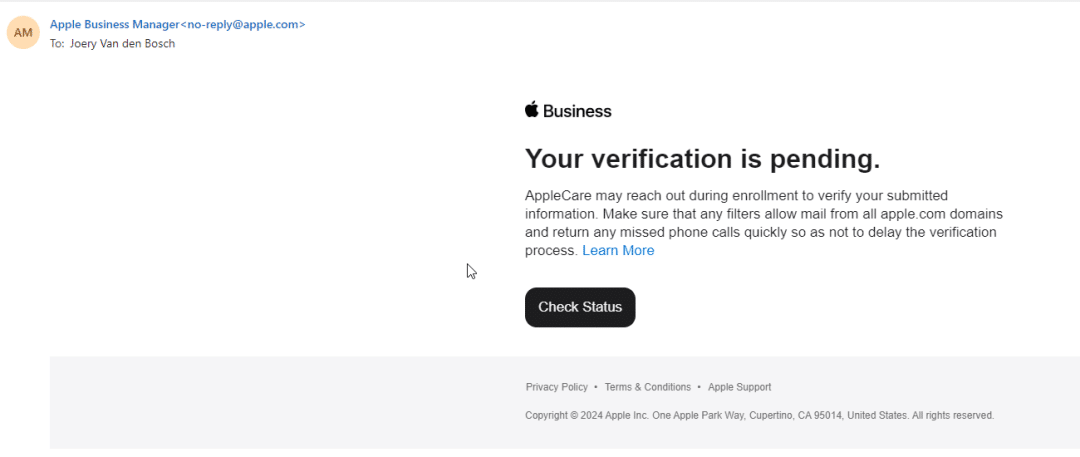
This can take up to 5 business days to complete. In this case it took 48hrs
Once your Apple Business Manager account has been approved you will get an email
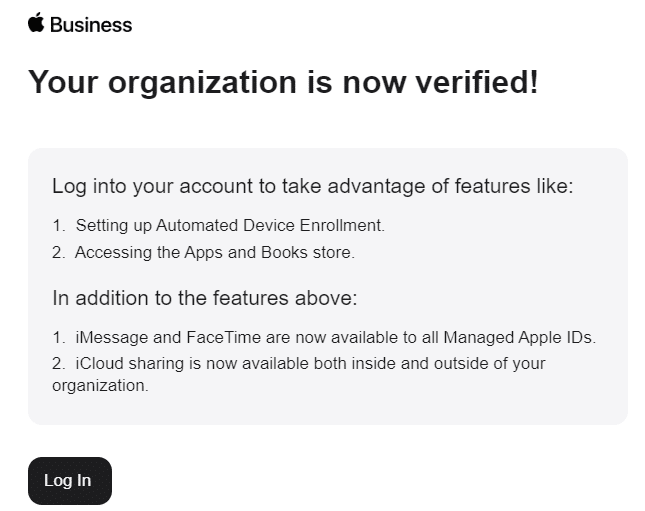
Now your company is enrolled with Apple Business Manager. Let’s proceed to integrate this with Intune.
Integrate Apple Business Manager with Intune
Create the push certificate
You need an Apple MDM Push certificate to manage your iOS/iPadOS and macOS devices in Microsoft Intune. This token enables devices to enroll via Intune Comp Portal or ADE/ASM/AC2. Follow the steps below to create the Apple MDM push certificate and upload it to the Intune Portal. I’ve written a post on the renewal of the certificate, you can use this post also for the creation of the certificate. It it not that different and pretty easy to do.
Create the Apple Automated Device Enrollment Token
So the pre-requisite is done, but before you can enroll iOS/iPadOS devices, you would need an Apple Server Token (.p7m) file from Apple. This token syncs information from Intune to ADE devices that your corporation owns. It also allows Intune to assign enrollment profiles to Apple and to assign devices to those profiles.
Follow the steps below to create & upload the ADE token:
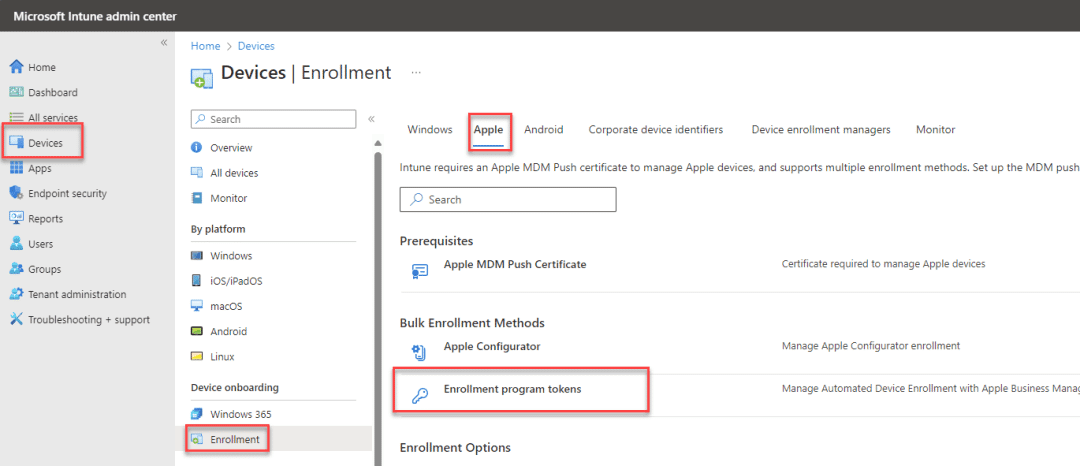
In Intune portal, select Devices – Enrollment – Apple – Enrollment Program Tokens
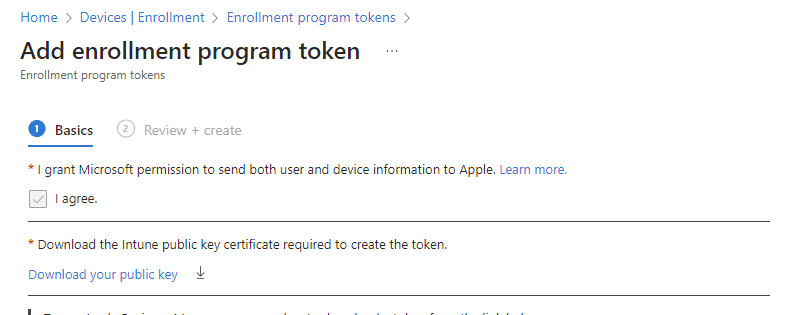
Click Add, tick the I agree box, click download your public key and save this key on your device. The .pem file is used to request a trust-relationship certificate from the Apple Business Manager portal.
Click on Create a token via Apple Business Manager to open the Apple Business Manager portal for creating your ADE token (MDM server).
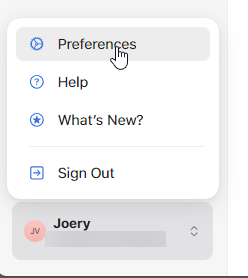
Sign in with your company’s Apple ID in Apple Business Manager.
Click your name at the bottom of the sidebar – Preferences.
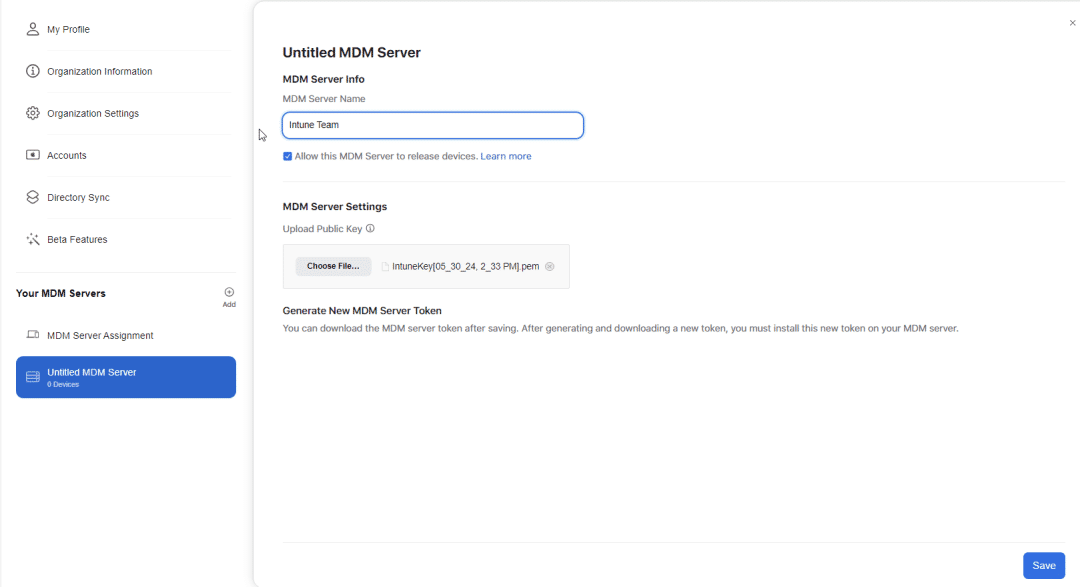
Then click “Add” to add MDM Server.
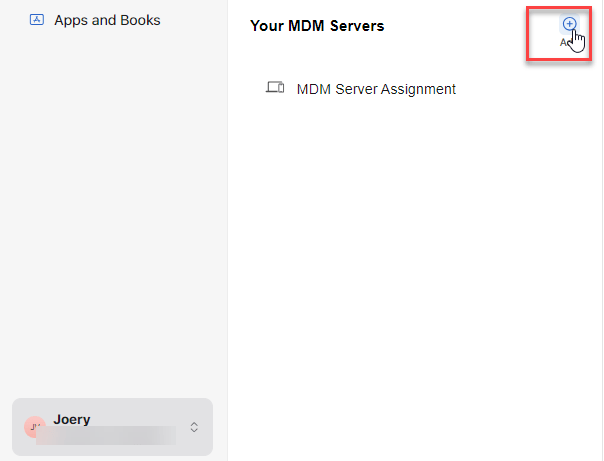
Name your MDM Server, tick the box Allow this MDM Server to release devices and upload the public key file you just downloaded and click save
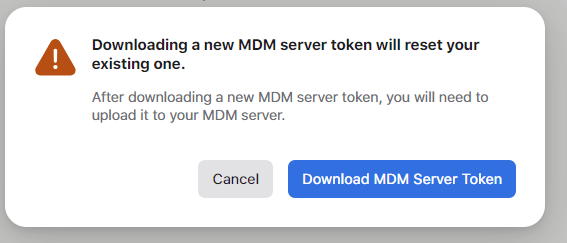
Now download your MDM Server Token

You will get a warning, you can ignore this because this is our first token, just click Download MDM Server Token and save this on your device
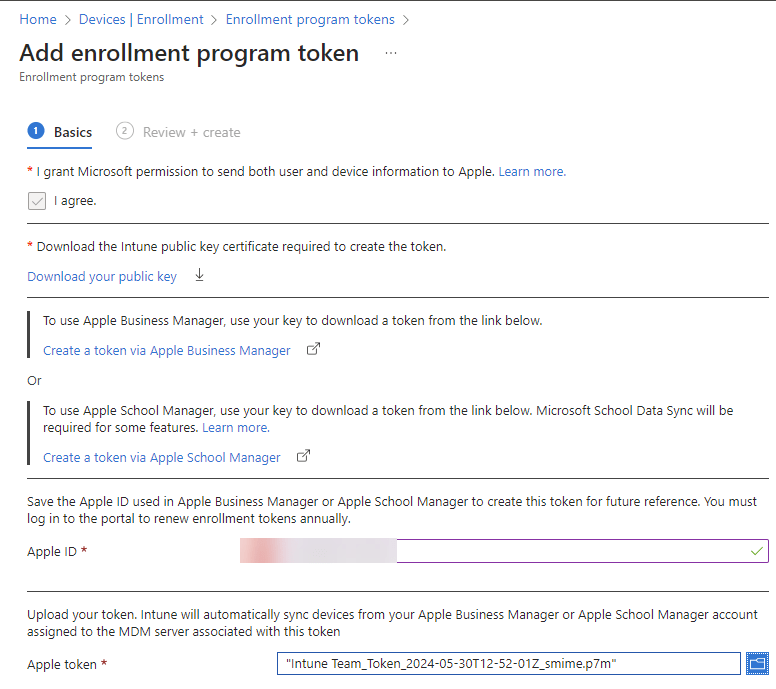
Now back to the Intune Portal, fill in your apple ID, upload the newly downloaded token, click next and create
When this is done you will get this screen
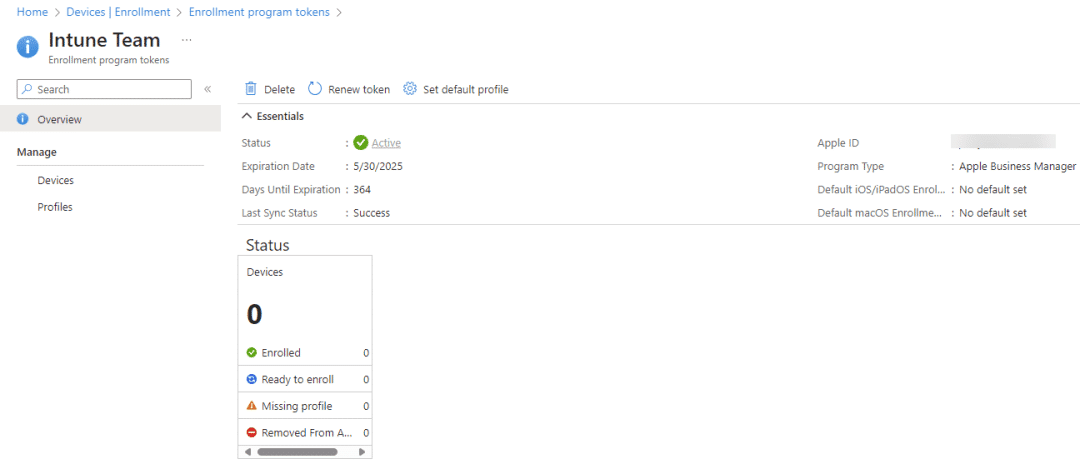
Now your Apple Business Manager is connected to Intune.
Add a device to Apple Business Manager
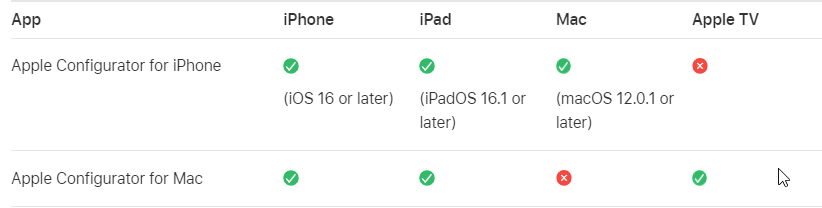
To add devices to Apple Business Manager you have some options. You Apple reseller can add them for you when you order a device. You can also add a device yourself by using the Apple Configurator app on your phone, i’m going to explain this method. If you want your reseller to add the devices you can read this article: Manage device suppliers in Apple Business Manager – Apple Support
You can add the following devices using Apple Configurator to Apple Business Manager, even if they weren’t purchased directly from Apple or from an Apple Authorized Reseller or cellular carrier:
- iPhone, iPad, and Apple TV devices using Apple Configurator for Mac.
- iPhone, iPad, and Mac computers (running macOS 12.0.1 or later) with Apple silicon or the Apple T2 Security Chip using Apple Configurator for iPhone.
After you’ve set up the device or devices, they behave like any other device already in Apple Business Manager, with mandatory supervision and mobile device management (MDM) enrollment. The device can then be shut down and stored until needed or sent to the user. If the device is given to a user, they have a 30-day provisional period to release the device from Apple Business Manager, supervision, and MDM. This 30-day provisional period begins after the device is successfully assigned to and enrolled in:
- A third-party MDM server linked to Apple Business Manager.
Create the Enrollment Profile
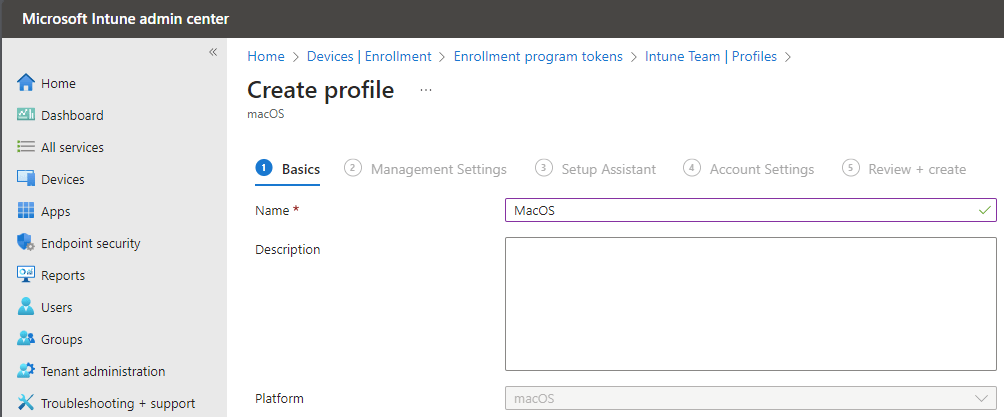
First you will have to create an enrollment profile. Go to the Intune portal – Devices – Enrollment – Apple – Enrollment program tokens – click token name – click profiles – create profile – MacOS – name you profile e.g MacOS
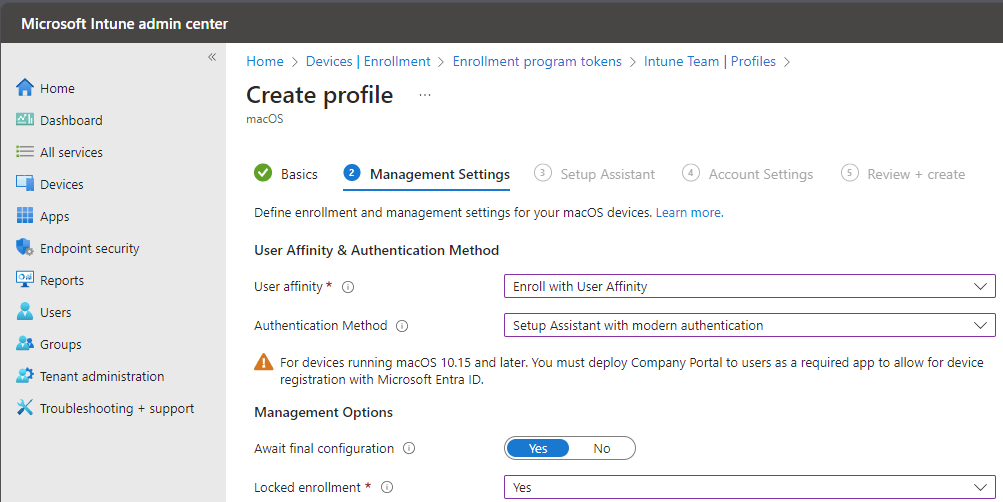
Click next and fill in the details, click next again
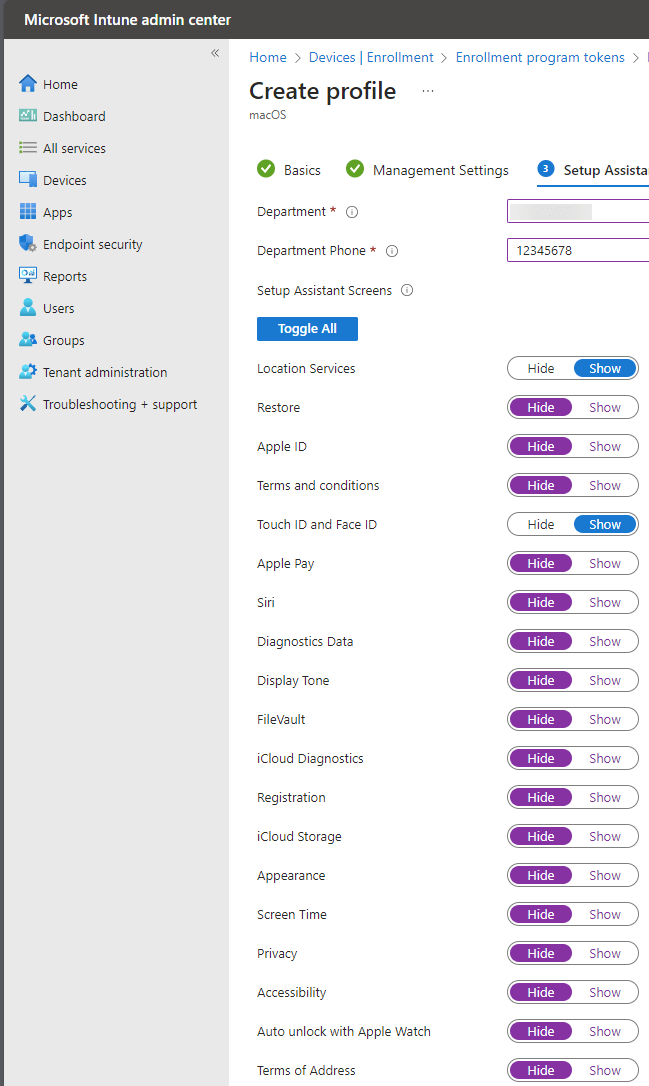
Now you can alter the setup assistant, you can choose which screens appear during the setup, this is totally up to you. Fill in the department and department phone.
Click next and fill in the details
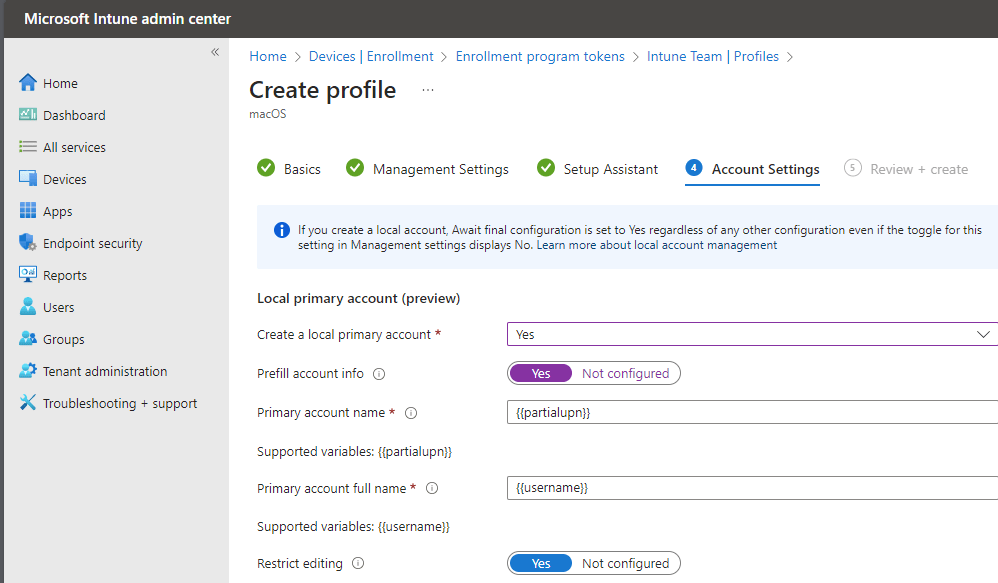
Click next and create. Now you enrollment profile has been created, we will add a device to it later on.

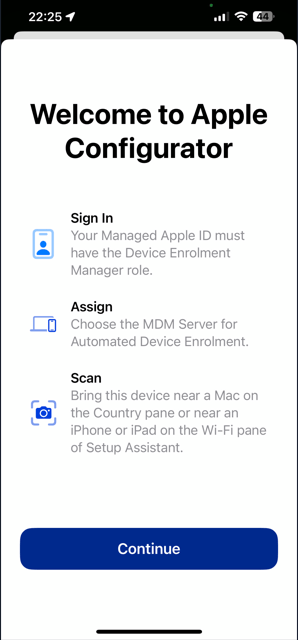
Install Apple Configurator on iPhone and configure it
Now it is time to add our device to Apple Business Manager with the use of the Apple configurator app on our iPhone. Download the app from the store and install it on your phone. I already got mine so i choose to open the app.

Open the configurator app and tap continue
Sign in with your apple id you used for Apple Business Manager and fill in the MFA code

In the network configuration section make sure that Share Wifi is selected and at the MDM Server Management your MDM server that you configured in Apple Business Manager is selected by selecting specific and selecting your MDM server
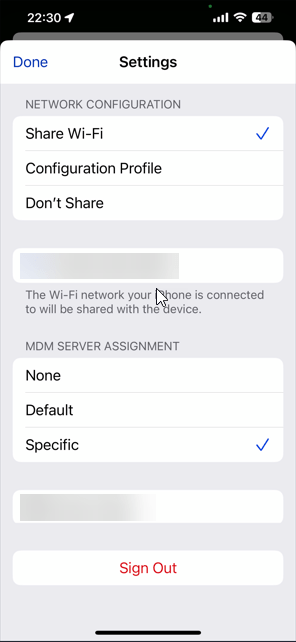
Tap Done
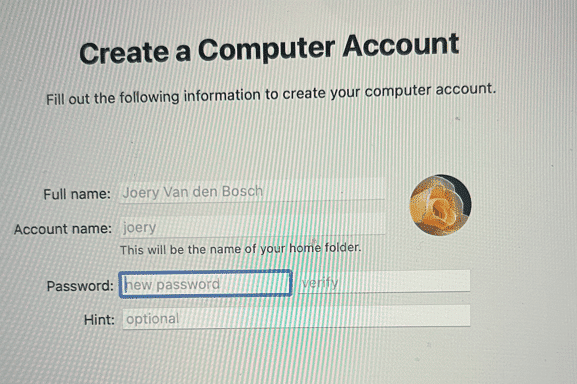
Your Mac device needs to be factory reset in order to add it to Apple Business manager. If you continue past the Country or Region setup pane, you will need to restart your Mac.
Now your Apple Configurator will look like this

Add your MacOS device to Apple Business Manager with Apple Configurator (iPhone)
Hold your iPhone with Apple Configurator open close to the Mac. You should see a screen that says “Assign this Mac to your Organization”.

From this screen, you have two options:
- Use the iPhone camera (with the Apple Configurator app open) to scan the image on the screen.
- Select “Pair Manually” on the iPhone and click “Pair Manually” on your Mac. You will be shown a 6-digit code and be prompted to enter it.
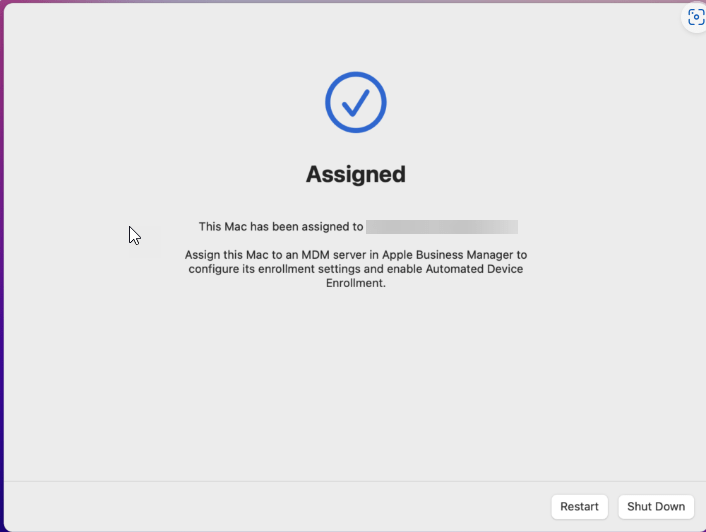
I will use the scan option, you will now see your device being added to Apple Business Manager. When it is finished you will be presented by this screen
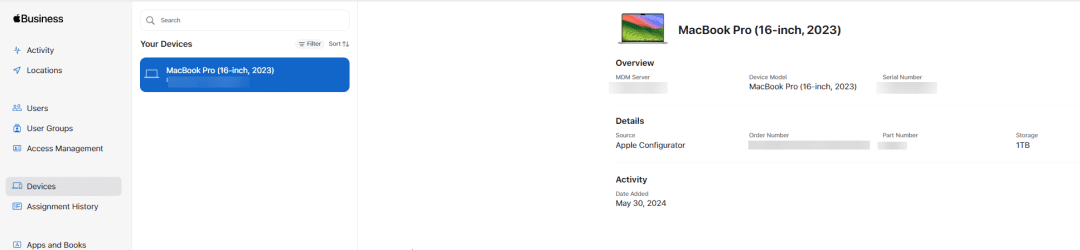
Leave you Mac now for what it is and go to the Apple Business Manager and login. Click on the left hand side on devices and your device should appear. Click on it for the details.
Sync Apple Business Manager device to Intune
Now go back to the Intune portal – Devices – enrollment – Apple – Enrollment program tokens – click on your token name – click devices – click sync
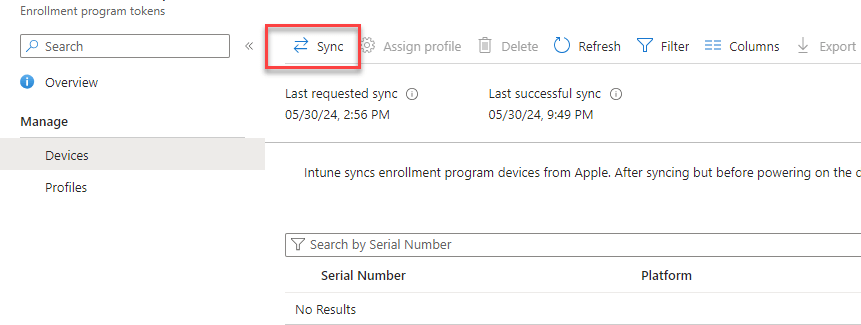
Now the devices in your Apple Business Manager will be synced to Intune. You can click refresh a few times to check if the device appears, after a few seconds my device is there. If you have a lot of devices to syn the time will increase.

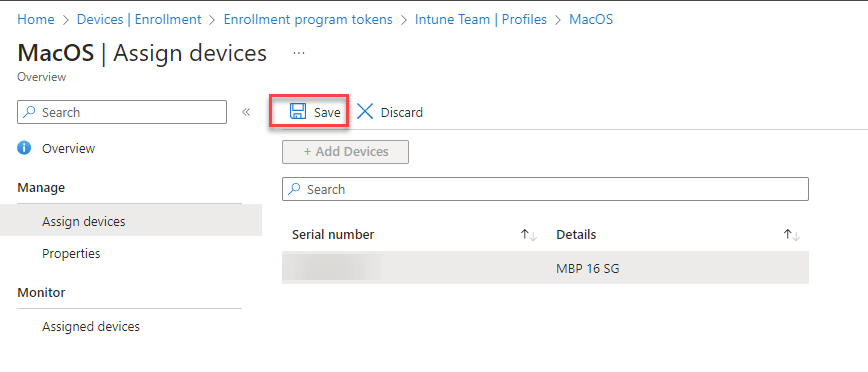
Now we can add this device to our enrollment profile. so go to the Intune Portal – Devices – Enrollment – Apple – Enrollment program tokens – click on your token name – click profiles – click on your profile name – click assign devices and click add devices – select your device to add it

After you add your device don’t forget to click save!!!
When all went good you will get this notification

Now you have added a device into Apple Business Manager and synced it to Intune and assigned it to the Enrollment profile. Now it is time to configure our Mac. But wait, i still want to configure the enable FileVault during setup Assistant and MacOS Platform SSO so let’s do this first. If you don’t want to use FileVault or Platform SSO you can skip these steps.
Enable FileVault during the Setup Assistant
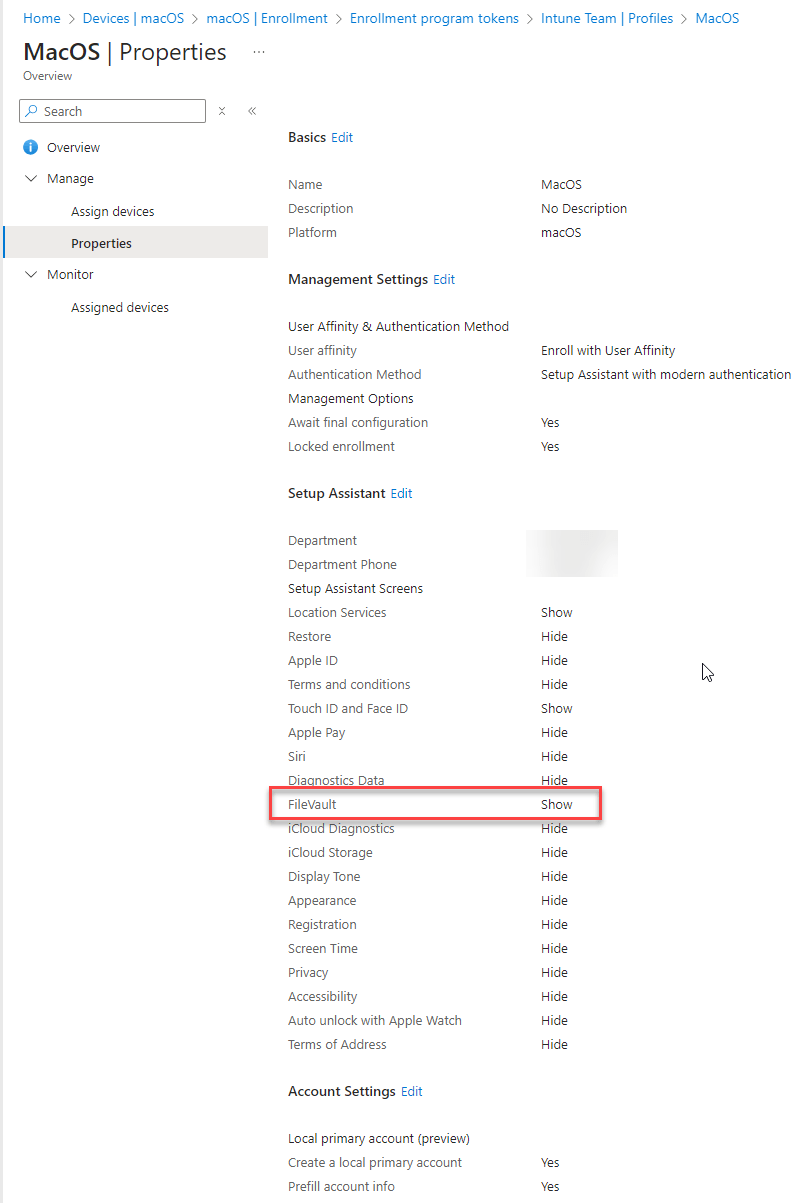
To enable FileVault encryption during the setup assistant do the following. Go to Devices – Macos – Enrollment – Enrollment progtam tokens – your token name – profiles – your profile name – properties. Here make sure to show FileVault.
Now we need to create a policy, to do this go to Devices – Macos – Configuration – create – new policy – settings catalog – name your policy – Add settings – Full Disk Encryption – FileVault. You can take the settings from the screenshot. You can of course play around with the rotation.
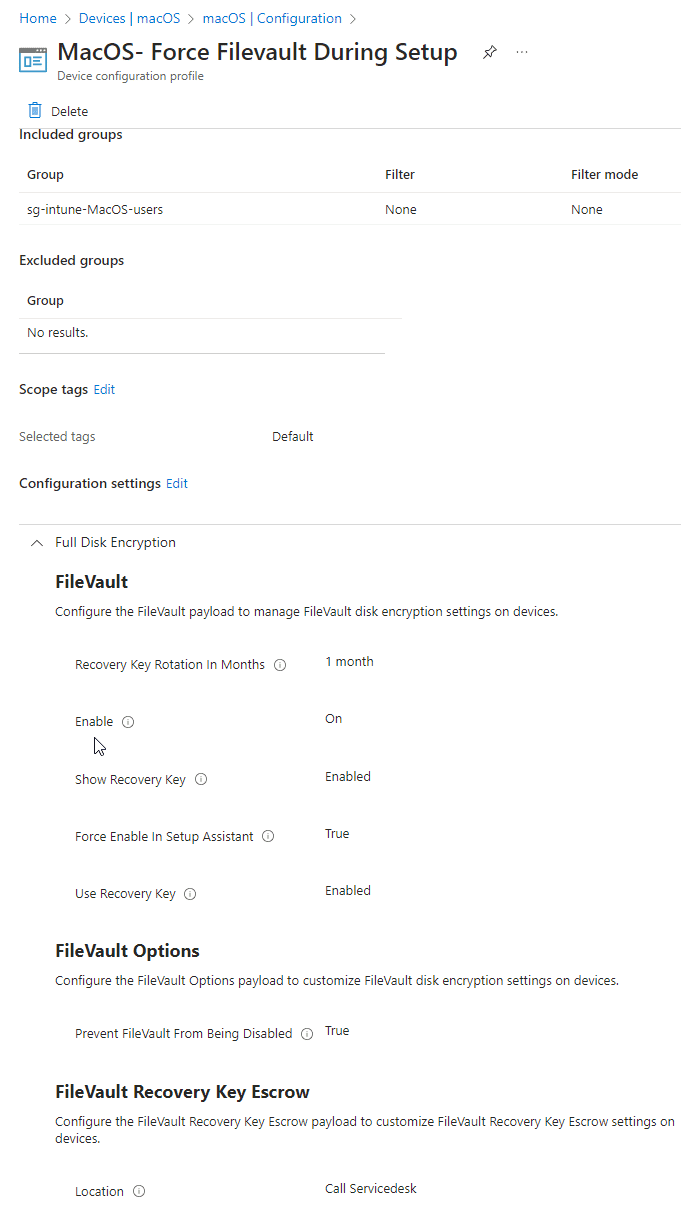
That is it, now your device will be encrypted during the setup.
Configure MacOS Platform SSO
What is MacOS Platform SSO
Platform single sign-on (SSO) is a replacement for binding to directory services. It builds on enterprise SSO capabilities so SSO extensions can also perform single sign-on for apps and websites. It integrates with macOS and doesn’t use JavaScript or render webpages for authentication.
The system stores the SSO tokens in the keychain and only shares them with the SSO extension. The SSO extension then uses the SSO tokens to authenticate the user to their on-premises apps and on websites as needed. If the SSO tokens are missing, expired, or more than four hours old, platform SSO attempts to refresh or retrieve new tokens from the IdP.
Platform SSO supports the following authentication methods with an identity provider (IdP):
- Password and encrypted password
The IdP uses the local account password and keeps it in sync, including password updates from the login window and screensaver unlock. - Password with WS-Trust
A federated IdP, meaning an IdP that facilitates federated authentication across multiple security domains, can use the local account password for authentication. - User secure enclave key
A secure enclave-backed key can authenticate with the IdP without a password and without changing the local account password. - SmartCard
High-security customers can use a SmartCard to authenticate with the IdP.
Platform SSO can create new local user accounts on demand at the login window using IdP credentials, and also integrate IdP group membership with macOS. You can use network accounts for authorization, and groups can also authorize network accounts.
Use Device Management to securely configure platform SSO, including device and user registration, configuring groups, and managing account permissions.
The system can also retrieve Kerberos ticket-granting tickets (TGTs), import them to a credential cache, and optionally share them with the Kerberos SSO extension.
I will describe the config for Secure Enclave Key.
You cannot use Enterprise Application SSO together with Platform SSO
Configure Platform SSO With Secure Enclave Key
Prerequisites
- Devices must be macOS 13.0 and newer devices. –> For the best results upgrade to MacOS 14.x
- Microsoft Intune Company Portal app version 5.2404.0 and newer.
- Supported web browsers:
- Microsoft Edge
- Google ChromePlatform
- Safari
Create the Platform SSO policy
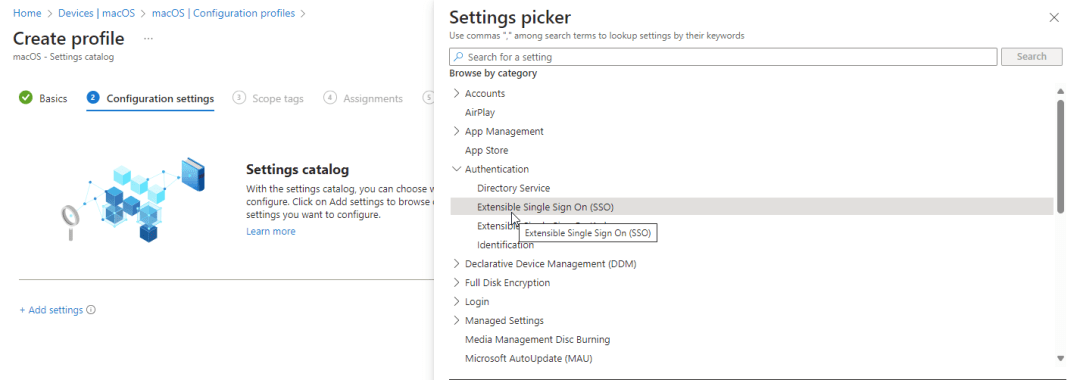
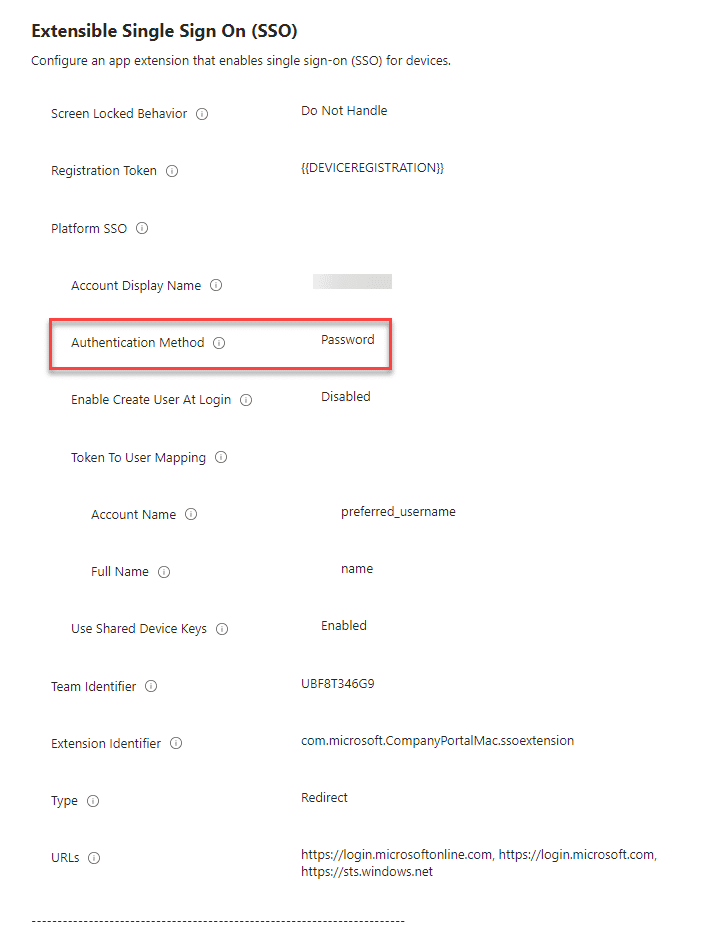
Go to Intune portal – Devices – MacOS – Configuration profiles – Create – New Policy – Platform MacOS – Profile type Settings Catalog – Name your policy e.g. MacOS – Platform SSO – Select Add Settings – Expand Authentication – Select Extensible Single Sign On (SSO)
If you have a mix of macOS 13 and macOS 14+ devices in your environment, then configure the Platform SSO Authentication Method and the Authentication Method (Deprecated) authentication settings in the same profile.
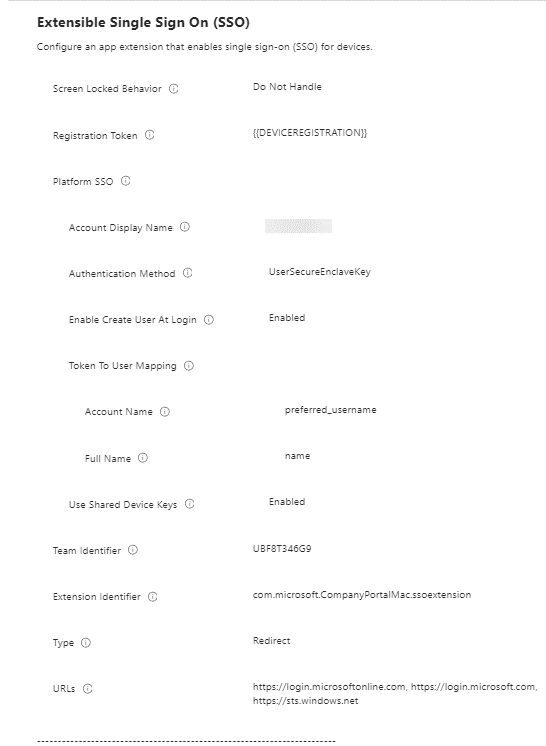
Configure the profile for at the below keys: (these are minimum required settings for PSSO to work)
- Authentication Method (Deprecated) (only if you are deploying profile to macOS 13.x devices)
- Extension Identifier
- Authentication Method (macOS 14+)
- Use Shared Device Keys
- Registration Token
- Account Display Name
- Screen Locked Behavior
- Team Identifier
- Type
- URLs
- Token To User Mapping: Account Name
- Token To User Mapping: Full Name
Here you can find all the info that you need to fill in: Configure Platform SSO for macOS devices | Microsoft Learn
As there is apparently some confusion on the use of the URL’s needed in the PSSO profile see here (although this is stated in de Microsoft docs – see link above) here just to clarify:
These URL prefixes are the identity providers that do SSO app extensions. The URLs are required for redirect payloads and are ignored for credential payloads.
If your environment needs to allow sovereign cloud domains, then also add the following URLs:
- https://login.partner.microsoftonline.cn
- https://login.chinacloudapi.cn
- https://login.microsoftonline.us
- https://login-us.microsoftonline.com
For more information on these URLs, go to Microsoft Enterprise SSO plug-in for Apple devices.
Your profile will look like this
Assign the profile to your desired device or user group.
When you configure Platform SSO with the Password authentication method instead of Secure Enclave Key, users sign in to the device with their Microsoft Entra ID user account password instead of their local account password. This option enables SSO across apps that use Microsoft Entra ID for authentication. With the Password authentication method:
- The Microsoft Entra ID password replaces the local account password, and the two passwords are kept in sync.
- The local account username isn’t changed and stays as-is.
- End users can use Touch ID to sign in to the device.
- There are fewer passwords for users and admins to remember and manage. -Users must enter their Microsoft Entra ID password after a device reboots. After this initial machine unlock, Touch ID can unlock the device.
- After the unlock, the device gets the hardware-bound Primary Refresh Token (PRT) credential for Microsoft Entra ID SSO. The local account machine password isn’t completely removed from the device. This behavior is by design due to Apple’s FileVault disk encryption, which uses the local password as the unlock key.
Any Intune password policy you configure also affects this setting. For example, if you have a password policy that blocks simple passwords, then simple passwords are also blocked for this setting. Make sure your Intune password policy and/or compliance policy matches your Microsoft Entra password policy. If the policies don’t match, then the password might not sync and end users are denied access. See the warning box below!
!!Important update!! Now i have been playing around with PSSO for a while and what i’ve found out is the following, if you have set a compliance policy with password settings, or a device restrictions policy with password settings configured scoped to a device group you will not be able to do the registration, it will break PSSO (see the bold text in the info box above, this is again very vague MS doc) unless you change you local user’s password 1st, I have tried all different scenario’s regard so it is very important to scope your policies like this:
- Compliance policy – no password settings specified – User group assigned
- Device restrictions Policy – password settings specified – Device group assigned
- PSSO Policy – Device group or user group assigned
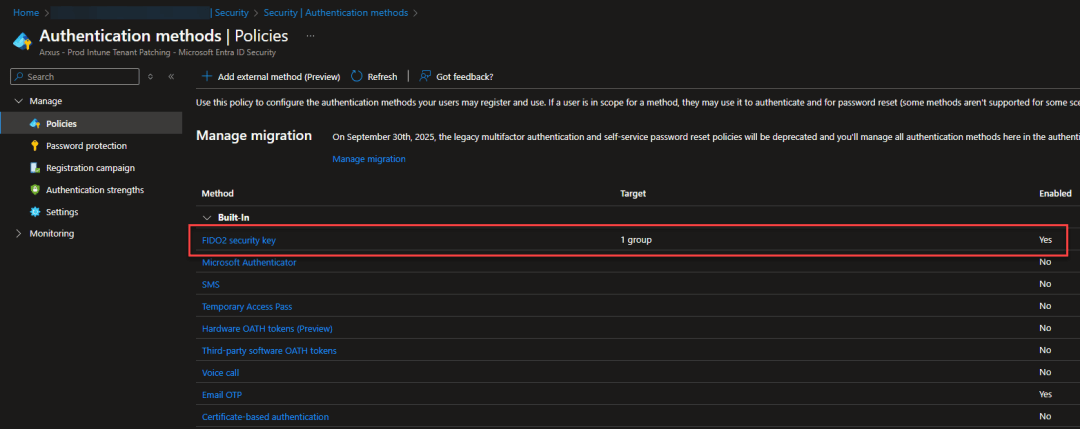
If you want to enable smart card login you will also need to enable FIDO as an authentication method in Entra ID:
Configure Platform SSO With Password
Prerequisites
- Devices must be macOS 13.0 and newer devices. –> For the best results upgrade to MacOS 14.x
- Microsoft Intune Company Portal app version 5.2404.0 and newer.
- Supported web browsers:
- Microsoft Edge
- Google ChromePlatform
- Safari
Create the Platform SSO policy
Go to Intune portal – Devices – MacOS – Configuration profiles – Create – New Policy – Platform MacOS – Profile type Settings Catalog – Name your policy e.g. MacOS – Platform SSO – Select Add Settings – Expand Authentication – Select Extensible Single Sign On (SSO)
If you have a mix of macOS 13 and macOS 14+ devices in your environment, then configure the Platform SSO Authentication Method and the Authentication Method (Deprecated) authentication settings in the same profile.

Configure the profile for at the below keys: (these are minimum required settings for PSSO to work)
- Authentication Method (Deprecated) (only if you are deploying profile to macOS 13.x devices)
- Extension Identifier
- Authentication Method (macOS 14+)
- Use Shared Device Keys
- Registration Token
- Account Display Name
- Screen Locked Behavior
- Team Identifier
- Type
- URLs
- Token To User Mapping: Account Name
- Token To User Mapping: Full Name
Here you can find all the info that you need to fill in: Configure Platform SSO for macOS devices | Microsoft Learn
As there is apparently some confusion on the use of the URL’s needed in the PSSO profile see here (although this is stated in de Microsoft docs – see link above) here just to clarify:
These URL prefixes are the identity providers that do SSO app extensions. The URLs are required for redirect payloads and are ignored for credential payloads.
If your environment needs to allow sovereign cloud domains, then also add the following URLs:
- https://login.partner.microsoftonline.cn
- https://login.chinacloudapi.cn
- https://login.microsoftonline.us
- https://login-us.microsoftonline.com
For more information on these URLs, go to Microsoft Enterprise SSO plug-in for Apple devices.
Assign the profile to your desired device or user group.
When you configure Platform SSO with the Password authentication method instead of Secure Enclave Key, users sign in to the device with their Microsoft Entra ID user account password instead of their local account password. This option enables SSO across apps that use Microsoft Entra ID for authentication. With the Password authentication method:
- The Microsoft Entra ID password replaces the local account password, and the two passwords are kept in sync.
- The local account username isn’t changed and stays as-is.
- End users can use Touch ID to sign in to the device.
- There are fewer passwords for users and admins to remember and manage. -Users must enter their Microsoft Entra ID password after a device reboots. After this initial machine unlock, Touch ID can unlock the device.
- After the unlock, the device gets the hardware-bound Primary Refresh Token (PRT) credential for Microsoft Entra ID SSO. The local account machine password isn’t completely removed from the device. This behavior is by design due to Apple’s FileVault disk encryption, which uses the local password as the unlock key.
Any Intune password policy you configure also affects this setting. For example, if you have a password policy that blocks simple passwords, then simple passwords are also blocked for this setting. Make sure your Intune password policy and/or compliance policy matches your Microsoft Entra password policy. If the policies don’t match, then the password might not sync and end users are denied access. See the warning box below!
!!Important update!! Now i have been playing around with PSSO for a while and what i’ve found out is the following, if you have set a compliance policy with password settings, or a device restrictions policy with password settings configured scoped to a device group you will not be able to do the registration, it will break PSSO (see the bold text in the info box above, this is again very vague MS doc) unless you change you local user’s password 1st, I have tried all different scenario’s regard so it is very important to scope your policies like this:
- Compliance policy – no password settings specified – User group assigned
- Device restrictions Policy – password settings specified – Device group assigned
- PSSO Policy – Device group or user group assigned
Insights
- Before setting up PSSO you should think about your approach and communication with the enduser. While your Security Department could expect you to implement the most secure Authentication Method, in this case this is Secure Enclave, your users and the IT Department would expect to use a single password for the local and online (EntraID) accounts.
- Secure Enclave only provides this additional security layer by NOT storing the keys and tokens in the Keychain like the Password method does.
- Secure Enclave could still be the best user experience because users do not need to technically use a password when they use touch id for the sign-in. This way a missing password sync will not be that important anymore but still be phishing resistant.
- Tokens and Keys stored in the Secure Enclave are Hardware Bound (Phishing Resistant). You can not export Tokens or Sync them via iCloud which makes this the most secure way.
- Secure Enclave with PSSO and TouchID has a very similar User Experience feeling like Windows Users have with Windows Hello for Business.
- The Password Method is storing Keys in the KeyChain which is software based. Users or Attackers could export the tokens and reuse them on a different device. This is why Microsoft and Apple is recommending to use Secure Enclave.
Install the Company Portal app for MacOS as a MacOS LOB app
Company Portal for macOS can be downloaded and installed using the macOS LOB apps feature. The version downloaded is the version that will always be installed and may need to be updated periodically to ensure users get the best experience during initial enrollment.
Download Company Portal for macOS from here
Add the app by going to the Intune portal – Apps – Add – App Type Line-of-business app – select
Browse to your downloaded CompanyPortal-installer.pkg file and fill in the empty required fields
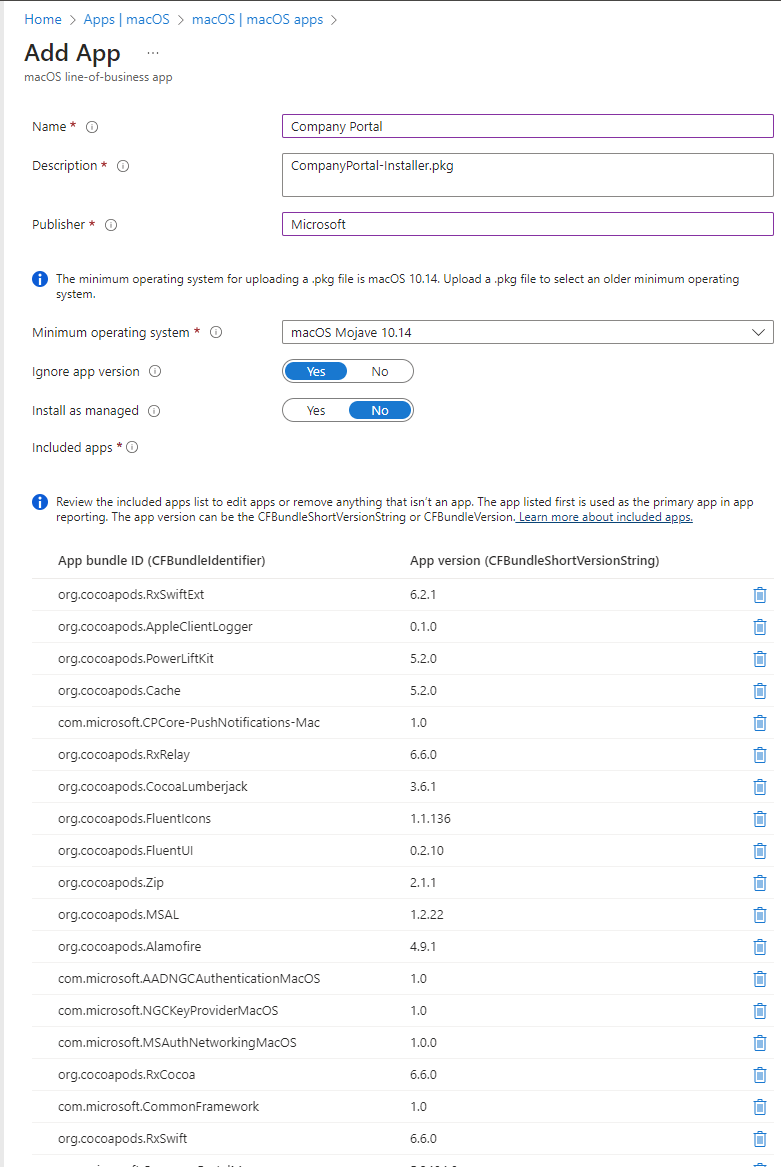
Assign it to your desired group
For macOS devices running 10.15 and later, when creating an Automated Device Enrollment profile, you can now choose a new authentication method: Setup Assistant with modern authentication, what we have done. The user has to authenticate using Microsoft Entra credentials during the setup assistant screens. This will require an additional Microsoft Entra login post-enrollment in the Company Portal app to gain access to corporate resources protected by Conditional Access and for Intune to assess device compliance.
Users must sign into the Company Portal to complete Microsoft Entra authentication and gain access to resources protected by Conditional Access. User affinity is established when users complete the enrollment and reach the home screen of the macOS device. If the tenant has multi-factor authentication turned on for these devices or users, the users will be asked to complete multi-factor authentication during enrollment during Setup Assistant. Multi-factor authentication is not required, but it is available for this authentication method within Conditional Access if needed.
User Experience on a MacOS Device
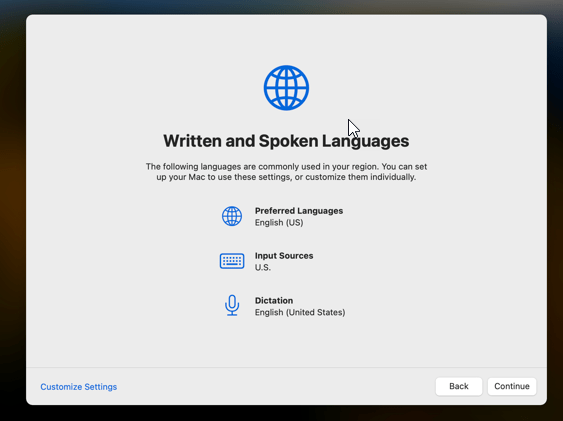
Remember that we left our Mac device after we enrolled it in Apple Business Manager, reboot it. Now just follow the setup assistant to continue onboarding you Mac into Intune With Platform SSO. These are the screenshots during enrollment. Apparently there is a limit on the screenshots you can make during the setup assistant so i missed some. But i think you will get the complete overview of what is going on. My apologies for this.
Select Country or region
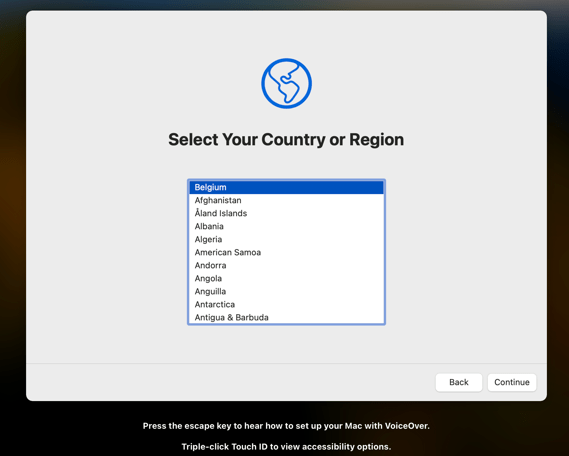
Click Continue
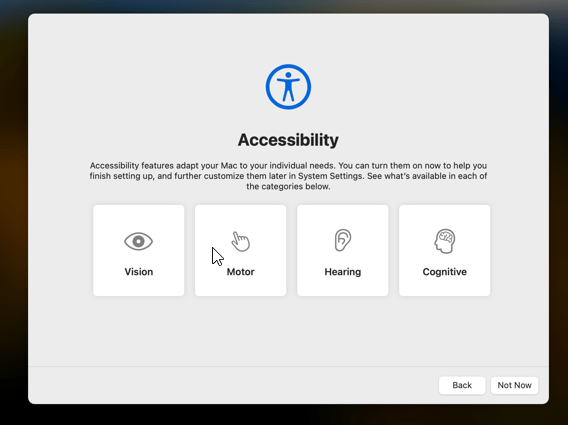
Click not now
Connect to Wifi
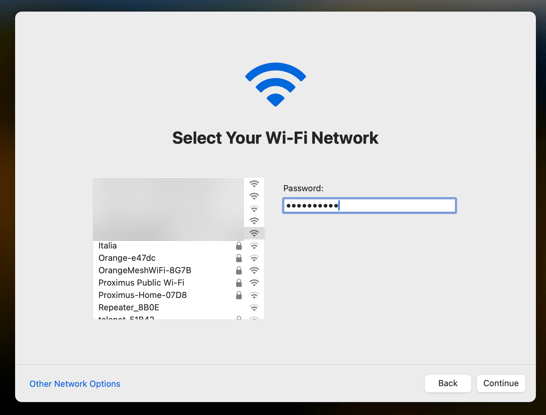
Click Continue
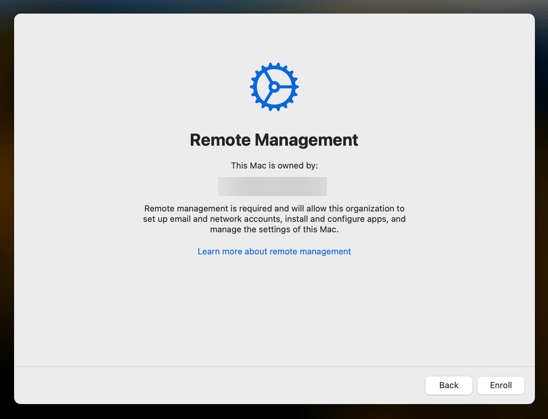
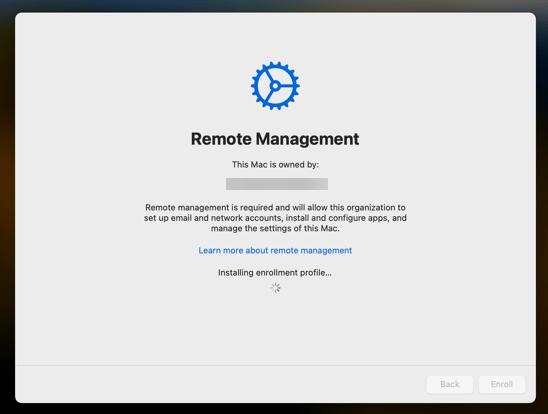
Now you can see that your device has got the Company enrollment profile, click enroll
Sign in with your Entra ID credentials and accept the MFA request if needed
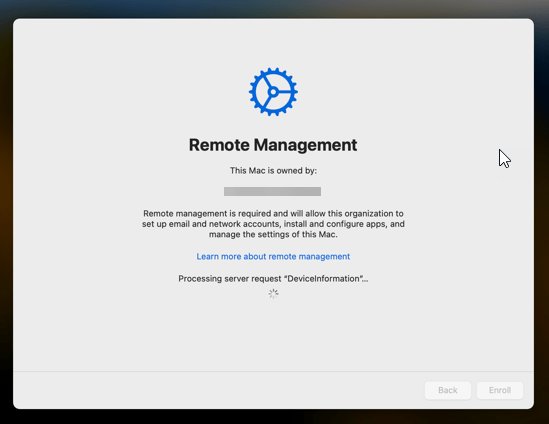
Now all Intune profiles are being installed, just watch the progress
Now i had to take a picture with my phone, pretty amateuristic i know…. 🙂
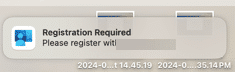
From now on you will go to the desktop of the Mac, check the message in the top right corner, click it
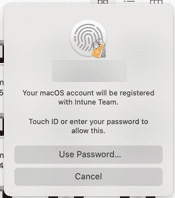
Now enter your local user password or use touch id
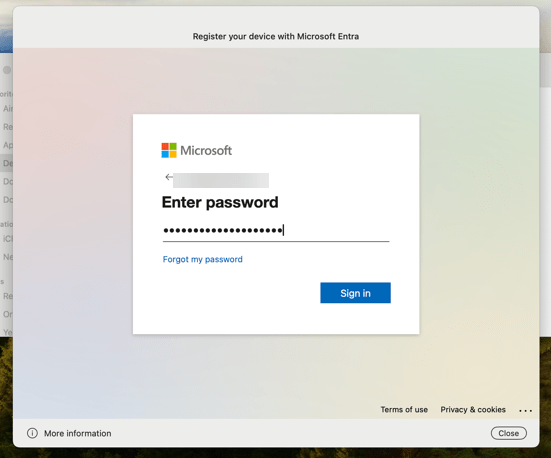
Enter your Entra ID credentials and approve MFA if needed
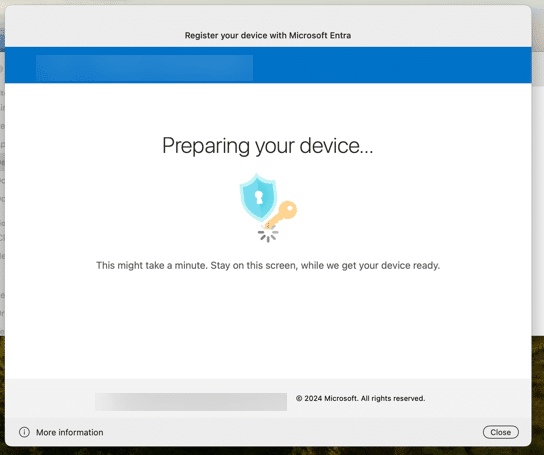
Preparing your device
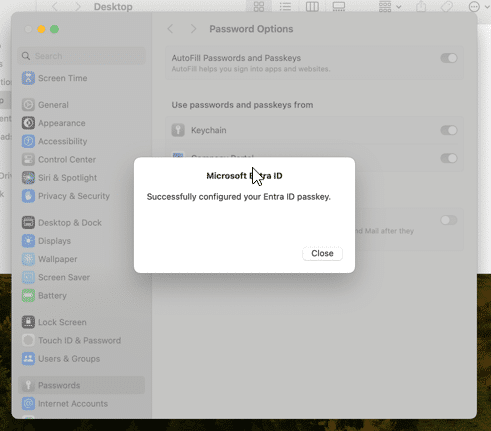
Toggle on Company Portal and click open System Settings
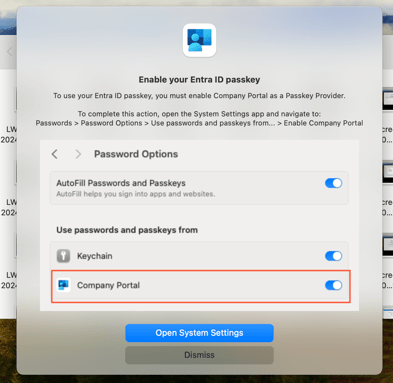
Toggle on Company Portal and click close
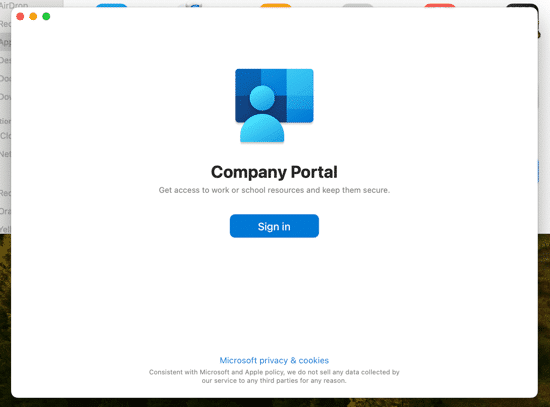
Go to Finder – Applications – Company Portal – Click sign in
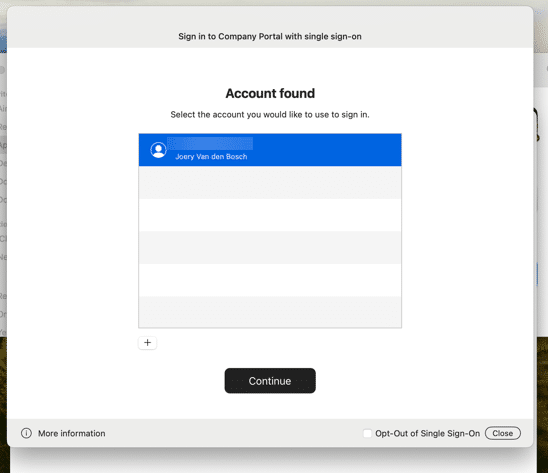
Check the SSO page, this is what we want to see, click continue
Now all is configured

You can check if all is OK by going to settings – users & groups and clicking on the Entra ID user
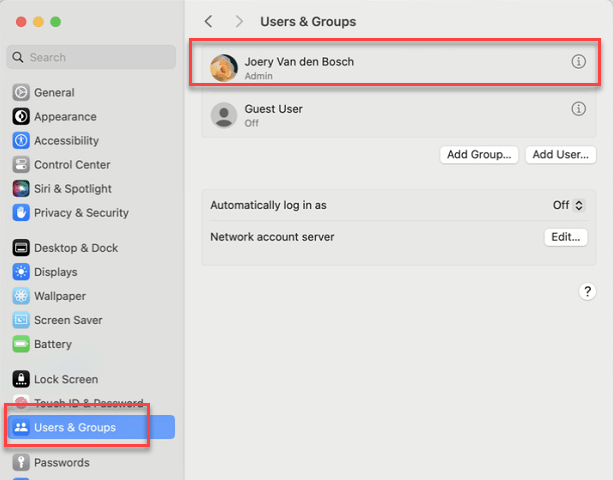
In the next window you can see that everything is ok
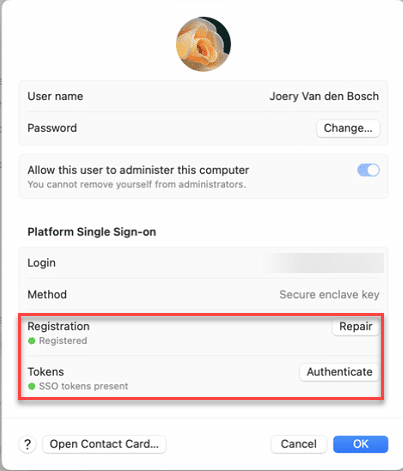
Now you have successfully enrolled your device via platform SSO to Intune. Congratulations!!!
Enroll MacOS in Microsoft Defender
Prerequisites
To successfully enroll your MacOS (or any other OS for that mater) you will need to setup all connections between Intune and Defender. You can read about it here. Of course you will need the correct licenses:
- Defender for Endpoint Plan 1 and Plan 2 (standalone or as part of other Microsoft 365 plans)
- Microsoft Defender for Business (for small and medium-sized businesses)
To onboard servers to the standalone versions of Defender for Endpoint, server licenses are required. You can choose from:
- Microsoft Defender for Servers Plan 1 or Plan 2 (as part of the Defender for Cloud) offering
- Microsoft Defender for Endpoint for Servers
- Microsoft Defender for Business servers (for small and medium-sized businesses only)
Enable Microsoft Defender in Intune
Sign in to the Microsoft Intune admin center. Select Endpoint security – Microsoft Defender for Endpoint, and toggle the Allow Microsoft Defender for Endpoint to enforce Endpoint Security Configurations box to On.

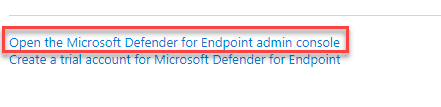
Select Endpoint security > Microsoft Defender for Endpoint, and then select Open the Microsoft Defender Security Center.
In Microsoft Defender portal (previously the Microsoft Defender Security Center) Select Settings (at the bottom of the left column) – Endpoints – Advanced features.
For Microsoft Intune connection, choose On and click Save preferences.
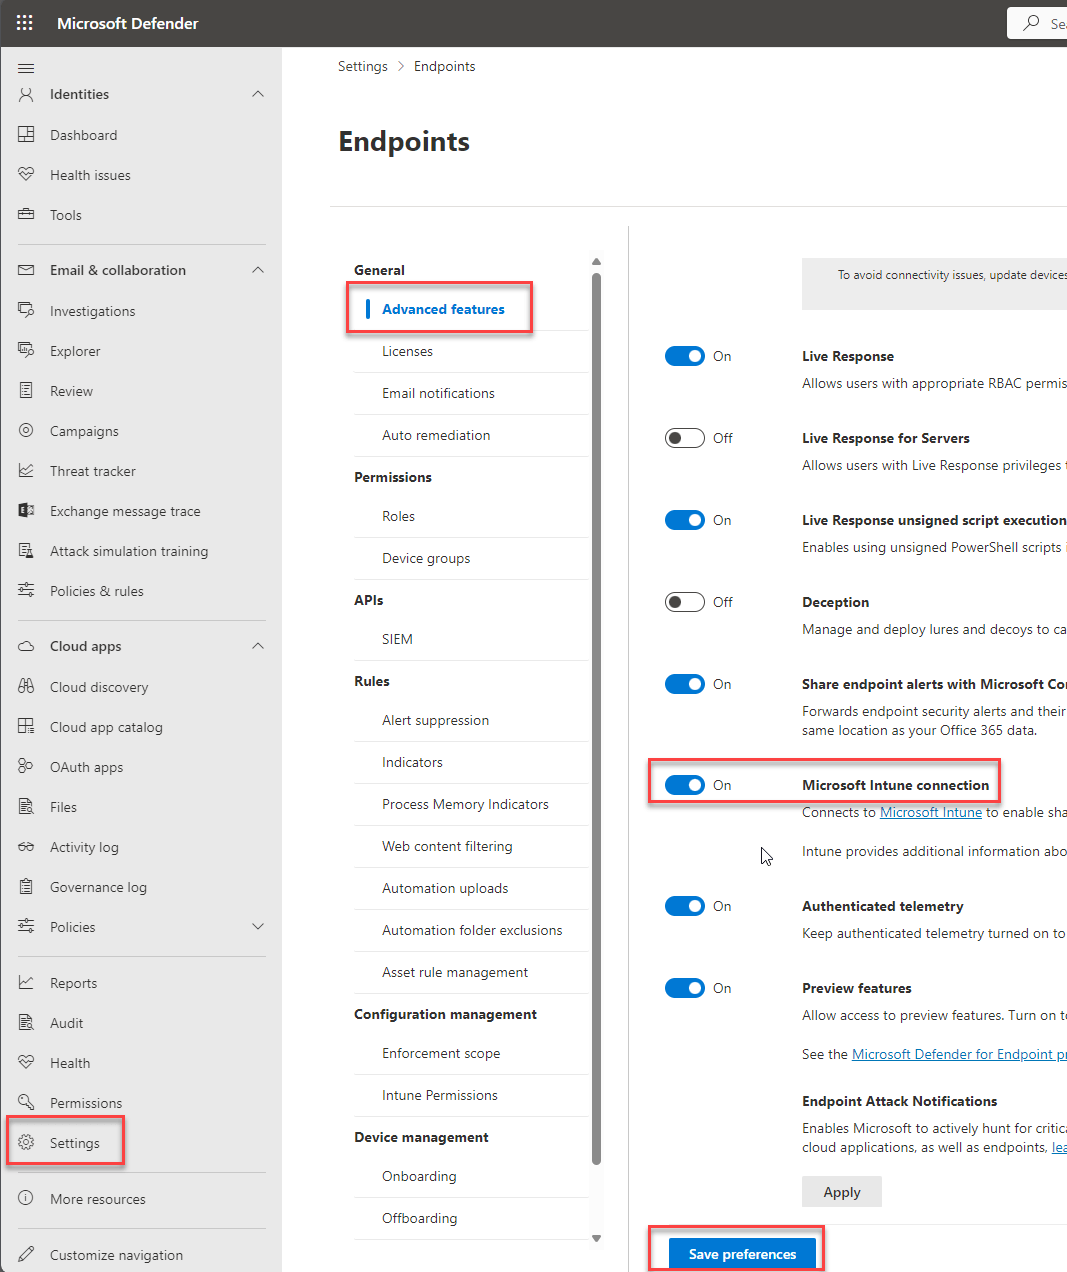
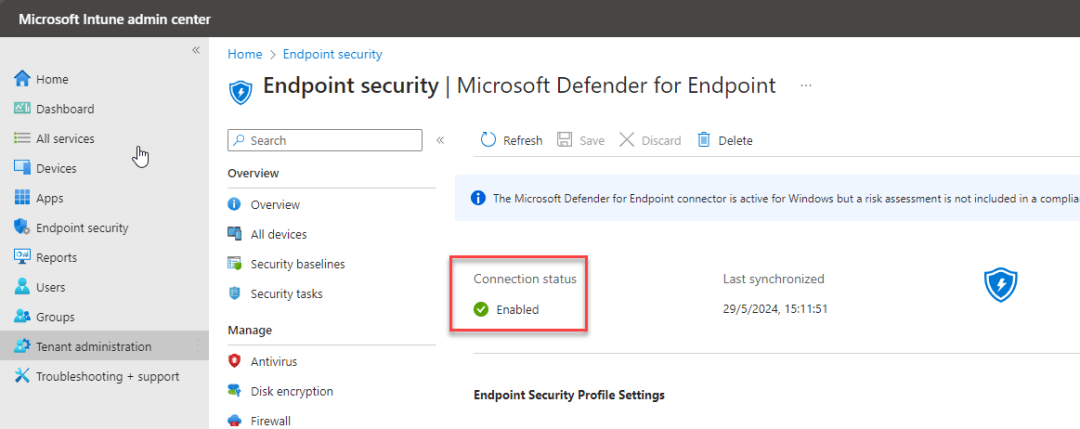
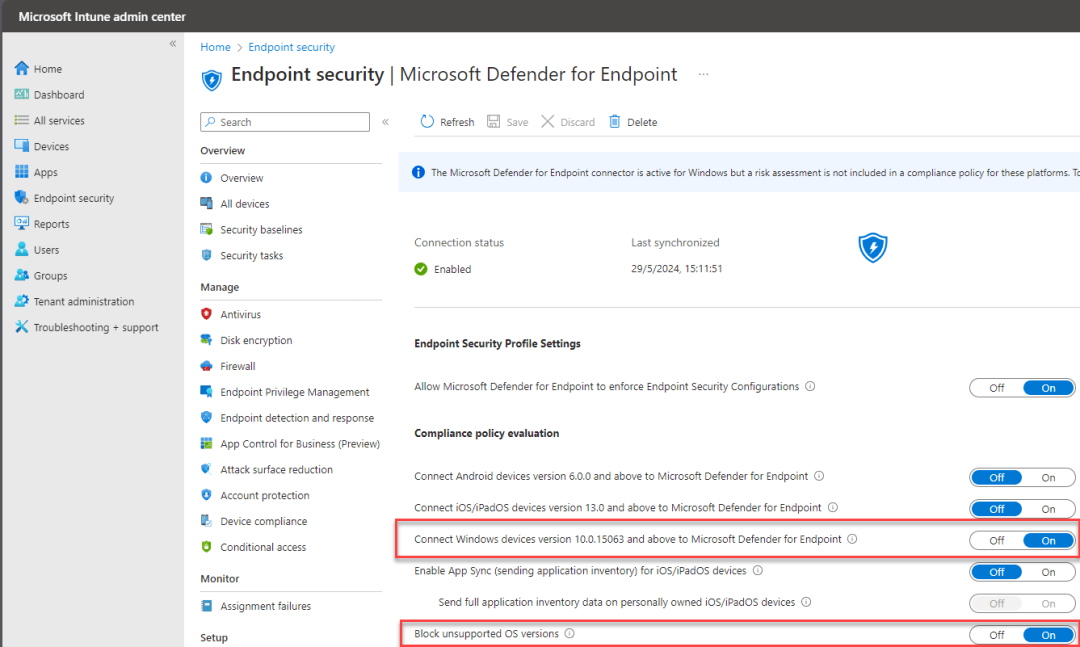
Go back to the Microsoft Intune admin center. Select Endpoint security – Microsoft Defender for Endpoint and you will see that the connection status is set to enabled. (this can take a few minutes, please refresh periodically)
Now on the same screen toggle both Connect Windows devices version 10.0.15063 and above to Microsoft Defender for Endpoint and Block unsupported OS versions to the On state.
Now you have enabled the connection between Microsoft Defender and Intune. Now let’s continue to create the different configuration profiles needed.
Create system configuration profiles
The System Extensions Policy
The next step is to create system configuration profiles that Microsoft Defender for Endpoint needs. In the Microsoft Intune admin center, open Devices – MacOS – Configuration profiles. We will need a lot of policies configured for this so make sure you have some spare time for this 😉
On the Policies tab, select Create > New Policy.
- Under Platform, select macOS.
- Under Profile type, select Templates.
- Under Template name, select Extensions, and then select Create.
- Name your policy e.g MacOS – Defender Extensions
On the Configuration settings tab, expand System Extensions and add the following entries in the Allowed system extensions section:
| Bundle identifier | Team identifier |
|---|---|
com.microsoft.wdav.epsext |
UBF8T346G9
com.microsoft.wdav.netext |
UBF8T346G9
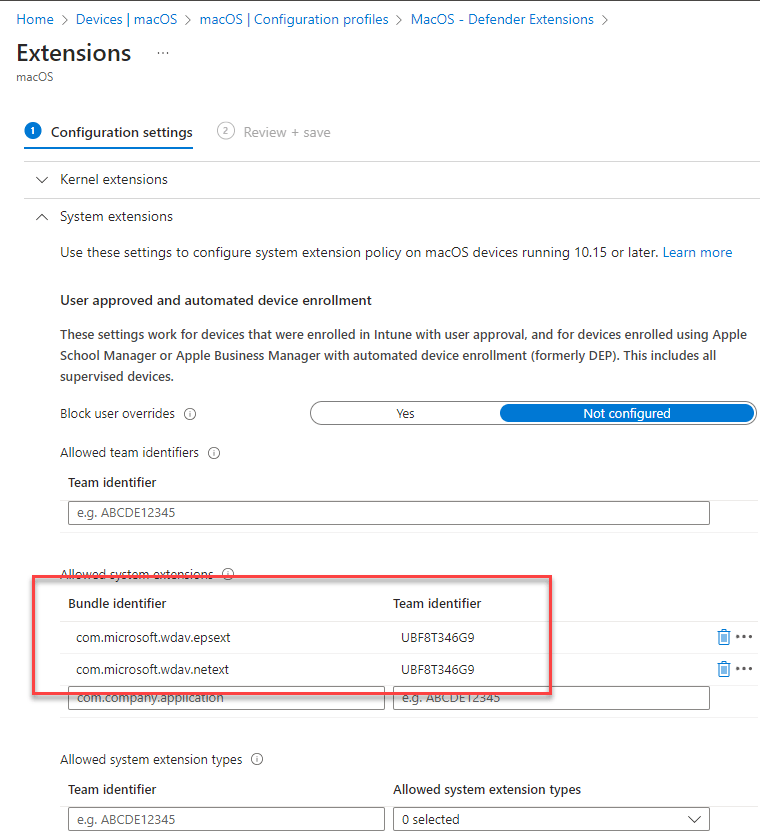
Select Next. On the Assignments tab, assign the profile to a group where the macOS devices and/or users are located, or select the Add all users and Add all devices options. Then select Next. Review the configuration profile. Select Create.
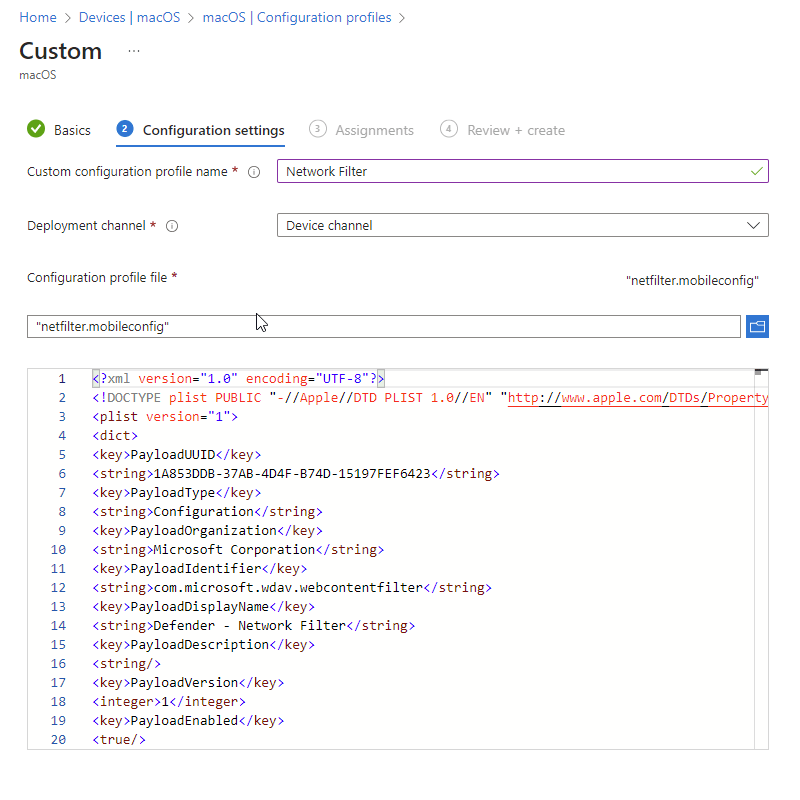
The Network Filter Policy
As part of the Endpoint Detection and Response capabilities, Microsoft Defender for Endpoint on macOS inspects socket traffic and reports this information to the Microsoft 365 Defender portal. The following policy allows the network extension to perform this functionality.
First we need to download the netfilter.mobileconfig file.
To configure network filter:
- Under Configuration profiles, select Create Profile.
- Under Platform, select macOS.
- Under Profile type, select Templates.
- Under Template name, select Custom.
- Select Create.
- On the Basics tab, Name the profile e.g. MacOS – Network Filter
- On the Configuration settings tab, enter a Custom configuration profile name e.g. Network Filter
- Deployment Channel: Device Channel (we are going to scope all Defender policies on device groups)
- Configuration profile file: Browse for the downloaded file
Select Next. On the Assignments tab, assign the profile to a group where the macOS devices and/or users are located, or select the Add all users and Add all devices options. Then select Next. Review the configuration profile. Select Create.
The Full Disk Access Policy
Starting with macOS Catalina (10.15) or newer, in order to provide privacy for the end-users, it created the FDA (Full Disk Access). Enabling TCC (Transparency, Consent & Control) through a Mobile Device Management solution such as Intune, will eliminate the risk of Defender for Endpoint losing Full Disk Access Authorization to function properly.
This configuration profile grants Full Disk Access to Microsoft Defender for Endpoint. If you previously configured Microsoft Defender for Endpoint through Intune, we recommend you update the deployment with this configuration profile.
First we need to download the Fulldisk.mobileconfig file.
To configure Full Disk Access:
- In the Intune admin center, under Configuration profiles, select Create Profile.
- Under Platform, select macOS.
- Under Profile type, select Templates.
- Under Template name, select Custom. Then select Create
- Select Create.
- On the Basics tab, Name the profile e.g. MacOS – Full Disk Access
- Select Next.
- On the Configuration settings tab, enter a Custom configuration profile name
- Deployment Channel: Device Channel (we are going to scope all Defender policies on device groups)
- Configuration profile file: Browse for the downloaded file
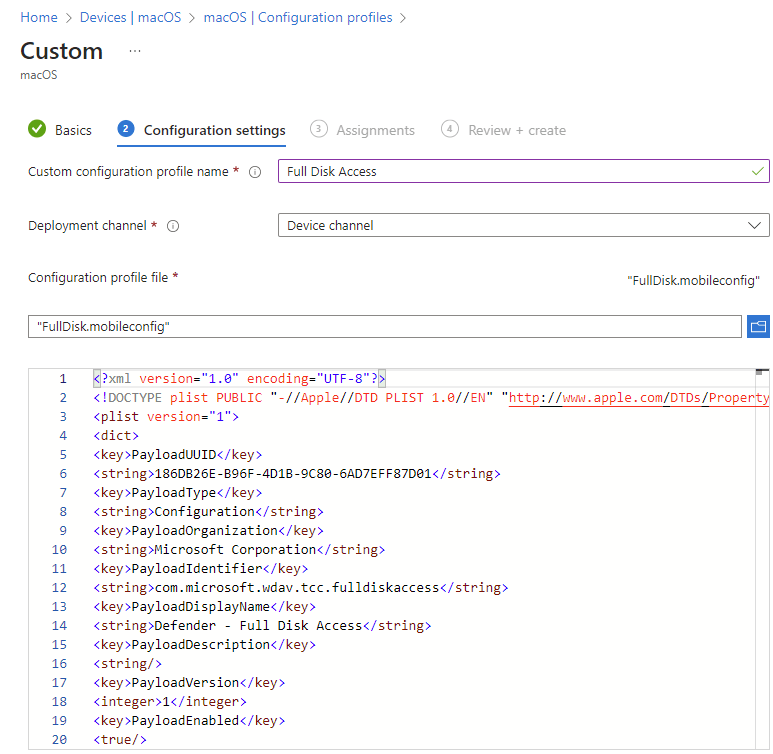
Select Next. On the Assignments tab, assign the profile to a group where the macOS devices and/or users are located, or select the Add all users and Add all devices options. Then select Next. Review the configuration profile. Select Create.
The Background Services Policy
macOS 13 (Ventura) contains new privacy enhancements. Beginning with this version, by default, applications cannot run in background without explicit consent. Microsoft Defender for Endpoint must run its daemon process in background. This configuration profile grants Background Service permissions to Microsoft Defender for Endpoint. If you previously configured Microsoft Defender for Endpoint through Microsoft Intune, we recommend you update the deployment with this configuration profile.
First we need to download the BackgroundServices.mobileconfig file.
To configure background services:
- Under Configuration profiles, select Create Profile.
- Under Platform, select macOS.
- Under Profile type, select Templates.
- Under Template name, select Custom, and then select Create.
- On the Basics tab, Name the profile e.g. MacOS – Background Services
- Select Next.
- On the Configuration settings tab, enter a Custom configuration profile name e.g. Background Services
- Deployment Channel: Device Channel (we are going to scope all Defender policies on device groups)
- Configuration profile file: Browse for the downloaded file
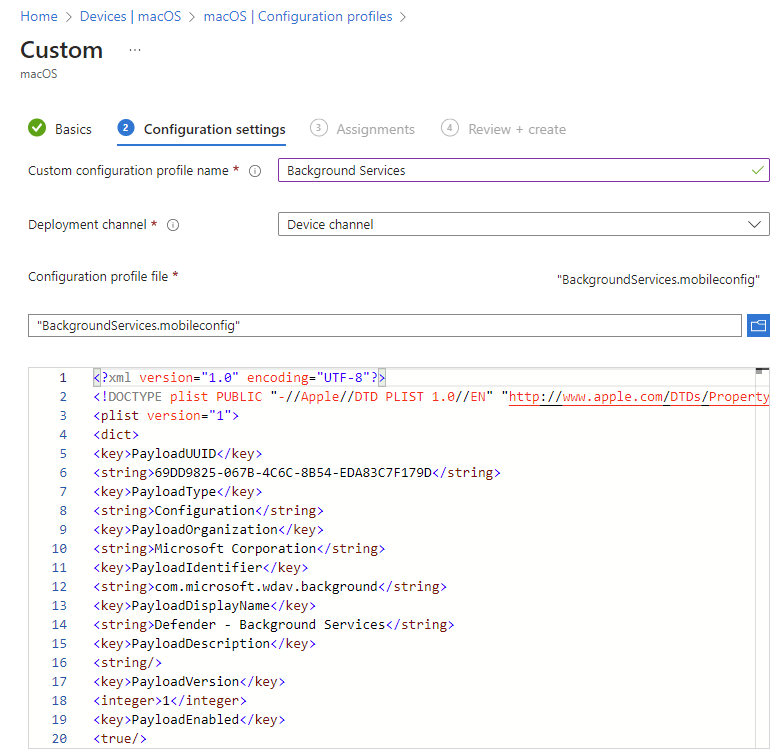
Select Next. On the Assignments tab, assign the profile to a group where the macOS devices and/or users are located, or select the Add all users and Add all devices options. Then select Next. Review the configuration profile. Select Create.
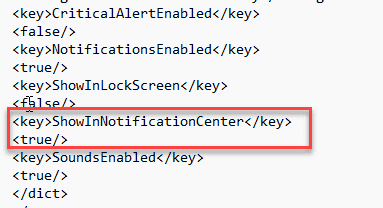
The Notifications Policy
This profile is used to allow Microsoft Defender for Endpoint on macOS and Microsoft AutoUpdate to display notifications in UI.
First we need to download the Notifications.mobileconfig file.
To turn off notifications for the end users, you can change Show NotificationCenter from true to false in the file.
To configure background services:
- Under Configuration profiles, select Create Profile.
- Under Platform, select macOS.
- Under Profile type, select Templates.
- Under Template name, select Custom, and then select Create.
- On the Basics tab, Name the profile e.g. MacOS – Notifications
- Select Next.
- On the Configuration settings tab, enter a Custom configuration profile name e.g. Notifications
- Deployment Channel: Device Channel (we are going to scope all Defender policies on device groups)
- Configuration profile file: Browse for the downloaded file

Select Next. On the Assignments tab, assign the profile to a group where the macOS devices and/or users are located, or select the Add all users and Add all devices options. Then select Next. Review the configuration profile. Select Create.
The Accessibility Settings Policy
This profile is used to allow Microsoft Defender for Endpoint on macOS to access the accessibility settings on Apple macOS High Sierra (10.13.6) and newer.
First we need to download the Accessibility.mobileconfig file.
To configure background services:
- Under Configuration profiles, select Create Profile.
- Under Platform, select macOS.
- Under Profile type, select Templates.
- Under Template name, select Custom, and then select Create.
- On the Basics tab, Name the profile e.g. MacOS – Accessibility Settings
- Select Next.
- On the Configuration settings tab, enter a Custom configuration profile name e.g. Accessibility Settings
- Deployment Channel: Device Channel (we are going to scope all Defender policies on device groups)
- Configuration profile file: Browse for the downloaded file
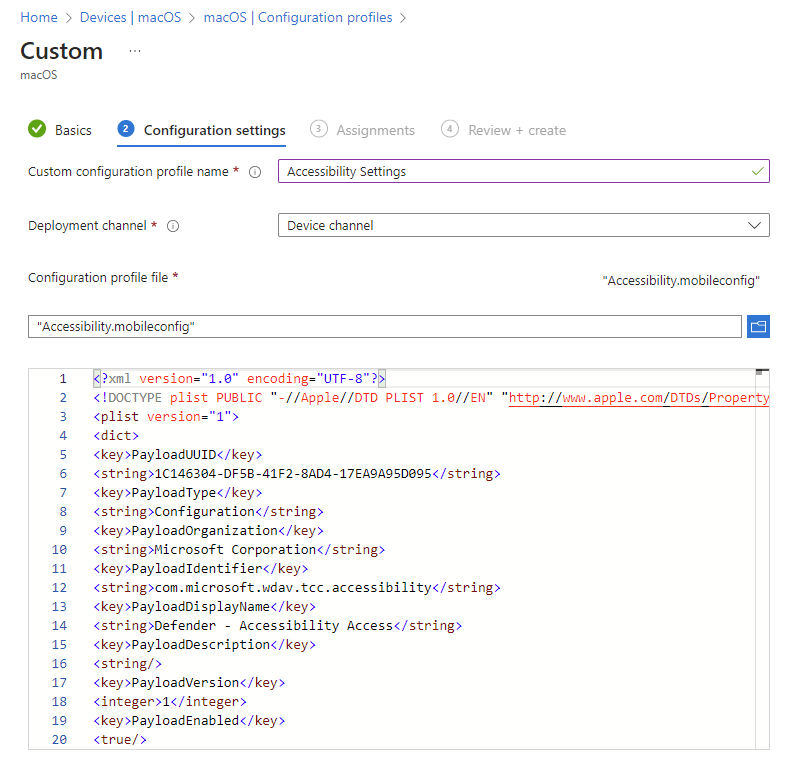
Select Next. On the Assignments tab, assign the profile to a group where the macOS devices and/or users are located, or select the Add all users and Add all devices options. Then select Next. Review the configuration profile. Select Create.
The Bluetooth Permissions Policy
macOS 14 (Sonoma) contains new privacy enhancements. Beginning with this version, by default, applications cannot access Bluetooth without explicit consent. Microsoft Defender for Endpoint uses it if you configure Bluetooth policies for Device Control.
Bluetooth granted through Apple MDM Configuration Profile is not reflected in System Settings => Privacy & Security => Bluetooth.
First we need to download the Bluetooth.mobileconfig file.
To configure background services:
- Under Configuration profiles, select Create Profile.
- Under Platform, select macOS.
- Under Profile type, select Templates.
- Under Template name, select Custom, and then select Create.
- On the Basics tab, Name the profile e.g. MacOS – Bluetooth Permissions
- Select Next.
- On the Configuration settings tab, enter a Custom configuration profile name e.g. Bluetooth Permissions
- Deployment Channel: Device Channel (we are going to scope all Defender policies on device groups)
- Configuration profile file: Browse for the downloaded file
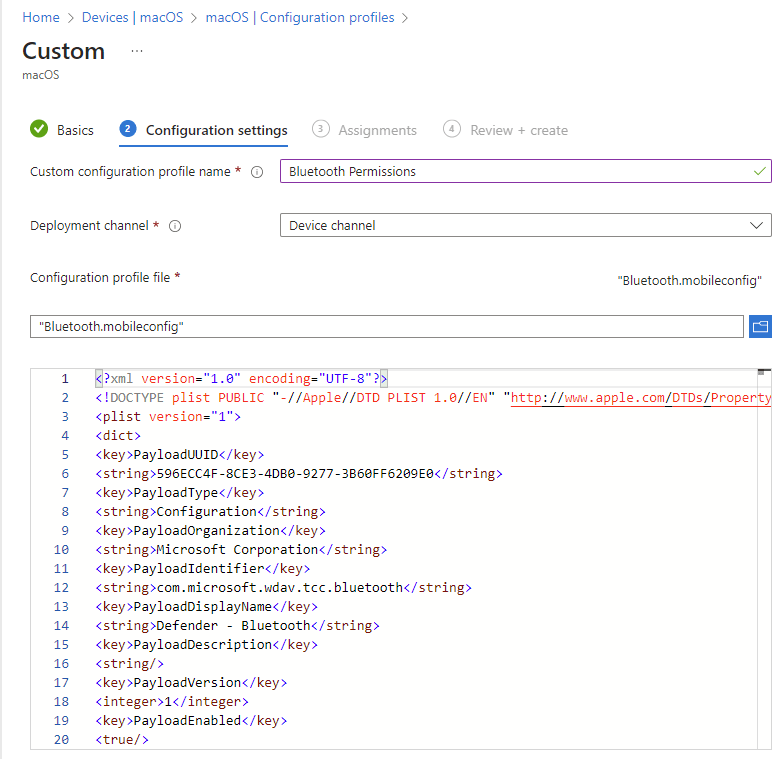
Select Next. On the Assignments tab, assign the profile to a group where the macOS devices and/or users are located, or select the Add all users and Add all devices options. Then select Next. Review the configuration profile. Select Create.
The Microsoft Auto Update Policy
This profile is used to update the Microsoft Defender for Endpoint on macOS via Microsoft AutoUpdate (MAU). If you’re deploying Microsoft Defender for Endpoint on macOS, you have the options to get an updated version of the application (Platform Update) that are in the different channels mentioned here:
- Beta (Insiders-Fast)
- Current channel (Preview, Insiders-Slow)
- Current channel (Production)
First we need to download the AutoUpdate.mobileconfig file.
To configure background services:
- Under Configuration profiles, select Create Profile.
- Under Platform, select macOS.
- Under Profile type, select Templates.
- Under Template name, select Custom, and then select Create.
- On the Basics tab, Name the profile e.g. MacOS – Auto Update
- Select Next.
- On the Configuration settings tab, enter a Custom configuration profile name e.g. Auto Update
- Deployment Channel: Device Channel (we are going to scope all Defender policies on device groups)
- Configuration profile file: Browse for the downloaded file
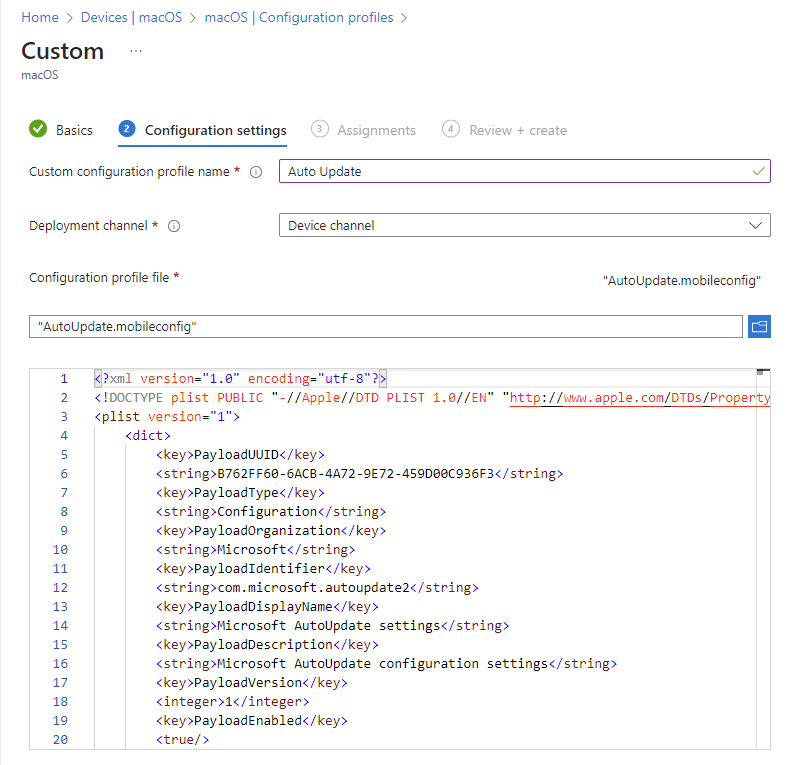
Select Next. On the Assignments tab, assign the profile to a group where the macOS devices and/or users are located, or select the Add all users and Add all devices options. Then select Next. Review the configuration profile. Select Create.
Microsoft Defender for Endpoint Configuration Settings
Set the Microsoft Defender Portal Onboarding Policy
Go through Configure Microsoft Defender for Endpoint in Intune before setting the security policies using Microsoft Defender for Endpoint Security Settings Management.
In the Intune portal, go to Endpoint Security – Endpoint Detection and Response
- Click Create policy
- Choose MacOS as platform
- Choose Endpoint Detection and Response
- Click Create
- Name your policy e.g. MacOS – Endpoint Detection and Response, click next
- Add your Device Tags
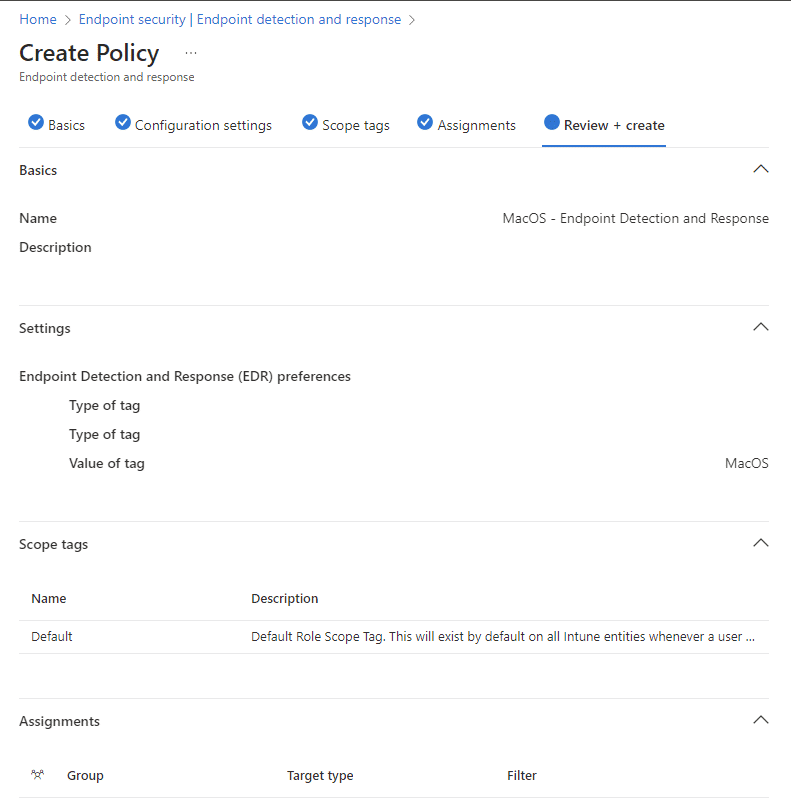
Select Next. On the Assignments tab, assign the profile to a group where the macOS devices and/or users are located, or select the Add all users and Add all devices options. Then select Next. Review the configuration profile. Select Save.
Set the Microsoft Defender Antivirus Policy
In this policy you will configure the settings of Microsoft Defender itself. These settings are not carved in stone and you can set these for your own needs.
In the Intune portal, go to Endpoint Security – Antivirus
- Click Create policy
- Choose MacOS as platform
- Choose Microsoft Defender Antivirus
- Click Create
- Name your policy e.g. MacOS – Microsoft Defender Antivirus , click next
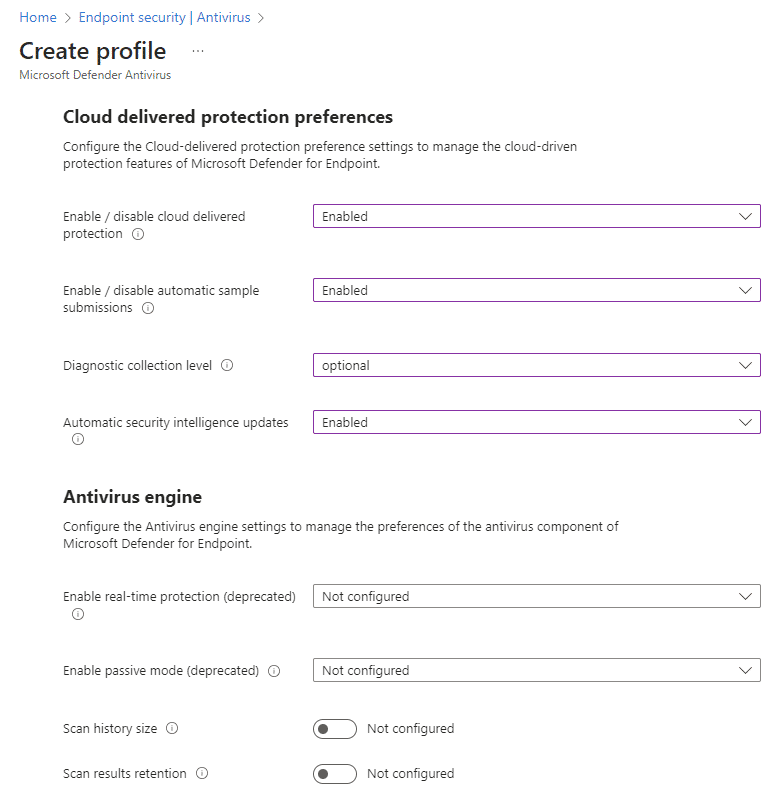
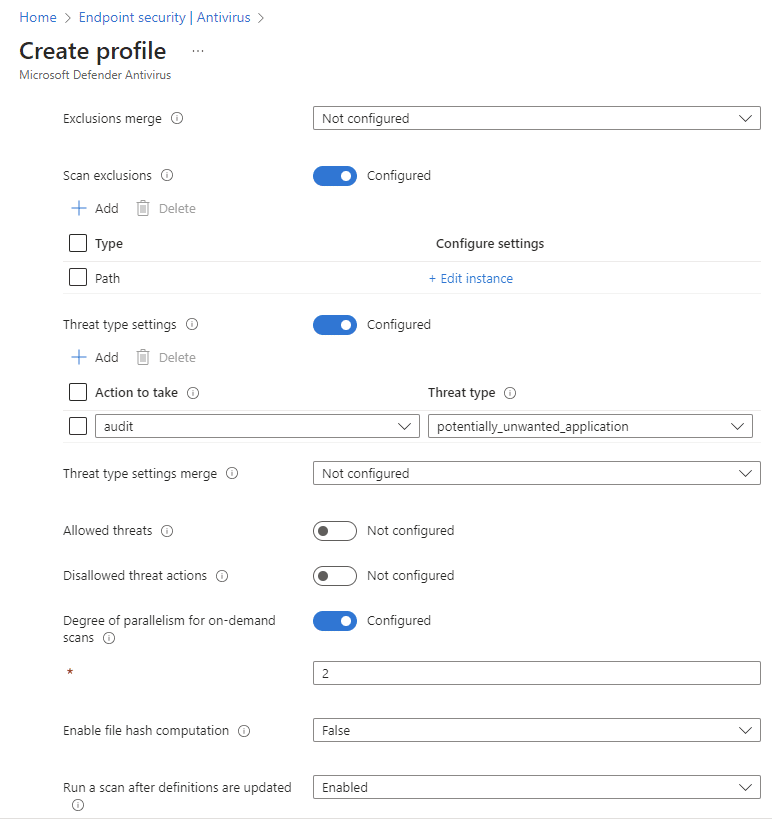
Select Next. On the Assignments tab, assign the profile to a group where the macOS devices and/or users are located, or select the Add all users and Add all devices options. Then select Next. Review the configuration profile. Select create.
User Experience Enrolling a device in Intune & Defender (The manual way)
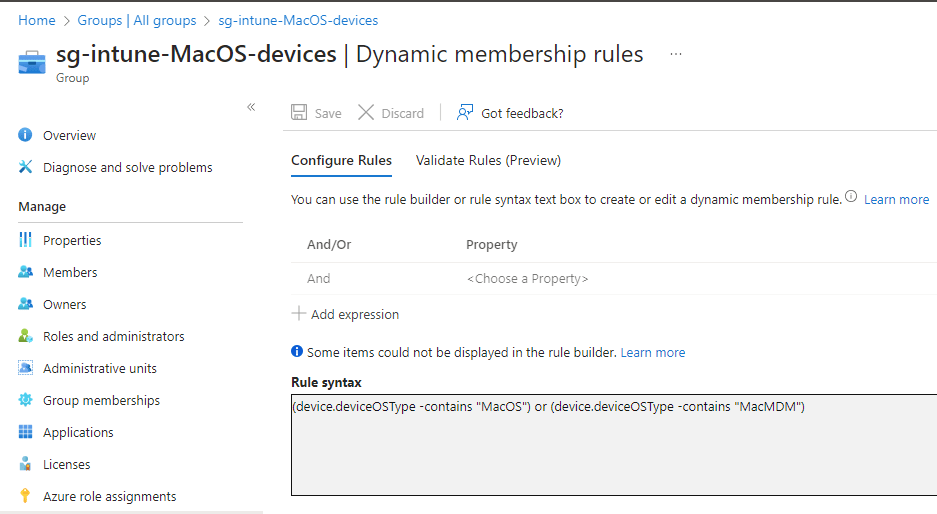
In this part i will show you how to enroll you MacOS device into Intune and Defender by using the Company portal app. I have created a dynamic device group for MacOS devices, this group is assigned to all different policies and configurations.
Get the Microsoft Defender ATP app for MacOS
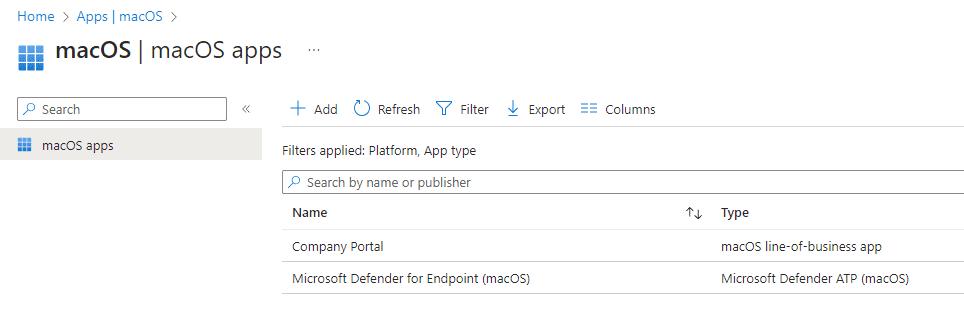
Go to the intune portal – apps – MacOS – Add – select app type – Microsoft Defender for Endpoint – MacOS

Click Select – Next – Assign the app to your desired group(s) – Create
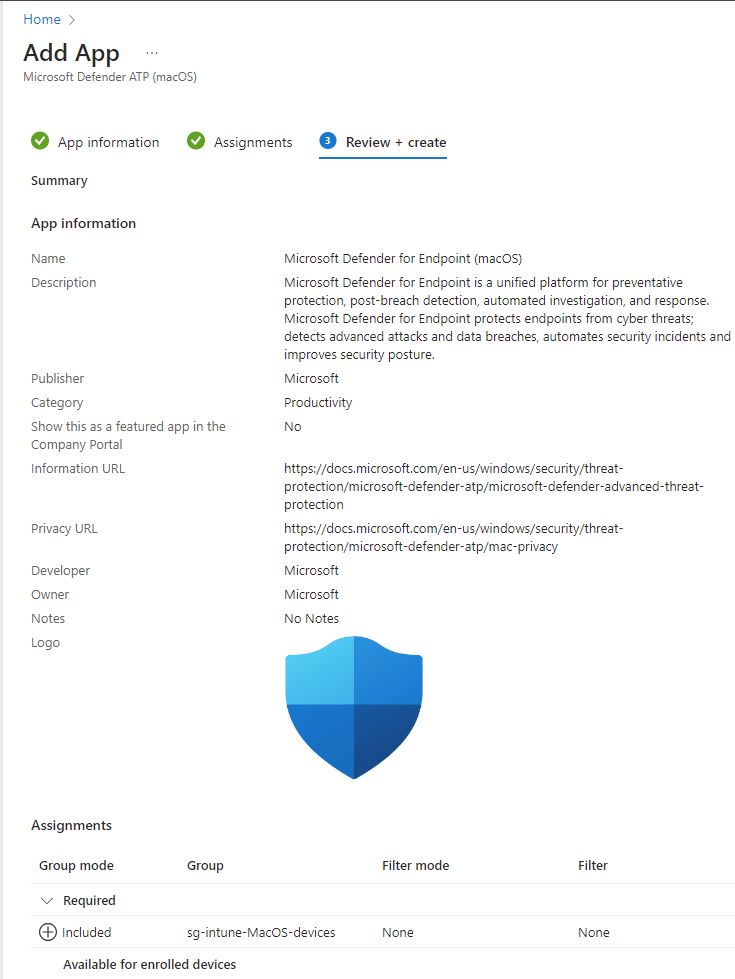
You will see the app in the list op apps for your Mac
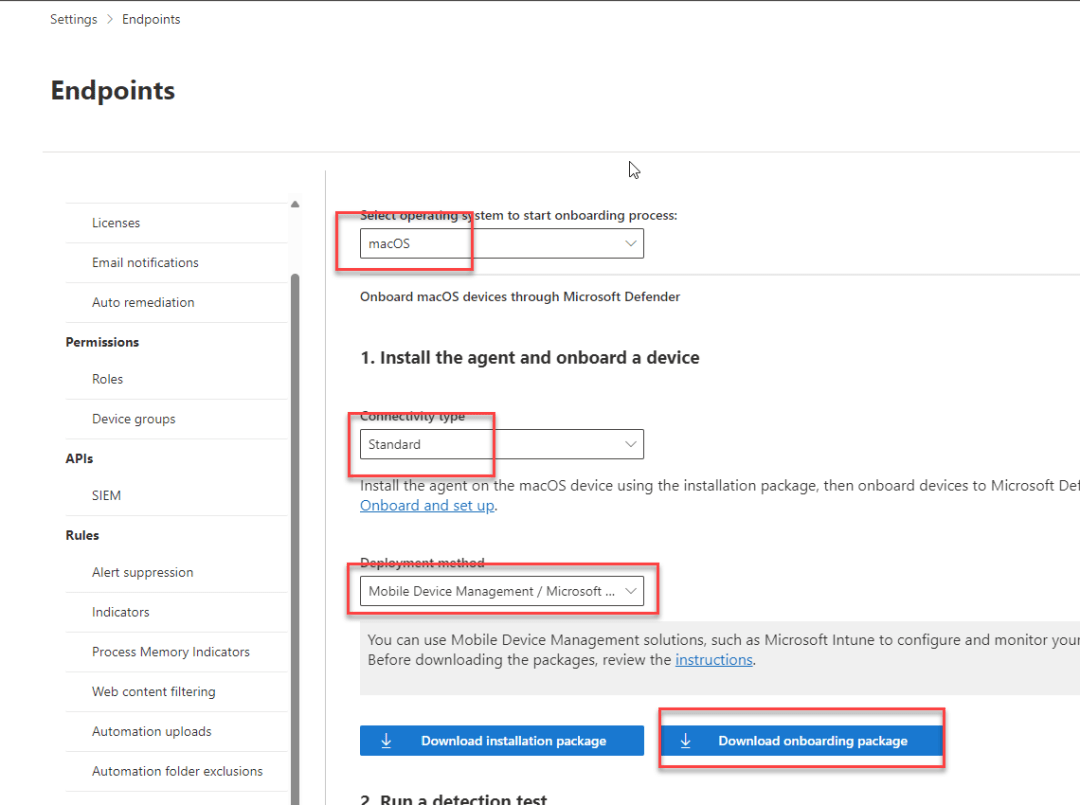
Get the Microsoft Defender onboarding package for MacOS
To download the onboarding packages from Microsoft 365 Defender portal:
- In the Microsoft 365 Defender portal, go to Settings > Endpoints > Device management > Onboarding.
- Set the operating system to macOS and the Connectivity type to standard and the deployment method to Mobile Device Management / Microsoft Intune.
This profile contains license information for Microsoft Defender for Endpoint.
To deploy the onboarding package:
- Under Configuration profiles, select Create Profile.
- Under Platform, select macOS.
- Under Profile type, select Templates.
- Under Template name, select Custom.
- Select Create.
- On the Basics tab, Name the profile e.g. MacOS – Onboarding Package
- Select Next.
- On the Configuration settings tab, enter a Custom configuration profile name e.g. Onboarding Package
- Deployment Channel: Device Channel (we are going to scope all Defender policies on device groups)
- Configuration profile file: Browse for the downloaded file
- On the Basics tab, Name the profile e.g. MacOS – Auto Update
Install the Company Portal app – You can skip this if you have enrolled your device with Apple Business Manager
- Go to Enroll My Mac. and click Allow
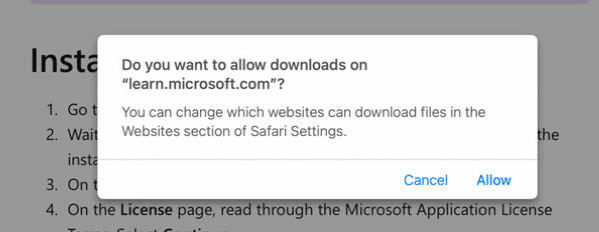
- Wait while the Company Portal installer .pkg file downloads. Open the installer when it’s ready.
- On the Introduction page, select Continue.
- On the License page, read through the Microsoft Application License Terms. Select Continue.
- Select Agree to agree to the terms of the software license agreement.
- On the Installation Type page, select Install.
- Enter your device password or registered fingerprint. Then select Install Software.
- Wait for Company Portal to finish installing.
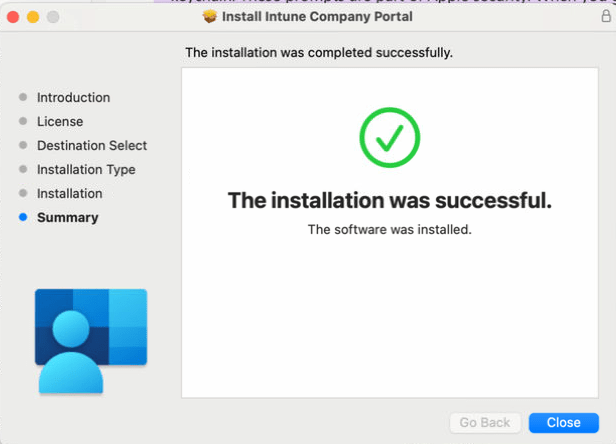
- Open the Company Portal app.
Microsoft AutoUpdate might open after enrollment and update your Microsoft software. After all updates are installed, open the Company Portal app. For the best setup experience, install the latest versions of Microsoft AutoUpdate and Company Portal.
Enroll your Mac -You can skip this if you have enrolled your device with Apple Business Manager
- Sign in to the Company Portal app with your work or school account. (Approve your MFA)
- On the Set up access page, select Begin.
- Review the privacy information. Then select Continue.
- On the Install management profile page, select Download profile.
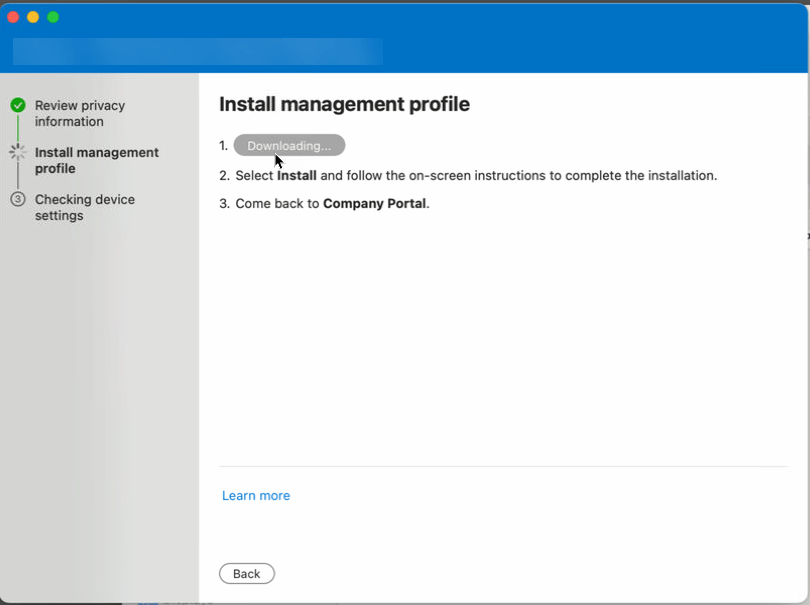
- Your macOS system settings open in a new window. The management profile you just downloaded is shown.
- Select the profile to open it.
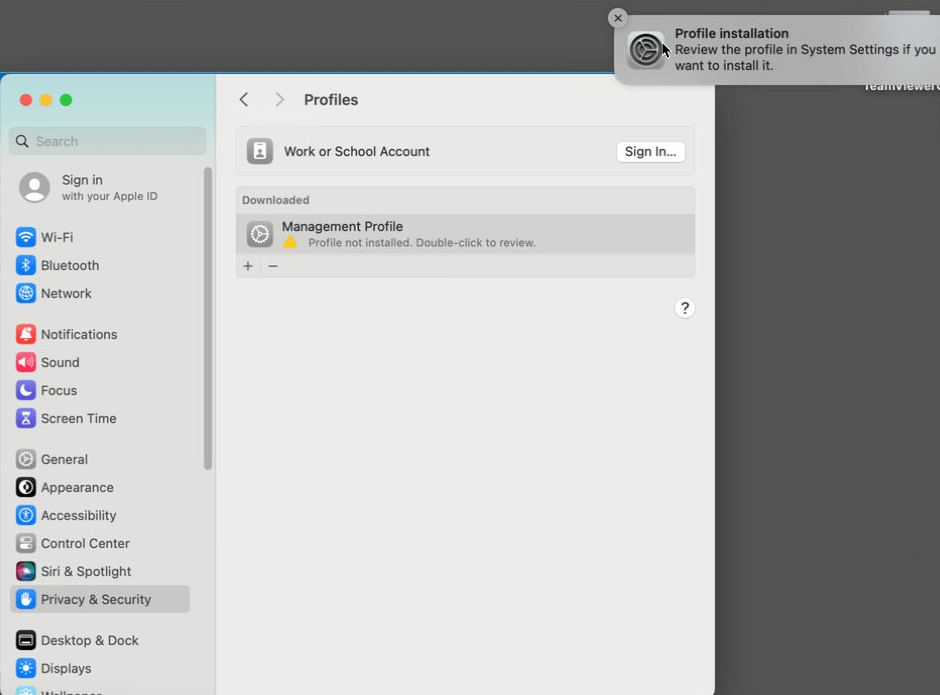
-
- Select Install…
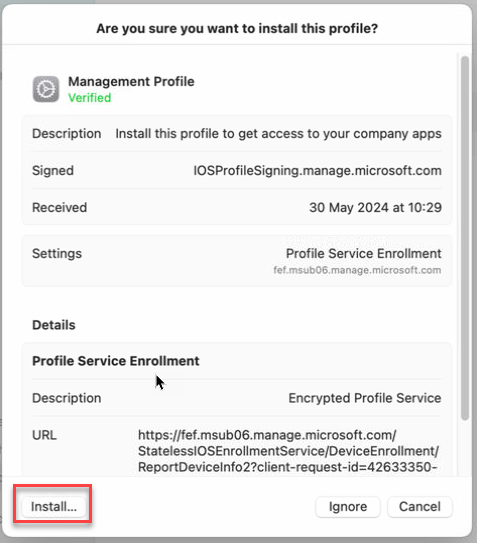
-
- When asked to confirm installation, select Install.
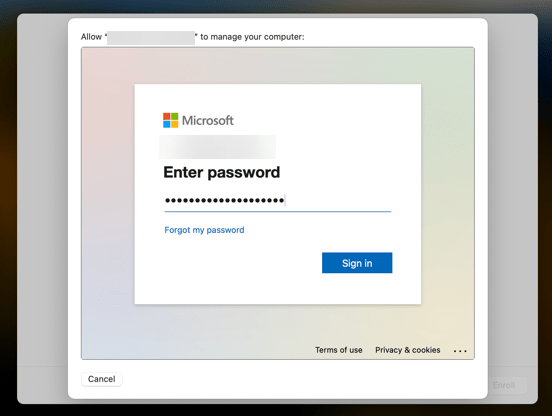
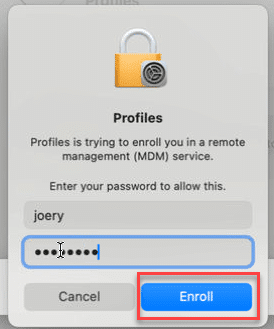
- Enter your device password to allow the profile to enroll your device. Then select Enroll.
- Wait while the management profile installs and then enrolls your device.

- Return to the Company Portal app and verify that there’s a green checkmark next to Install management profile.

- Your organization may require you to update your device settings. On the Checking device settings page, review the list of settings you need to change. Select How to resolve this to view related help documentation in a web browser.
- After you make all changes, select Retry. Wait while Company Portal rechecks your device settings.
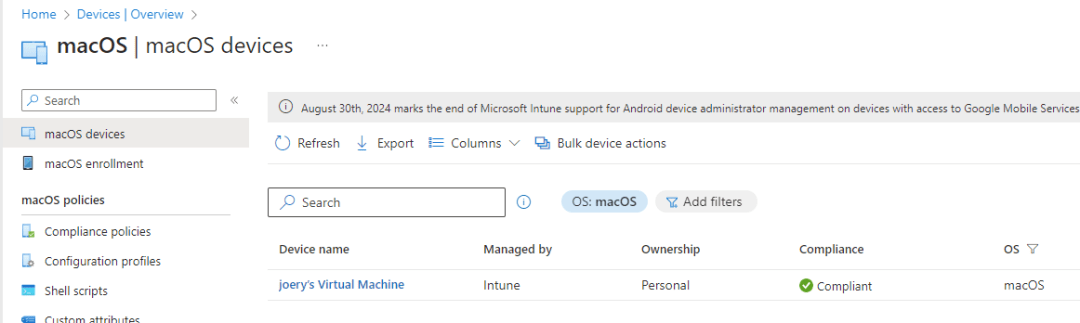
After some time you can check the Intune portal if your device is there, almost immediately my devices shows up as compliant.
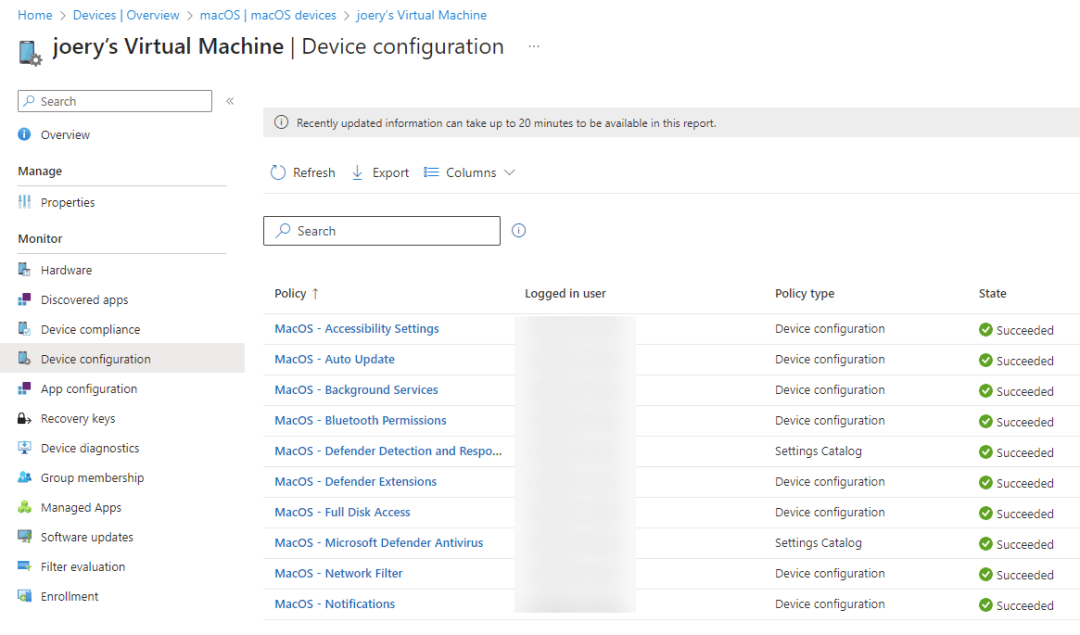
A few minutes later my device is getting al its configuration profiles which we have configured in the previous steps
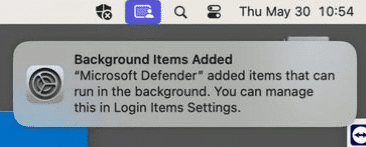
After a few minutes you will receive a pop-up and notice the Defender icon.
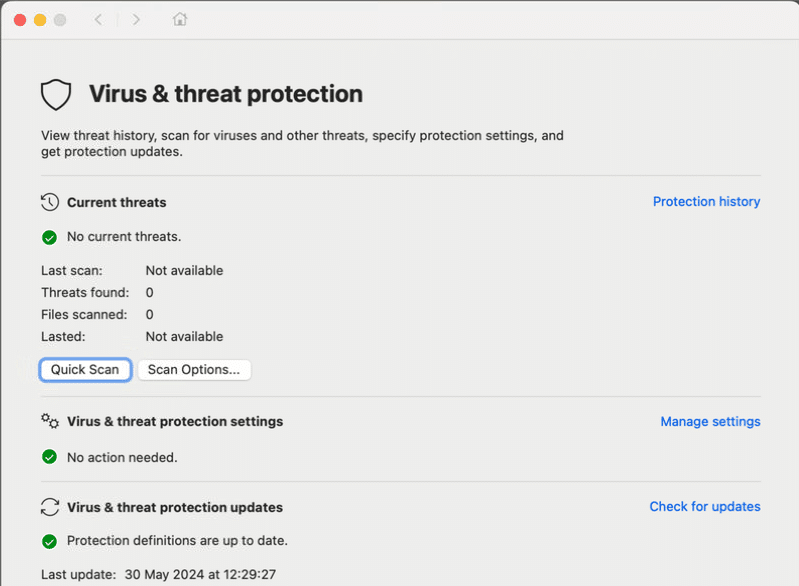
When you open the Defender app and you see this all is good.
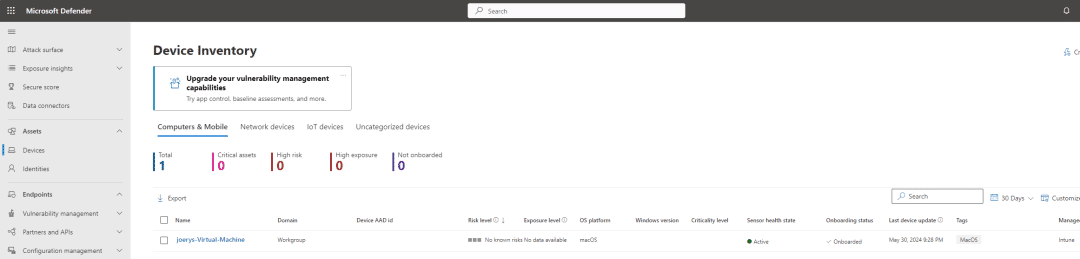
Now you can go to the security portal – Assets – Devices and you will see your device listed in the Defender portal
And that’s it, congratulations you have just enrolled your Mac in Intune and onboarded it in Defender.
This concludes the setup of Microsoft Defender for MacOS. Now let’s dive into some other cool stuff in part 2.