If you want to give users access to a specific folder in SharePoint without granting them access to the entire site, there is a secure way of doing it. I’ve gone through the process taking screenshots so I can demonstrate the entire series of steps in this post.
To give access to a specific folder in SharePoint:
- Navigate to Office.com, sign in using your Microsoft credentials, and open SharePoint
- Open the site where the folder is contained
- Click Site contents and locate the document library the folder’s stored in
- Locate the folder, select it with your cursor, and click the Share button
- Select who you want to share the folder with and their permissions, then click Apply
- Specify the users you’re sharing with, type a message (optional), then click Send
It’s a relatively simple process, but below I’ve demonstrated each step with screenshots. Also, I’ll explain how view and edit permissions differ and what they let users do — they’re not as simple as they might first seem, and it’s important to understand how both work so you can keep your organization’s data secure.
We’ve also created a video that walks you through the steps of giving access to a specific folder in SharePoint. You can watch the video here:
Step-by-step (with screenshots): How to give access to a specific folder in SharePoint
Giving access to a specific folder in SharePoint is a fairly simple process, but you have to be careful to protect organization data — which I’ll explain on step 5. However, here are the steps for sharing a specific folder in SharePoint Online.
To give access to a specific folder in SharePoint:
- Navigate to Office.com, sign in using your Microsoft credentials, and open SharePoint
- Open the site where the folder is contained
- Click Site contents and locate the document library the folder’s stored in
- Locate the folder, select it with your cursor, and click the Share button
- Select who you want to share the folder with and their permissions, then click Apply
- Specify the users you’re sharing with, type a message (optional), then click Send
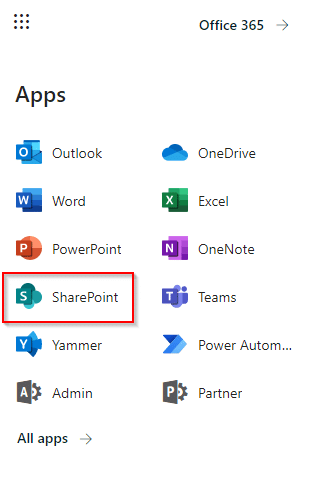
1. Navigate to Office.com, sign in using your Microsoft credentials, and open SharePoint
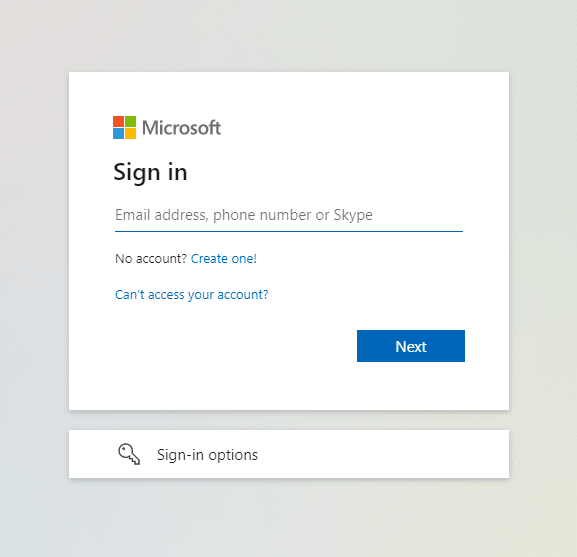
Firstly, you want to navigate to Office.com and log in using your Microsoft 365 credentials. These are likely the credentials you use to sign into your work device.
Once you’re logged in, open up SharePoint. You can easily open up the SharePoint application using the app launcher and selecting SharePoint.
2. Open the site where the folder is contained
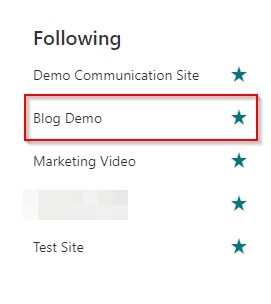
In my case, I’m going to demonstrate the process using a folder stored in our site ‘Blog Demo’.
3. Click Site contents and locate the document library the folder’s stored in
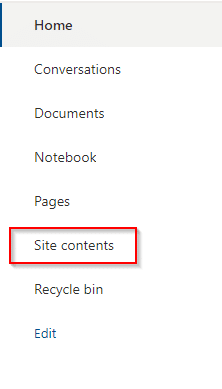
If you have numerous document libraries, click Site contents as shown on the screenshot above. Using site contents, you can — as the name suggests — see the entire contents of your SharePoint site on one page.
Locate the document library that the folder you’re wanting to share is stored in and open it up by clicking on it. If you have just the one document library, you can simply click Documents (also seen on the screenshot above).
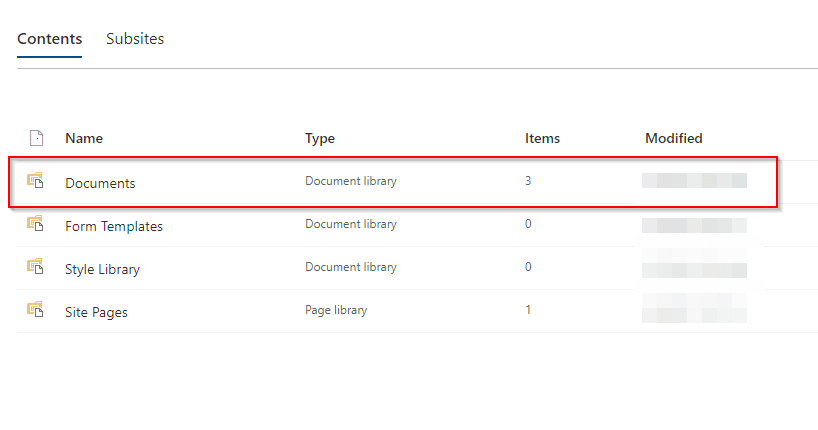
If you don’t have more than one document library, it’s often worthwhile having numerous. For example, if you use one SharePoint site for your entire organization, you can create a document library for each department and restrict access so only users in that department can access that particular document library.
4. Locate the folder, select it with your cursor, and click the Share button
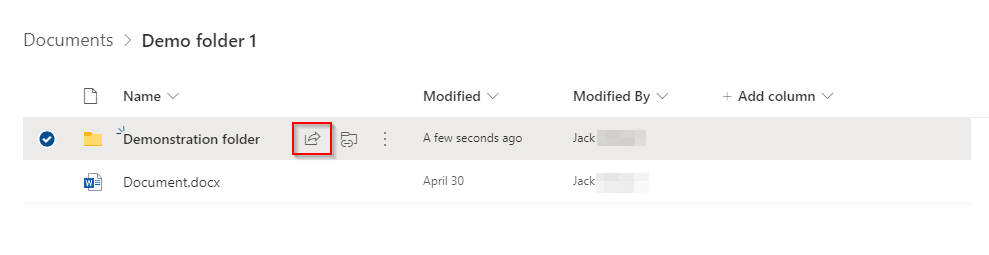
Once you locate the folder, simply select it with your cursor. When you select the folder, the Share button appears. I’ve highlighted it in the screenshot above, because it’s easily missed if you’re unsure where to look!
5. Select who you want to share the folder with and their permissions, then click Apply
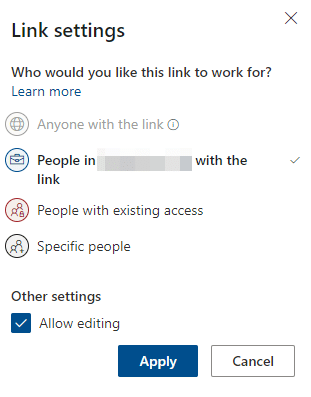
When you first click the Share button, here’s what you’ll see:
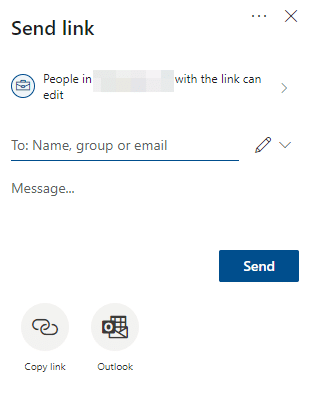
The default setting is that anyone within your organization can use the link and edit the folders and files within the folder you’re sharing — although this does depend on whether your organization has changed the default option.
Depending on what you’re sharing, letting anyone within your organization use the link and edit the items in the folder might be a big risk. You can click where it says “People in…” to open up the link settings menu. The link settings menu lets you decide who the link works for and, equally importantly, what those users can do with the content within the folder.
You have 4 options to choose from when deciding who the link will work for:
- Anyone with the link (if Anyone with the link is grayed out and that’s the option you want, read my blog post on changing external sharing settings for SharePoint sites by clicking here)
- People within your organization
- People with existing access (i.e., people who are already site members)
- Specific people
Specific people is by far the most secure option because the folder will be shared only with the people you specify. Other people cannot use the link, even if the specified person sends it on to them — i.e., the specified person can send the link to user X, but if user X clicks the link they’ll be denied access.
You also need to decide what the people you share the folder with can do — specifically you have to choose between two options: view and edit. The table below says what people can and can’t do with the folder’s content if you uncheck the ‘Allow editing’ box — i.e., users have ‘can view’ permissions.
| Can view: What users can do | Can view: What users can’t do |
|---|---|
| Download files and folders (note: files can then be sent) | Modify or delete files and folders |
| Copy files and folders (link only usable by people with existing access — i.e., site members) | Rename files and folders |
| Share files and folders (only sharable with people with existing access — i.e., site members) | Access anything else on the SharePoint site, including the same library |
| Access folders and view items | |
| Can sync folders and files to desktop |
Depending on the type of files you’re storing in the folder you’re sharing, it might be concerning that even view-only users can download files and then send them to anyone. However, you can disable the ability to download files from SharePoint if that is a concern. My blog post How to disable downloading of files in SharePoint document library gives a step-by-step process for preventing the download of files.
The table below explains what users can and can’t do if you leave the ‘Allow editing’ box checked — i.e., users have ‘can edit’ permissions.
| Can edit: What users can do | Can edit: What users can’t do |
|---|---|
| Download files and folders (note: files can be sent) | Access anything else on the SharePoint site, including the same library |
| Upload files and create folders | |
| Modify or delete files and folders | |
| Move and copy files and folders | |
| Rename files and folders | |
| Share files and folders (only sharable with people with existing access — i.e., site members) |
In other words, just choose with caution according to the folder and the files within. If the folder doesn’t contain confidential data of any kind, it perhaps isn’t a big deal. That being said, if you do have files you don’t want to share with people — other than the people you specify — be careful about which sharing option you choose.
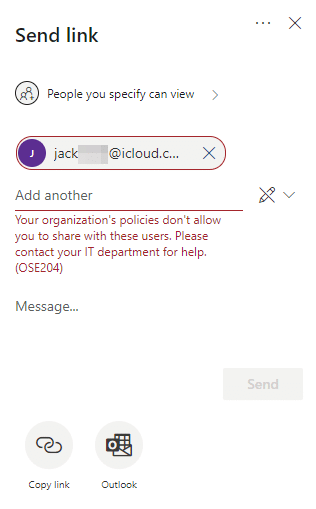
6. Specify the users you’re sharing with, type a message (optional), then click Send
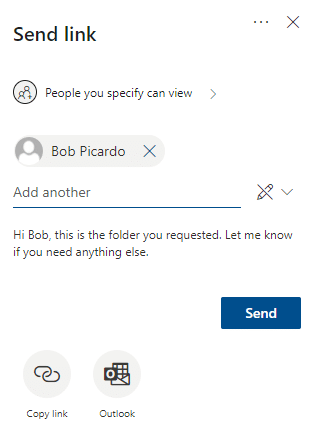
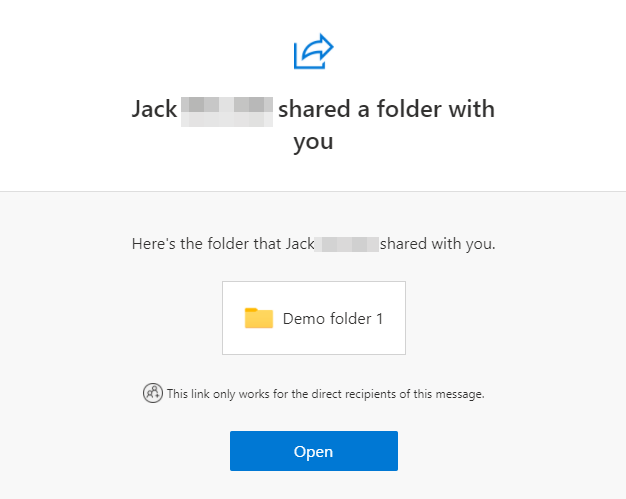
Once you click Send, an email containing the link will be sent to the user. The email will look almost identical to the screenshot below, depending on whether you wrote a message or not.
If you are getting the message “Your organization’s policies don’t allow you to share with these users. Please contact your IT department for help.” 99% of the time, this is because you’re trying to share the folder with an external user. If this is the case, you’ll need to check the external sharing settings at both site and organization level. I explain how you can check the external sharing settings at site and organization level in my blog post Can I use SharePoint to share files with external users? Which you can read by clicking here.