Hate it or love it; email is everywhere. The protocol to move that email everywhere is SMTP, and the SMTP “routers” are SMTP relays.
Not a reader? Check out this tutorial’s related video.
Setting up SMTP relays varies across systems, but if you have Office 365 as your mail service provider, your options are limited. Setup can be complicated and error-prone, especially for devices that are not TLS capable.
Note that sending email through Office 365 does not require an SMTP relay. You can have clients send emails directly to Office 365 without adding an SMTP relay that does not require any configuration changes. To learn what they are, read How to Send Office 365 Direct Send/SMTP Client Submission Email (PowerShell).
Prerequisites
These are the requirements before you can proceed.
- An Office 365 Subscription. If you do not have this yet, you can Sign up for an Office 365 E5 trial subscription.
- A Windows 10 computer with PowerShell v5.1
- A public static IP address. You can still create an SMTP relay in Office 365 even without this, but you might not test.
- TCP port 25 access from a client to your Office MX endpoint
- A valid SSL certificate. This certificate could be a wildcard certificate (eg. *.yourdomain.com) issued by third-party certificate authorities like LetsEncrypt, Digicert, etc. Note, that you cannot use self-signed certificates or certificates issued by an internal PKI because they are not supported. (only required for TLS connections)
To set up an SMTP relay, you must first create a connector in Office 365 to accept SMTP transactions. This connector will receive SMTP relay transactions from the application or device.
Before you attempt to create a connector, be sure your account has the proper Exchange Online permissions. Ensure your account is a member of the Organization Management group.
There are two ways to create a connector. You can either use the Exchange Admin Center or PowerShell. Both options will perform the same task. It’s up to you which one to use. In this article, we’ll cover both. We’ll also cover creating both non-TLS and TLS connectors.
Create a Non-TLS Connector using the Exchange Admin Center
Let’s start by creating a non-TLS connector. You’ll first learn how to do this via the Exchange Admin Center. You can configure many Office 365 SMTP settings in the Exchange Admin Center.
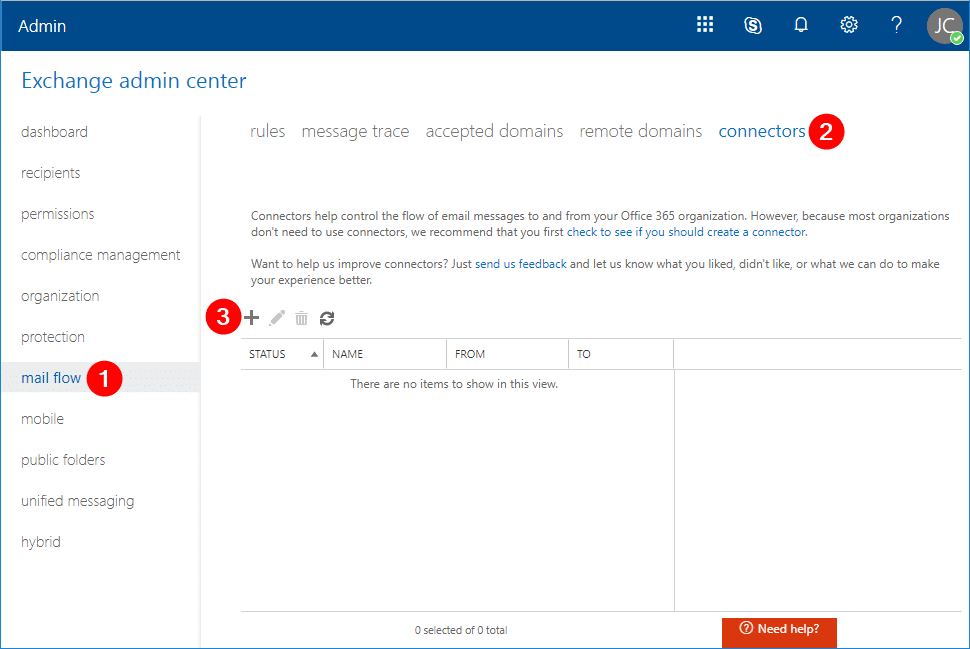
Once logged in, click on mail flow (1) –> connectors (2) –> New (3). The New Connector window will pop-up.
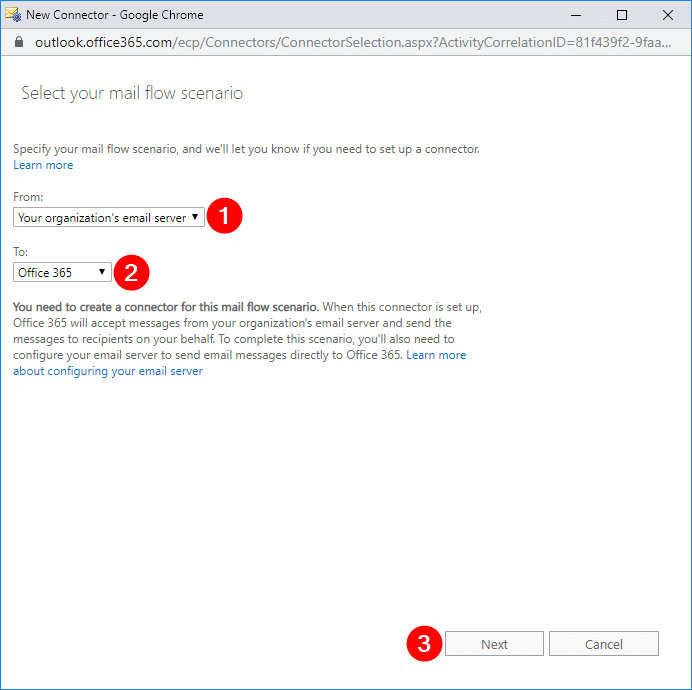
In the New Connector window, select From: Your organization’s email server (1), select To: Office 365 (2), click Next (3).
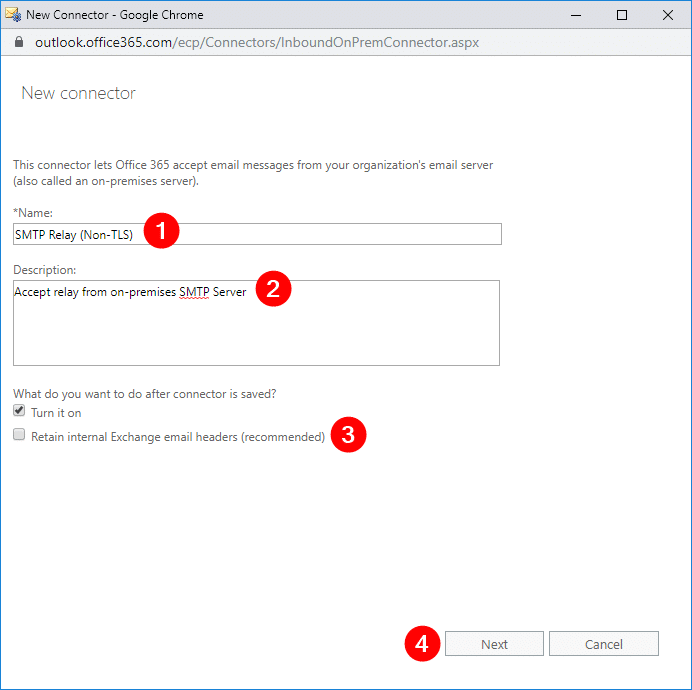
In the next window, enter the name SMTP Relay (Non-TLS) or choose your own name (1), type in the description Accept relay from on-premises SMTP Server (2), uncheck Retain internal Exchange email headers (recommended) (3) and click Next (4).
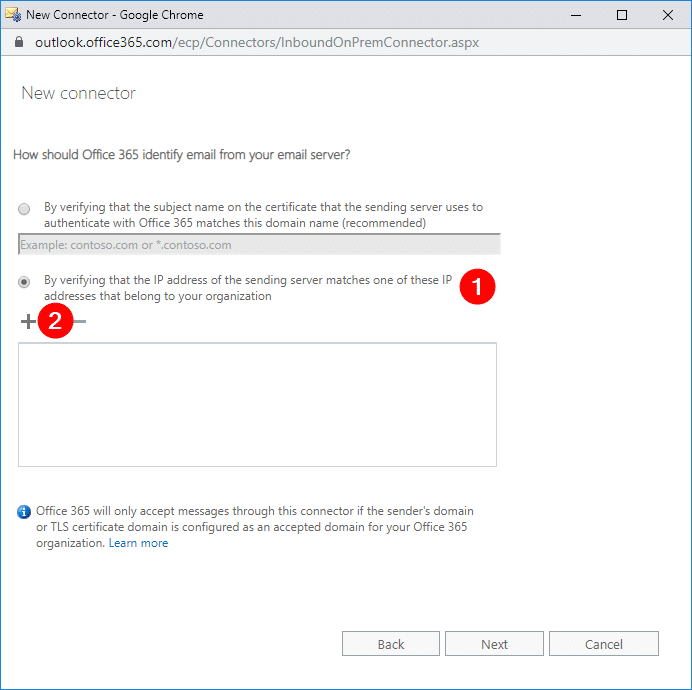
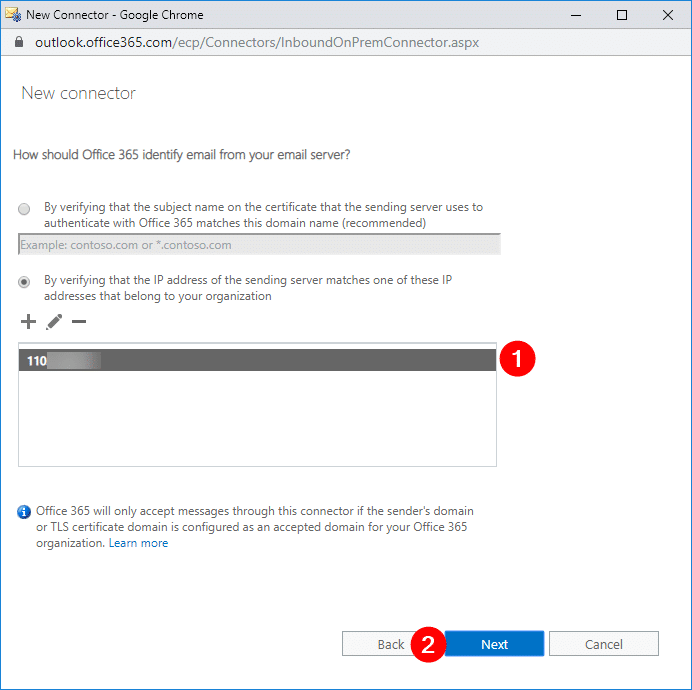
In the next window, select By verifying that the IP address of the sending server matches one of these IP addresses that belong to your organization (1), and click Add (2).
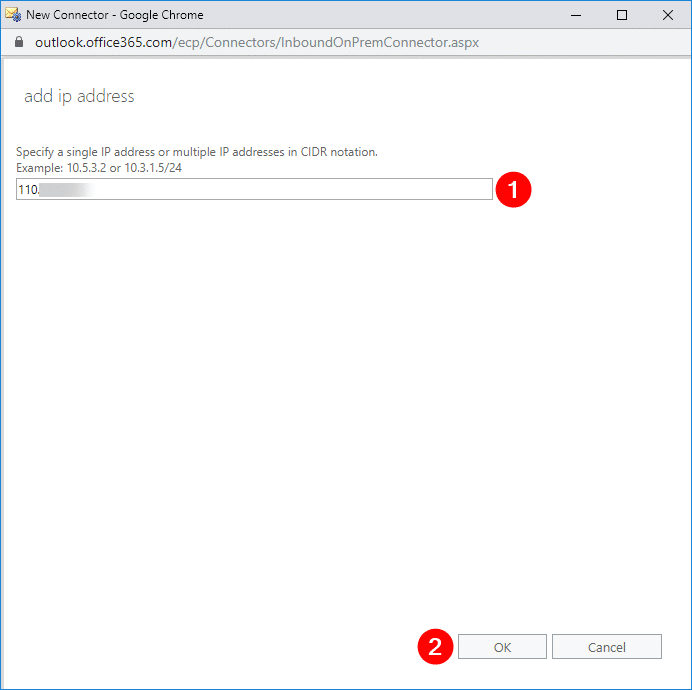
In the new pop-up window, type in your public IP address (1), then click OK (2). This should bring you back to the previous window.
Verify that the IP address is added in the list (1), then click Next (2).
Then you will see the summary of the changes that you need to implement. Work on the necessary changes first. If there’s none, you can go ahead and click Save.
Back in the Exchange Admin Center, you can now confirm that the new connector has been created.

You should now have a non-TLS connector created.
Create a TLS Connector using Exchange Admin Center
Creating a TLS connector is similar to creating a non-TLS connector. Like how you created a non-TLS connector, head back to the New Connector wizard and use the same mail flow scenario. I’ll be using a a connector name of SMTP Relay (Non-TLS) but yours may vary.
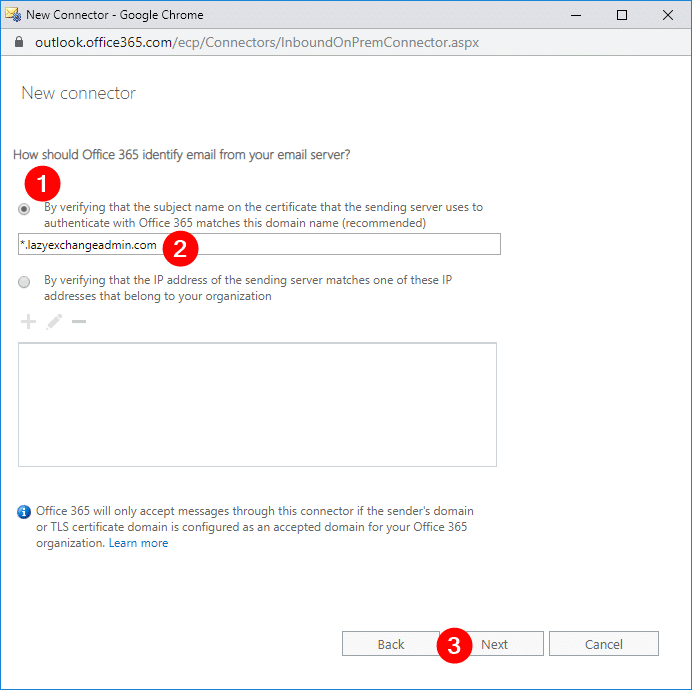
In the window to define Office 365 should identify email from your email server, select:
- By verifying that the subject name on the certificate that the sending server uses to authenticate with Office 365 matches this domain name (recommended) (1)
- then type in the subject of the SSL certificate (2)
- and click Next (3).
Again, you will see a summary of necessary changes. Work on them first before processing. If there’s none, you can click the Save button right away.
Create a Non-TLS Connector using PowerShell
If creating Office 365 connectors via a GUI isn’t your thing, you can always create them via PowerShell as well. To do so, first ensure you are connected to Exchange Online PowerShell.
To create the connector, you’ll need to run the New-InboundConnector command. This command requires a few different parameters so I’ll set up these parameters ahead of time using PowerShell splatting.
I’ve added some comments in the code itself below but here’s a breakdown of each parameter and what it’s used for:
- Name – This is the name of the connector.
- ConnectorType – This is the type of connector. This value can be
OnPremisesorPartner. In this scenario, the appropriate type isOnPremises. - SenderDomains – This can be a list of the allowed sender domains. Only verified domains for your tenant are valid choices. The asterisk (
*) means that you are allowing all of your verified domains to relay messages using this connector. If you only need to allow certain sender domains, change this value to an array of the domains. (eg.'domain1.com','domain2.com') - SenderIPAddresses – This is your public IP address. Do not forget to change this before execution.
- RestrictDomainsToIPAddresses – When this value is set to
$true, it indicates that this connector will only accept emails from sender addresses coming from your allowed public IP address.
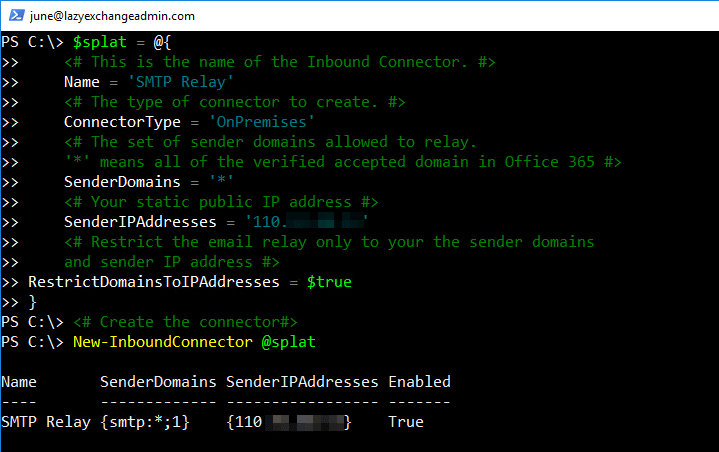
$splat = @{
    ## Define the name of the connector.
    Name = 'SMTP Relay'
    ## Defined the type of connector to create.
    ConnectorType = 'OnPremises'
    ## The set of sender domains allowed to relay.
    SenderDomains = '*'
    ## Change this to your actual public IP address.
    SenderIPAddresses = '110.x.x.x'
    ## Restrict the email relay only to your sender domains and sender IP address
    RestrictDomainsToIPAddresses = $true
}

## Create the connector
New-InboundConnector @splat
When executed, you should see something similar to below.
Create a TLS Connector using PowerShell
Assuming you’re connected, run the code below to create a TLS connector with PowerShell as well. You can see below many parameters are identical to creating a non-TLS connector. The required parameters that differ from creating a non-TLS connector are:
- RequireTLS – This specifies that all messages received by this connector require TLS transmission
- TlsSenderCertificateName – This is the name (or subject) of the certificate used by the sender.
$splat = @{
    ## Define the name of the connector.
    Name = 'SMTP Relay (TLS)'
    ## The type of connector to create.
    ConnectorType = 'OnPremises'
    ## The set of sender domains allowed to relay.
    SenderDomains = '*'
    ## Require TLS
    RequireTLS = $true
    ## Subject/Name of the SSL certificate
    TlsSenderCertificateName = '*.YourDomain.com'
}

## Create the connector
New-InboundConnector @splat
Execute the above code and to have a TLS connector created and ready to receive email.
Testing the Office 365 SMTP Relay Connector with PowerShell
After creating the connector, prepare to test it out. The easiest way to do that is to use PowerShell. In this section, we’ll create some PowerShell scripts to allow you to easily ensure the connector is working properly.
Before you get started testing, first ensure you know what the MX endpoint URL is for your Exchange Online domain. If you don’t know how to find your MX endpoint URL, log in to the Office 365 Admin Portal. Click on Setup, select Domains, click the Domain name and copy the MX Points to address or value.
Testing a non-TLS SMTP Relay (IP Address)
Note: This testing must be done from the computer whose public IP address is allowed in the Office 365 SMTP relay setup.
Use the PowerShell code below for testing. Be sure to change the From, To and SmtpServer parameter values to use your own Office 365 SMTP relay settings before running it.
To– Must include one internal domain recipient and one external domain recipient. Don’t forget to change these values to your own.From– Must be changed to your nominated sender address. The domain part of the email address must be one of your tenant’s email domains.SmtpServer– Must be changed to your Office 365 tenant’s MX endpoint.
$mailParams = @{
    SmtpServer = '<tenant>.mail.protection.outlook.com'
    Port = '25'
    From = '[email protected]'
    To = '[email protected]','[email protected]'
    Subject = ('SMTP Relay - ' + (Get-Date -Format g))
    Body = 'This is a test email using SMTP Relay'
    DeliveryNotificationOption = 'OnFailure','OnSuccess'
}

Send-MailMessage @mailParams
Testing a TLS SMTP Relay (Certificate)
Note: You must have the public SSL certificate in PFX format before you can proceed with this test.
Since the TLS SMTP relay requires a certificate, you cannot use the Send-MailMessage PowerShell cmdlet because it does not allow you to select a specific certificate. Instead, use two .NET objects called System.Net.Mail.SmtpClient to define the SMTP parameters, and System.Net.Mail.MailMessage to compose the message.
Below you will find a PowerShell code snippet you can use to test the TLS SMTP relay. Do not forget to change the pfxFile, pfxPass, From, To and SmtpServer values to use your Office 365 SMTP relay settings before running it.
# specify the full path of your PFX certificate
$pfxFile = "C:\Certificate\cert.pfx"
$pfxPass = '<cert password here>'
$pfxBytes = Get-Content -path $pfxFile -encoding Byte -ErrorAction:SilentlyContinue
$X509Cert = New-Object -TypeName System.Security.Cryptography.X509Certificates.X509Certificate2
$X509Cert.Import([byte[]]$pfxBytes, $pfxPass,"Exportable,PersistKeySet")

# Build SMTP properties
$smtpServer = '<tenant>.mail.protection.outlook.com'
$smtpPort = '25'
$smtp = New-Object Net.Mail.SmtpClient($smtpServer,$smtpPort)
$smtp.ClientCertificates.Add($X509Cert)
$smtp.EnableSSL = $true

# Compose message
$emailMessage = New-Object System.Net.Mail.MailMessage
$emailMessage.From = '[email protected]'
$emailMessage.To.Add('[email protected]')
$emailMessage.To.Add('[email protected]')
$emailMessage.Subject = ('SMTP Relay (TLS) - ' + (Get-Date -Format g))
$emailMessage.Body = 'This is a test email using SMTP Relay (TLS)'

# Send the message
$smtp.Send($emailMessage)
If set up the TLS connector is correct, the recipients define via the Add() method should receive the test email.
Validating SMTP Relay Hops using the Message Header
Now you have a functional SMTP relay set up using a local server and Office 365 SMTP relay. All the tests were successful and your devices can send messages to both internal and external recipients. Nice job!
If you are still in doubt and need to confirm whether these messages are going through the Office 365 SMTP relay, you can review the message headers on the received emails.
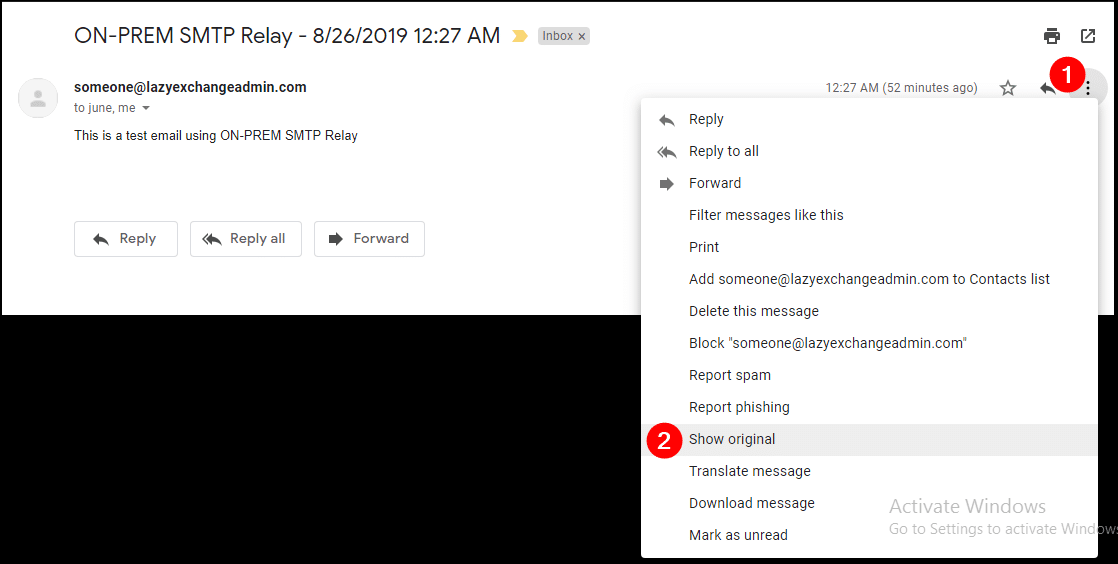
Note: Opening the message headers are varies between different mail clients. The below example is specific to Gmail.
Open the email in Gmail interface, open the message, and click on the three vertical dots (1), then click Show original (2).
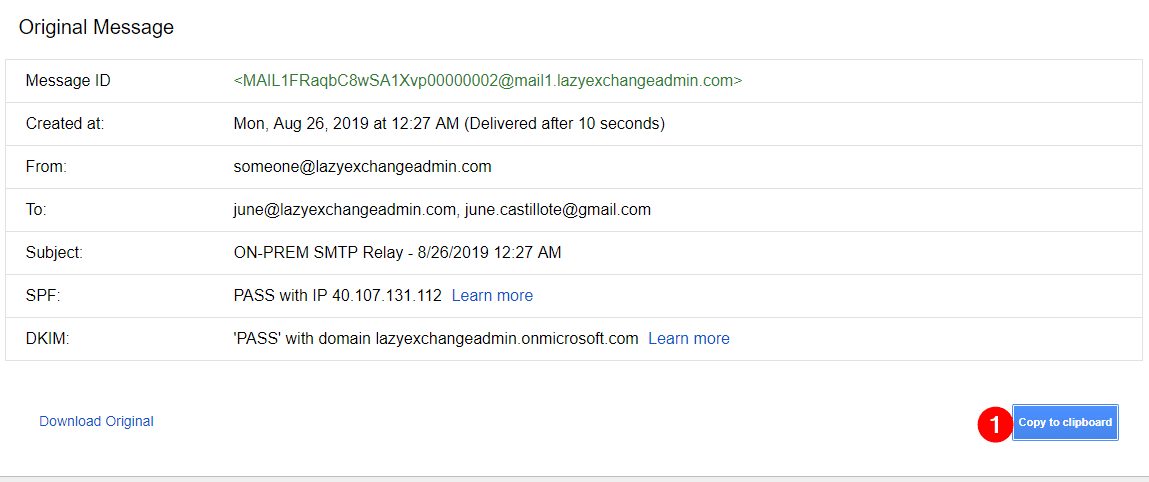
A new page will show the email message headers. Click on Copy to clipboard (1).
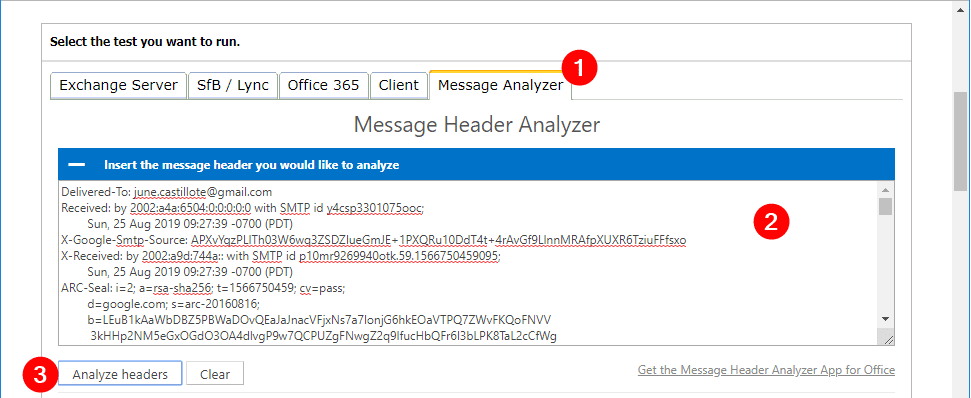
Open a new browser tab and navigate to https://testconnectivity.microsoft.com/.
Go to the Message Analyzer (1) tab, paste the copied data into the box (2), and click Analyze headers (3).
The result of the analysis will be displayed in the table as shown below.
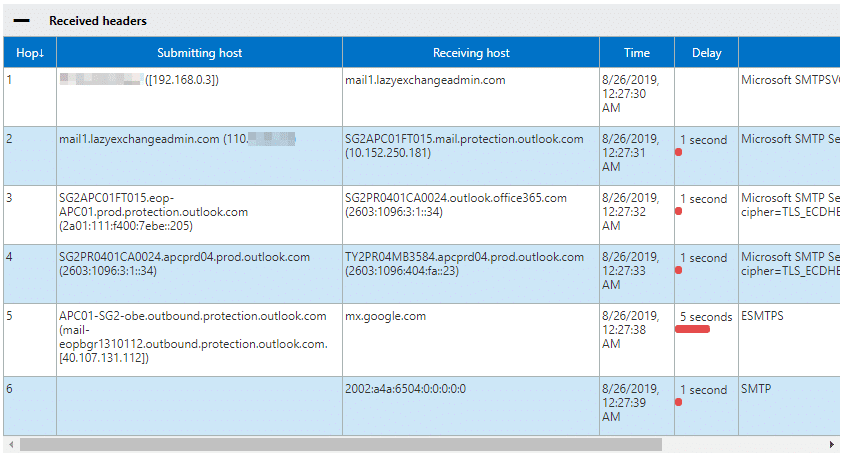
You should see the following workflow in the results above:
- IP address 192.168.0.3 the indicates the origin of the computer.
- On-prem SMTP relay server received the message.
- Exchange Online Protection (EOP) received the message.
- Exchange Online server and re-routed for outbound delivery received the message.
- Office 365 to google.com delivered the message.
Based on the analysis results, you can confirm that the message did pass through the Office 365 SMTP relay as intended.
Summary
In this article, you’ve learned how to create a TLS and non-TLS Office 365 SMTP relay. You also learned how to test and confirm their functionality using different techniques and how to validate the SMTP routes that the message had passed through.