Source: https://lazyadmin.nl/powershell/get-mailbox-permissions-with-powershell/
How do you keep track of mailbox permissions in Exchange Online? Adding new permissions is easy and done quickly, but removing obsolete permissions is often forgotten. To keep track we want to get a report with all mailbox folder permissions.
Mailbox permissions can be set by the Exchange Admin or by the users themself. This makes managing and keeping track of the permissions a real challenge. We will need to gather the permissions from different places and combine them into one clear overview.
With the help of PowerShell, we can easily get the mailbox folder permissions for each user and generate a nice CSV report from it.
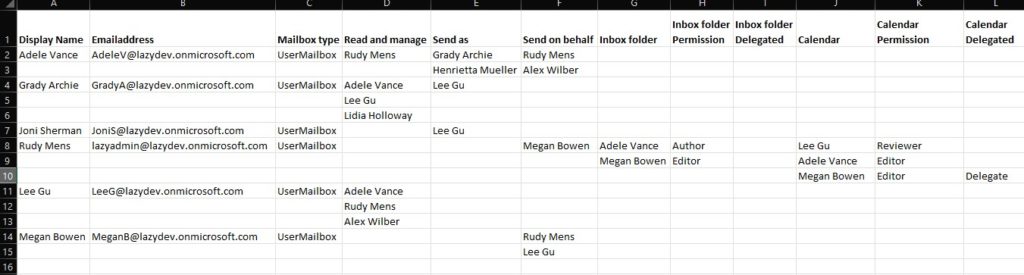
The PowerShell script below exports the following data from user and shared mailboxes to a CSV file:
- Display name
- Primary Emailadres
- Mailbox type
- Read and Manage Permissions
- Send as Permissions
- Send on behald
- Inbox folder permissions (displayname and permission level)
- Calendar permissions (displayname and permission level)
As always, I will first explain the script and different options to you. So you understand how the script works. At the end of the article, you will find a link to the script in my GitHub repository.
Mailbox Permissions
Before we start with the report script, I first want to explain to you where all the different permissions are coming from. Because to get a complete overview of all the mailbox permissions we need to get the permissions from 4 different places.
We have the following permissions that we want to list:
- Read and manage permissions
- Send as permissions
- Send on behalf of permissions
- Inbox folder permissions
- Calendar folder permissions
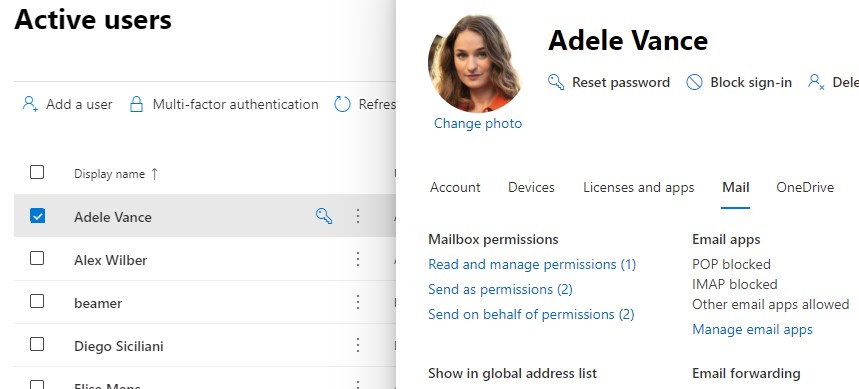
The first 3 permissions can easily be set and viewed through the Microsoft 365 Admin Center, but for the folder permissions, you will need to use the get mailbox folder permissions cmdlet in PowerShell.
Read and Manage permissions
Read and manage are basically full access permissions. To view all users that have access to the mailbox we will need to use the cmdlet Get-EXOMailboxPermissions. We want to make sure that we don’t list the default system permissions, so we filter them out.
Get-EXOMailboxPermission -Identity <userprincipalname>| where { -not ($_.User -match "NT AUTHORITY") -and ($_.IsInherited -eq $false)} | ftSend as Permissions
To view the send as permission in PowerShell we will need to use the Get-EXORecipientPermissions cmdlet. Also here we want to filter out the default permissions.
Get-EXORecipientPermission -Identity <userprincipalname> | where { -not ($_.Trustee -match "NT AUTHORITY") -and ($_.IsInherited -eq $false)} | ftSend on Behalf permissions
The send on behalf permissions is part of the Get-EXOMailbox cmdlet. You will have to specify the property GrantSendOnBehalfTo to view the permissions
Get-EXOMailbox -Identity <userprincipalname> -Properties GrantSendOnBehalfTo | select UserPrincipalName, DisplayName, PrimarySMTPAddress, GrantSendOnBehalfTo, ForwardingSMTPAddress | ft
Get Mailbox Folder Permissions
The last permissions that we want to list in our report are the folder permissions. These are a bit tricky because we will need to give up the correct folder names. For most of you, these will be the default English folder names, like inbox and calendar.
But in Dutch, it’s for example “Postvak in” and “Agenda”. If you are not sure what the correct folder names are in your tenant, then list all the folders of a single mailbox:
Get-EXOMailboxFolderStatistics -identity <userprincipalname> | ft

If you have found the correct folder names for your tenant we can use the following PowerShell cmdlet to get the mailbox folder permissions
$identity = <userprincipalname>
$folder = Inbox  # Or Calendar for example

Get-EXOMailboxFolderPermission -Identity "$($identity):\$($folder)" | where { -not ($_.User -match "Default") -and -not ($_.AccessRights -match "None")}
So as you can see to get all the mailbox permissions we will need to look into different places and combine all the data.
How to use the Mailbox Permission Script
Getting all mailbox permissions in a larger tenant can take some time because we need to get the permissions from 4 different places. So I have added a couple of parameters to the script so you can fine-tune the report to your needs.
To run the script you will always need to enter your email address for authentication with the-adminUPN parameter. Without any other parameter, the script will generate a report with:
- All mailboxes (shared and user)
- Include inbox and calendar folder permisssions
- Get display names for the permissions
- Store the report in the script root location ( .\mailboxsizereport-nov-30-2021.csv)
.\MailboxPermissionReport.ps1 -adminUPN [email protected]
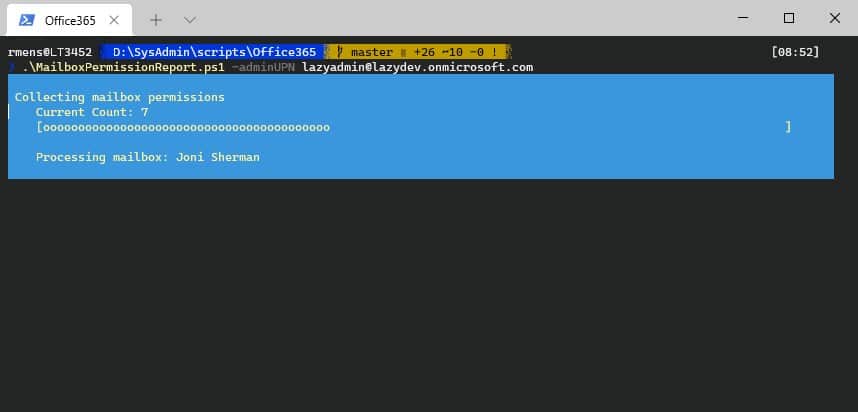
As you can see the script will show a progress bar based on the number of mailboxes its processing.
Get Shared Mailbox Permissions
There are a couple of options when it comes to shared mailboxes. By default, they are included in the report. But you can also get only the shared mailboxes permissions or leave them out of the PowerShell report with the parameter -sharedMailboxes:
# Get only the shared mailboxes
.\MailboxPermissionReport.ps1 -adminUPN [email protected] -sharedMailboxes only

# Get only the user mailboxes
.\MailboxPermissionReport.ps1 -adminUPN [email protected] -sharedMailboxes no

# (Default) Get user and shared mailboxes
.\MailboxPermissionReport.ps1 -adminUPN [email protected] -sharedMailboxes include
Mailbox Folder Permissions
By default, the script will list all the mailbox folder permissions. These are the permissions that apply only to the calendar or inbox folder for example. Especially calendar is a mailbox folder where a lot of permissions are applied.
But as mentioned, each request takes extra time. So if are not interested in the mailbox folder permissions you can leave them out with the parameter -folderPermissions:
.\MailboxPermissionReport.ps1 -adminUPN [email protected] -folderPermissions:$false
The columns are still listed in Excel though, but they are all empty.
Get Permissions for a Single or Selection of Users
You can also request only the mailbox permissions of a single mailbox or a selection of mailboxes. This allows you to check only the mailbox permission of the management mailboxes for example:
.\MailboxPermissionReport.ps1 -adminUPN [email protected] -UserPrincipalName [email protected],[email protected],[email protected]
You can use any of the following options for the UserPrincipalName parameter, as long as the value uniquely identifies the mailbox:
- User ID or user principal name (UPN)
- Name
- Alias
- Distinguished name (DN)
- Domain\Username
- Email address
Use CSV File with Users
I have added the option to use a CSV file with users that you want to get the mailbox permissions from. This way you can easily get the permissions from only a selection of users without the need to type all the userspricipalnames in the command line.
.\MailboxPermissionReport.ps1 -adminUPN [email protected] -csvFile "c:\temp\csvfile.csv"
Make sure that the CSV file is comma-separated, has headings, and contains a field UserPrincipalName. For example:
UserPrincipalName,Display Name
[email protected],Adele Vance
[email protected],Grady Archie
[email protected],Joni Sherman
Show Display Names or Not
The different mailbox permissions cmdlets that we use in the script all return the userprincipal names of the users that have permissions. For example, if we look up the Send as permissions, the users that have to send as permissions are listed in the Trustee column.

Listing all users as [email protected] in your report doesn’t really make it readable. So by default, we will look up the display name of each user. But that takes a bit extra time.
If you want to run the report against a large group of users, you might want to disable this feature. What the script then does, is remove that domain part from the username, so you get only GradyA in your report for example.
.\MailboxPermissionReport.ps1 -adminUPN [email protected] -displayNames:$false
CSV Export Path
You can also specify the location and file name of the output file with the -path parameter. By default, the CSV file will be saved in the script root location with the name MailboxPermissionReport-MM-dd-yyyy.csv
.\MailboxPermissionReport.ps1 -adminUPN [email protected] -path c:\temp\permission.csv
PowerShell Get Mailbox Permissions Script
To get the mailbox permissions with PowerShell we will need to use the Exchange Online module. We are going to use the Exchange Online v2 module because it supports MFA and SSON. This way you only have the enter your email address to connect to Exchange Online.
The script will check if the module is installed and give you the option to install it when it’s not available on your computer. We also check for any existing connections, to prevent multiple connections from the same computer.
Get the mailboxes
So the first part of the script is to get the mailboxes. If the parameter -userPrincipalName is set, then we will get every mailbox listed and add them to an array. Otherwise, we will get all mailboxes, including shared or not depending on the -sharedMailboxes parameter.
# Check which mailboxes to get
    if ($UserPrincipalName) {

      Write-Host "Collecting mailboxes" -ForegroundColor Cyan
      $mailboxes = @()

      # Get the requested mailboxes
      foreach ($user in $UserPrincipalName) {
        Write-Host "- Get mailbox $user" -ForegroundColor Cyan
        $mailboxes += Get-SingleUser -identity $user
      }

    }else{
      Write-Host "Collecting mailboxes" -ForegroundColor Cyan
      $mailboxes = Get-Mailboxes
    }

# Function Get-SingleUser gets mailbox based on identity
Get-EXOMailbox -Identity $identity -Properties GrantSendOnBehalfTo, ForwardingSMTPAddress |
      select UserPrincipalName, DisplayName, PrimarySMTPAddress, RecipientType, RecipientTypeDetails, GrantSendOnBehalfTo, ForwardingSMTPAddress

# Function Get-Mailboxes gets all mailboxes based on shared mailbox parameter
    switch ($sharedMailboxes)
    {
      "include" {$mailboxTypes = "UserMailbox,SharedMailbox"}
      "only" {$mailboxTypes = "SharedMailbox"}
      "no" {$mailboxTypes = "UserMailbox"}
    }

    Get-EXOMailbox -ResultSize unlimited -RecipientTypeDetails $mailboxTypes -Properties GrantSendOnBehalfTo, ForwardingSMTPAddress|
      select UserPrincipalName, DisplayName, PrimarySMTPAddress, RecipientType, RecipientTypeDetails, GrantSendOnBehalfTo, ForwardingSMTPAddress
Collecting permissions
The next step is to get permissions for each mailbox. Each function will look up the permissions, using the functions described in the beginning, and return an array with the users
# Collect permissions for each mailbox
$mailboxes | ForEach {

   # Get Send on Behalf Permissions
   $sendOnbehalfUsers = Get-SendOnBehalf -mailbox $_

   # Get Fullaccess Permissions
   $fullAccessUsers = Get-FullAccessPermissions -identity $_.UserPrincipalName

   # Get Send as Permissions
   $sendAsUsers = Get-SendAsPermissions -identity $_.UserPrincipalName
}
Depending on the parameter folderPermissions we will also get the mailbox folder permissions:
if ($folderPermissions.IsPresent) {

    # Get Inbox folder permission
    $inboxFolder = Get-FolderPermissions -identity $_.UserPrincipalName -folder $inboxFolderName
    $ib = $inboxFolder.users.Count

    # Get Calendar permissions
    $calendarFolder = Get-FolderPermissions -identity $_.UserPrincipalName -folder $calendarFolderName
    $ca = $calendarFolder.users.Count
}
For the folder permissions, we need to know the correct folder names. At the beginning of the script, we set 2 variables with the correct names:
$inboxFolderName = "inbox"  # Default "inbox"
$calendarFolderName = "calendar"  # Default "calendar"
Creating the CSV Export
For the CSV export, I wanted to list each user that has permission to a mailbox on its own row, with the correct indentation. So to do this, we need to know how many sub rows we are going to add and which array with permissions is the longest.
So we count each array and then use a simple if-else function to figure out which are is larger.
# Count number or records
$sob = $sendOnbehalfUsers.Count
$fa = $fullAccessUsers.Count
$sa = $sendAsUsers.Count

# $ib and $ca are set in the folder permissions
$mostRecords = Find-LargestValue -sob $sob -fa $fa -sa $sa -ib $ib -ca $ca

# Find Largest Values function:
Function Find-LargestValue {
  <#
    .SYNOPSIS
        Find the value with the most records
  #>
  param(
    [Parameter(Mandatory = $true)]$sob,
    [Parameter(Mandatory = $true)]$fa,
    [Parameter(Mandatory = $true)]$sa,
    [Parameter(Mandatory = $true)]$ib,
    [Parameter(Mandatory = $true)]$ca
  )

  if ($sob -gt $fa -and $sob -gt $sa -and $sob -gt $ib -and $sob -gt $ca) {return $sob}
  elseif ($fa -gt $sa -and $fa -gt $ib -and $fa -gt $ca) {return $fa}
  elseif ($sa -gt $ib -and $sa -gt $ca) {return $sa}
  elseif ($ib -gt $ca) {return $ib}
  else {return $ca}
}
If we know how many sub-records we need to create, we can loop through them with a do-while loop and create a PSCustomObject with all the data.
Do{
  if ($x -eq 0) {
      [pscustomobject]@{
        "Display Name" = $_.DisplayName
        "Emailaddress" = $_.PrimarySMTPAddress
        "Mailbox type" = $_.RecipientTypeDetails
        "Read and manage" = @($fullAccessUsers)[$x]
        "Send as" = @($sendAsUsers)[$x]
        "Send on behalf" = @($sendOnbehalfUsers)[$x]
        "Inbox folder" = @($inboxFolder.users)[$x]
        "Inbox folder Permission" = @($inboxFolder.permission)[$x]
        "Inbox folder Delegated" = @($inboxFolder.delegated)[$x]
        "Calendar" = @($calendarFolder.users)[$x]
        "Calendar Permission" = @($calendarFolder.permission)[$x]
        "Calendar Delegated" = @($calendarFolder.delegated)[$x]
      }
      $x++;
  }else{
      [pscustomobject]@{
        "Display Name" = ''
        "Emailaddress" = ''
        "Mailbox type" = ''
        "Read and manage" = @($fullAccessUsers)[$x]
        "Send as" = @($sendAsUsers)[$x]
        "Send on behalf" = @($sendOnbehalfUsers)[$x]
        "Inbox folder" = @($inboxFolder.users)[$x]
        "Inbox folder Permission" = @($inboxFolder.permission)[$x]
        "Inbox folder Delegated" = @($inboxFolder.delegated)[$x]
        "Calendar" = @($calendarFolder.users)[$x]
        "Calendar Permission" = @($calendarFolder.permission)[$x]
        "Calendar Delegated" = @($calendarFolder.delegated)[$x]
      }
      $x++;
  }

  $currentUser = $_.DisplayName
  if ($mailboxes.Count -gt 1) {
    Write-Progress -Activity "Collecting mailbox permissions" -Status "Current Count: $i" -PercentComplete (($i / $mailboxes.Count) * 100) -CurrentOperation "Processing mailbox: $currentUser"
  }
}
while($x -ne $mostRecords)
Download the Complete Mailbox Permissions Script
You can download the complete script here from my GitHub page. This way you will have always the latest version of the script. Always test the script first with a small set of users, using the -UserPrincipalName parameter.
If you want to know how you can run a PowerShell script, then make sure you read this article.
Wrapping Up
To run the script easily from the command line, you can also add the script (or folder) to your PowerShell profile. Read all about it in this article.
I hope you found this script useful, if you have any questions, just drop a comment below.
You may also like one of the following PowerShell report scripts: