Source: https://lazyadmin.nl/office-365/migrate-users-home-drives-to-onedrive-for-business-with-powershell/
We have Office 365 now for 3 years almost and one the things on my to-do list was migrating the users home folders to OneDrive for Business. I tried it last year, asking everyone to copy or move the files themself but that didn’t work out as planned.
So this time I had to change my tactics, clearly, the users (150+) weren’t going to move the files themself. Now I know OneDrive has the ability to move the Known Folders (Desktop, Documents, and Pictures), but that are not the personal files that are stored on the file server. So to move the files we are going to use PowerShell.
Server storage is expensive, so it’s a waste of money to buy storage for the home folders when every user gets unlimited storage in the cloud. Another advantage for the users is that they can access their files from every location of course.
Preparing the home folder move
Before we can move the files we need to prepare some things. There are some GPO settings we can configure, review the OneDrive admin settings, we need to inform our users and we have to deploy the script.
Another potential issue are invalid filenames or to longs paths. Just like SharePoint has OneDrive for Business some file limitations:
- Invalid file or folder names
- Invalid characters ( ” * : < > ? / \ |)
- Max 15Gb file size
- 400 character path limit
Read the full list of limitations here.
Checking OneDrive for Business Admin Center
It’s always good to check the Office 365 Admin Center before you are running out this kind of migrations. New settings are added regularly and you might want to limit for example the sharing options for OneDrive for Business.
Make sure the settings are in line with your business security policies.
OneDrive for Business Known Folder Move
Moving the known folders (Desktop, Documents, and Pictures) to OneDrive is something you really should enable. It only requires two GPO settings to set it up and it will roll out by itself. Your users can work and store the files as they are used to do, but they are safely backupped in the cloud.
When we switch from a full Citrix environment to standalone, one of my concerns was keeping the user’s data safe. Of course, they store the work-related files on the network drivers and now on SharePoint. But we all know users like to keep work-related files on there desktop or they may save them unknowingly in their documents folder.
And yes, we need to educate our users, but by settings up known folders, we have one problem less to worry about.
Get your Office 365 Tenant ID
Before we can configure the GPO’s we need to get our tenant ID. With PowerShell we can get it with only one command:
# Connect to the Azure AD
connect-azuread

# result:
Account                Environment Tenant
-------                ----------- ------
[email protected]   AzureCloud  <your tenant ID>

# Optional - Get your tenant details
get-azureadtenantdetail
After you successfully connected to Azure AD you will get the Tenant ID in the results. If you don’t get it you can always use the cmdlet Get-AzureAdTenantDetail where the objectid is your tenant id.
Configuring the GPO’s
There are a couple of GPO’s we need to configure. Keep in mind that if you enable this GPO for your entire organization at once you will have a huge network traffic spike due to the OneDrive synchronization. So you might want to use a temporary security group to target the GPO.
Create a new GPO and navigate to the following policies:
Computer configuration\Policies\Administrative Templates\OneDrive
If you can’t find the OneDrive Group Policies, then you may need to copy the adml and admx files first:
- Copy the .adml and .admx file from %localappdata%\Microsoft\OneDrive\BuildNumber\adm\ on a workstation
- Paste the .admx in the central store of the domain controller: \\domain\sysvol\domain\Policies\PolicyDefinitions
- Paste the .adml in the correct language folder in the central store
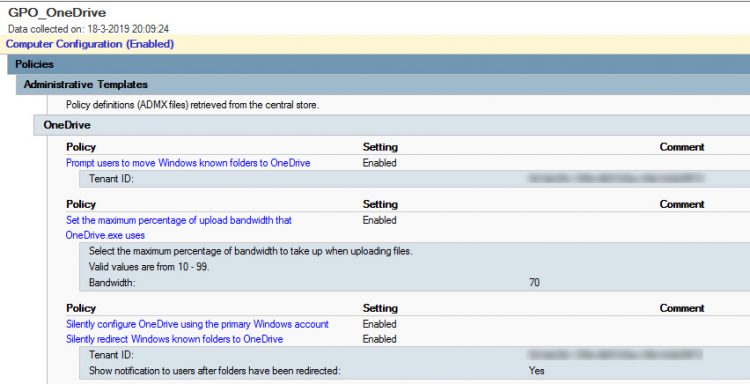
If you haven’t done already, first enable the policy Silently configure OneDrive using the primary Windows account. This will save the user an extra login when they set up OneDrive the first-time.
Also, make sure you limit the upload bandwidth, this way one user can’t slow down the whole internet connection. Set the policy Set the maximum percentage of upload bandwidth that OneDrive.exe uses to something like 70.
To move the known folder, enable the policy Silently redirect Windows Known folder to OneDrive and enter the tenant ID. You can enable a user notification if you like.
It’s also recommended to enable the Prompt user to move Windows Known folder to OneDrive policy to support any legacy OneDrive clients.
Moving the users home folder
The last step, and this what we were planned to do, is to move the user home folder data to their OneDrive for Business account. In my case are the files stored on the file servers. So every user has a network drive mapped to their folder.
A few things we need to tackle in our PowerShell script is to find the users OneDrive folder, check if it is connected and leave an indication behind in the home folder so we know it’s copied. We are not going to move the files, just copy it. I plan to move the files to our archive server later so we always have a backup.
PowerShell and OneDrive
To check if OneDrive is connected we need to import a DLL file to readout the OneDrive status. Download the OneDriveLib.dll from this GitHub repository. Place it in a location every user can access, I recommend the netlogon but any other network share can work as well.
First, we import the DLL file:
Import-Module \\contoso.local\netlogon\OnedriveLib.dll
Next, we need to get the path to the users OneDrive folder. The default location for this folder is the users profile folder. If you have multiple OneDrive folders you can user the USERPROFILE variable, otherwise, I would recommend using the OneDriveCommercial variable.
#Find OneDrive folder
$path = $env:OneDriveCommercial

# Alternative:
# $path = $env:USERPROFILE + '\OneDrive - LazyAdmin'
To check if we have the right folder and that OneDrive is connected we can get the OneDrive status:
#Get OneDrive status
$ODStatus = Get-ODStatus -ByPath $path

# or in short:
$ODStatus = Get-ODStatus -ByPath $env:OneDriveCommercial
If it’s connected it will return either ‘UpToDate’ or ‘Syncing’. So we check the result and use robocopy to copy the files.
if ($ODStatus -eq 'UpToDate' -or $ODStatus -eq 'Syncing') {
    #OneDrive is connected
    write-host 'OneDrive connected and found'
    robocopy $env:HOMESHARE $env:OneDriveCommercial /E /SEC
    new-item $env:HOMESHARE -name '_FILES COPIED TO ONEDRIVE.txt' -ItemType 'file' -Value 'Files Copied'
}
As you can see on the last line we create a new item, a text file. We run a PowerShell script, later on, to check if we migrated every home drive folder before we archive them.
Conclusion
Run the PowerShell in the logged-on user’s context mode, you can use PDQ Deploy for this, a GPO (logon script) or SCCM. If you have many users, make sure you spread the deployment to limit the impact on your network.
With PowerShell make sure you check the available environment variables. In my first attempt to make this script, I tried using the drive letter of the users home folder. That didn’t work out. While looking for an alternative I noticed that we can use $env:HomeDrive which will return the drive letter or $env:HomeShare which returns the actual path.