Source: https://adamtheautomator.com/powershell-script-examples/
PowerShell is an extensive scripting language capable of automating just about everything, and not just for system administrators. But what if you don’t know what you don’t know yet? In that case, this combination of various PowerShell script examples will help jumpstart your PowerShell scripting adventure.
Prerequisites
This tutorial will be a hands-on demonstration. If you’d like to follow along, be sure you have the following:
- Any version of Windows 10, but this tutorial uses Windows 10 Enterprise, build 19043.
- Windows PowerShell version 5.1 or higher would work, but this tutorial uses PowerShell 7.1, and ideally use the latest version of PowerShell available.
- An editor such as PowerShell ISE or Visual Studio Code with the PowerShell extension.
Creating and Updating Registry Keys and Values
Each application and operating system on your Windows computer is registered in a central location, the Windows Registry. The Windows Registry is composed of values and keys, where keys being the containers for the values.
PowerShell has many built-in commands to help you create, update and modify registry keys and values.
Related:How to Edit the Windows Registry Completely Offline
The Windows Registry is a sensitive area of the Windows operating system, so make sure to back up the registry before making changes.
To make changes to the registry, listed below are three different PowerShell commands. Let’s cover some examples of how each of these PowerShell cmdlets works.
New-Item– Creates new registry keys.New-ItemProperty– Creates new registry values.Set-ItemProperty– Changes registry key values.
The example script below defines a list of registry keys, checks to see if each key exists. If so, it then updates the registry values inside. If not, it creates the keys and then creates new registry values inside of those keys.
The outcome of the script below disables registry values related to Transport Layer Security (TLS 1.0).
## Defines three registry key paths in an array
$tls10 = 'HKLM:\SYSTEM\CurrentControlSet\Control\SecurityProviders\SCHANNEL\Protocols\TLS 1.0\Server', 'HKLM:\SYSTEM\CurrentControlSet\Control\SecurityProviders\SCHANNEL\Protocols\TLS 1.0\Client'

## Checks to see if all of the registry keys in the array exists
$tls10check = ($tls10 | Test-Path) -notcontains $false

## If all of the registry keys exist
if ($tls10check -eq $True){
	## Updates four different DWORD registry values to either 0 or 1
	Set-ItemProperty -Path 'HKLM:\SYSTEM\CurrentControlSet\Control\SecurityProviders\SCHANNEL\Protocols\TLS 1.0\Server' -name 'Enabled' -value '0' -Type 'DWORD'
	Set-ItemProperty -Path 'HKLM:\SYSTEM\CurrentControlSet\Control\SecurityProviders\SCHANNEL\Protocols\TLS 1.0\Server' -name 'DisabledByDefault' -value '1' -Type 'DWORD'
	Set-ItemProperty -Path 'HKLM:\SYSTEM\CurrentControlSet\Control\SecurityProviders\SCHANNEL\Protocols\TLS 1.0\Client' -name 'Enabled' -value '0' -Type 'DWORD'
	Set-ItemProperty -Path 'HKLM:\SYSTEM\CurrentControlSet\Control\SecurityProviders\SCHANNEL\Protocols\TLS 1.0\Client' -name 'DisabledByDefault' -value '1' -Type 'DWORD'
} else { ## If at least one of the registry keys do not exist
	## Creates the missing registry keys skipping the confirmation (Force)
	New-Item 'HKLM:\SYSTEM\CurrentControlSet\Control\SecurityProviders\SCHANNEL\Protocols\TLS 1.0\Server' -Force
	New-Item 'HKLM:\SYSTEM\CurrentControlSet\Control\SecurityProviders\SCHANNEL\Protocols\TLS 1.0\Client' -Force

	## Creates four different DWORD registry values setting the value to either 0 or 1
	New-ItemProperty -Path 'HKLM:\SYSTEM\CurrentControlSet\Control\SecurityProviders\SCHANNEL\Protocols\TLS 1.0\Server' -name 'Enabled' -value '0' -Type 'DWORD'
	New-ItemProperty -Path 'HKLM:\SYSTEM\CurrentControlSet\Control\SecurityProviders\SCHANNEL\Protocols\TLS 1.0\Server' -name 'DisabledByDefault' -value '1' -Type 'DWORD'
	New-ItemProperty -Path 'HKLM:\SYSTEM\CurrentControlSet\Control\SecurityProviders\SCHANNEL\Protocols\TLS 1.0\Client' -name 'Enabled' -value '0' -Type 'DWORD'
	New-ItemProperty -Path 'HKLM:\SYSTEM\CurrentControlSet\Control\SecurityProviders\SCHANNEL\Protocols\TLS 1.0\Client' -name 'DisabledByDefault' -value '1' -Type 'DWORD'
}
Copy
Starting a Windows Service (If Not Running)
Once you’re done editing the registry, let’s move right along to managing Windows services.
Related:How to Manage Windows Services with PowerShell
In the below PowerShell script example, you’ll see a great example of performing some comparison logic followed by an action. When run, this script will get the Status of the EventLog service. If the Status is anything but Running, it will write some text to the console and start the service.
If the service is already started, it will tell you so and perform no further actions.
## Define the service name in a variable
$ServiceName = 'EventLog'

## Read the service from Windows to return a service object
$ServiceInfo = Get-Service -Name $ServiceName

## If the server is not running (ne)
if ($ServiceInfo.Status -ne 'Running') {
	## Write to the console that the service is not running
	Write-Host 'Service is not started, starting service'
	## Start the service
	Start-Service -Name $ServiceName
	## Update the $ServiceInfo object to reflect the new state
	$ServiceInfo.Refresh()
	## Write to the console the Status property which indicates the state of the service
	Write-Host $ServiceInfo.Status
} else { ## If the Status is anything but Running
	## Write to the console the service is already running
	Write-Host 'The service is already running.'
}
Copy

Finding CIM/WMI Classes
CIM is a handy repository of information in Windows, and PowerShell can, by default, query it. Using a combination of CIM cmdlets, you can gather all kinds of handy information from CIM.
To find all of the CIM-related PowerShell cmdlets, run
Get-Command -Name *Cim*.
Related:How to Work with WMI in PowerShell
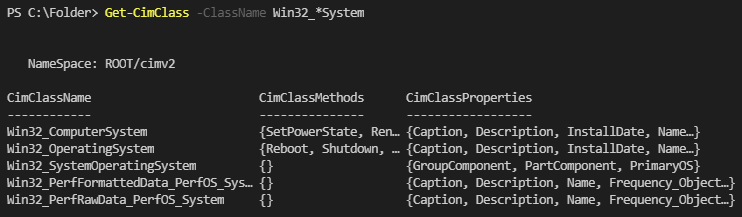
CIM data is broken out in CIM classes. CIM classes hold categories of Windows information. Perhaps you’re looking for some hardware information and discovered that the CIM class has some variation of System in the class name. Using the Get-CimClass cmdlet, you can find all classes matching a particular pattern.
To retrieve one or more CIM classes via the Get-CimClass cmdlet, specify the ClassName parameter with the exact class name or search pattern on a PowerShell command prompt. If you don’t know the whole class name, you can use a wildcard (*). Below, you’ll see the command to find all CIM classes matching the pattern Win32_*System.
Get-CimClass -ClassName Win32_*System
Copy
Querying WMI for Computer Information
Once you’ve found the CIM class you’d like to query, PowerShell now has another cmdlet called Get-CimInstance to help you query information from that class.
Below you’ll find another great PowerShell example script, this time demonstrating a real-world case of querying CIM. This example is querying the Win32_OperatingSystem CIM class on two remote computers at once and creating a CSV file with a few select properties returned from that query.
After finding your desired -ClassName, perhaps you wish to filter the information further where the property names are separated by commas.
## Query the Win32_OperatingSystem CIM instance on both the serv1 and serv2 computers
Get-CimInstance -ClassName Win32_OperatingSystem -ComputerName Serv1,Serv2 |`
## Limit the output to only a few select propeties
Select-Object -Property BuildNumber,BuildType,OSType,ServicePackMajorVersion,ServicePackMinorVersion | `
## Send each CIM instance object to a CSV file called C:\Folders\Computers.csv
Export-CSV C:\Folder\Computers.csv -NoTypeInformation -Encoding UTF8 -Verbose
Copy
When the script finishes, you’ll find a CSV file called Computers.csv in the C:\Folder directory looking something like this:
BuildNumber,BuildType,OSType,ServicePackMajorVersion,ServicePackMinorVersion
19042,Multiprocessor Free,18,0,0
19012,Multiprocessor Free,18,0,0
Copy
Installing Applications
Now that you know how to gather computer information, you can now use that information to tell whether those computers are compatible with certain applications, for example.
Manually installing software on a single computer may be doable, but if you have many computers to install software on, that task soon becomes untenable. To help out, you can create a PowerShell script to install software (if your software supports it) silently.
Perhaps you’re working on a Microsoft Installer (MSI) package, and you’d like to install the software silently. You can install MSI packages via the msiexec.exe utility. This utility isn’t a PowerShell command, but you can invoke it with PowerShell.
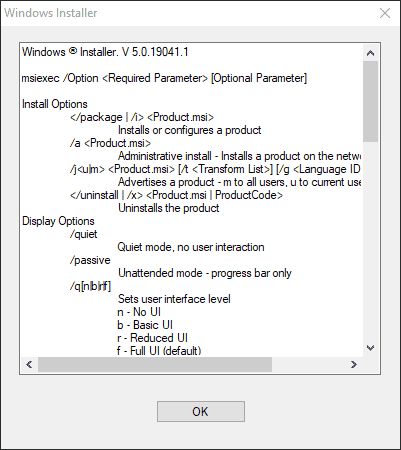
Maybe you have an MSI called package.msi in the C:\folder directory. To silently install software, you must first know what switches that installer requires to do so. To find the available switches, run the MSI and provide a /? switch. The /? should display each available parameter, as shown below.
C:\Folder\package.msi /?
Copy
You can see below a pop-up window that shows a list of argument parameters available for installing the MSI package.
Once you know the switches the installer package needs, it’s now time to invoke the msiexec.exe utility. Since msiexec.exe is not a PowerShell command, you must invoke it as an external process. One of the easiest ways to invoke processes with PowerShell is using the Start-Process cmdlet.
Related:A Better PowerShell Start-Process
The Start-Process has two parameters you’ll need to use in this example; Name and Wait. In this below example, you’ll see that Start-Process is invoking the msiexec.exe utility by using the Name parameter and waiting (Wait) for the process to finish before releasing control back to the console.
Since msiexec.exe needs a few parameters to install the software silently, the example uses the ArgumentList to provide each parameter that msiexec.exe needs to install the software silently.
## Invoke the msiexec.exe process passing the /i argument to indicate installation
## the path to the MSI, /q to install silently and the location of the log file
## that will log error messages (/le).
Start-Process -Name 'msiexec.exe' -Wait -ArgumentList '/i "C:\Folder\package.msi" /q /le "C:\Folder\package.log"'
Copy
Handling Errors with a Try, Catch, and Finally Statement
To sum up this PowerShell script example post, let’s end on a topic you can (and should) apply to any PowerShell script; error handling. Error handling “catches” unexpected errors found in your script, making your script more robust and able to execute with fewer hiccups.
Error handling is a big topic that could be explained in an entire book but let’s only cover the basics; the try, catch, and finally statements. Try/catch blocks are blocks of code that PowerShell “monitors” for hard-terminating errors or exceptions.
If code inside a try/catch block produces a hard-terminating error, that exception will be “caught” by a block and specific code run against it. Once the script is finished, either returning an exception or completing successfully, PowerShell will process the finally block.
In the below example, the script creates a File Transfer Protocol (FTP) script file that connects to an FTP server, attempts to upload a file to an FTP server, and then removes the FTP script file once complete.
You’ll see in the example the “functional” code has been wrapped in a try, catch and finally block. For example, if the Out-File cmdlet returns a hard-terminating error, PowerShell will catch that error and return Error: <the error/exception message> and then exit with a code of 1.
Once the script successfully creates the FTP script file, it then attempts to invoke the ftp.exe utility, which executes the commands inside of the FTP script file. If _that
Notice that you’re creating the FTP script file via the Out-File cmdlet with the first try statement. If the try statement failed, the catch statement below would catch the errors. Then the $($_.Exception.Message) property followed by an exit 1 will end the script, displaying the error status.
But if the first try statement succeeds, the following try statement will run the generated FTP script. When the FTP script runs successfully, you will see log output with the successful connection to the FTP server and file download.
Then regardless of the results of the try and catch statements, the finally statement will run and remove the FTP script file.
## Create the try block and create any code inside.
try {
	## Create the FTP script file using a here string (https://devblogs.microsoft.com/scripting/powertip-use-here-strings-with-powershell/)
	## If Out-File creates the FTP script, it then invokes ftp.exe to execute
	## the script file.
	$Script = @"
	open localhost
	username
	password
	BINARY
	CD remotefolder
	LCD C:\folder
	GET remote.file
	BYE
"@
	$Script | Out-File "C:\Folder\ftp.txt" -Encoding ASCII

	ftp -s:C:\folder\ftp.txt
} catch {
	## If, at any time, for any code inside of the try block, returns a hard-terminating error
	## PowerShell will divert the code to the catch block which writes to the console
	## and exits the PowerShell console with a 1 exit code.
	Write-Host "Error: $($_.Exception.Message)"
	exit 1
} finally {
	## Regardless if the catch block caught an exception, remove the FTP script file
	Remove-Item -Path "C:\folder\ftp.txt"
}

## When the code inside of the try/catch/finally blocks completes (error or not),
## exit the PowerShell session with an exit code of 0
exit 0
Copy
As you can see below, running the FTP script was successful.
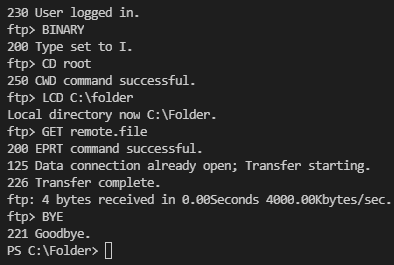
If an exception is caught anywhere inside the try block, you’ll see an error message ($_.Exception.Message) indicating what went wrong.

Conclusion
Through these PowerShell script examples, you should now get a hint at what’s possible with PowerShell. PowerShell can do so much more than what you learned in this tutorial, so use this tutorial as a springboard to your learning.
How do you think can these script examples improve your workflow? Whatever your answer is, don’t hesitate and start leveling up your scripting skills!