Source: https://adamtheautomator.com/winscp-command-line/
WinSCP is a secure file transfer graphical utility. But, it has more features than what you can see with a GUI. The WinSCP command line also exists to help you manage and automate file transfers from your console too!
To learn the ins and outs of the WinSCP GUI, check out this post’s complementing post, The WinSCP GUI: The Ultimate Guide.
In this WinSCP Command-Line Ultimate Guide, you’re going to learn, step-by-step, just about every command-line feature WinSCP provides to help you do more with WinSCP.
Let’s do it!
Prerequsites
- A Windows XP+ PC – This tutorial will use Windows 10 Enterprise.
- A remote Linux host – This tutorial will use an Ubuntu 18.04.5 LTS machine.
- A user account on the remote SSH host with sudo permissions.
Generating a Session URL
When you work with WinSCP in the GUI, you have the luxury of the Login window shown below. This window allows you to specify remote connection properties. The command-line doesn’t have windows and interactivity like this. Instead, you must define those attributes another way.

To tell the WinSCP command line where to connect, you must provide a string called a session URL. This session URL is a combination of each of the connection attributes you had defined in the GUI above.
A session URL, at it’s simplest, is defined via the schema:
<protocol>://<username>:<password>@<host name>/<folder path>
For example, if you’d like to connect to the 1.1.1.1 remote host with the user adam , password pw via the SFTP protocol with WinSCP, your session URL would look like this:
sftp://adam:[email protected]
If you’ve already created a WinSCP site, you can find the site’s session URL by opening the WinSCP GUI, clicking on the Session menu, right-clicking on the site, and choosing to Generate Session URL/Code.
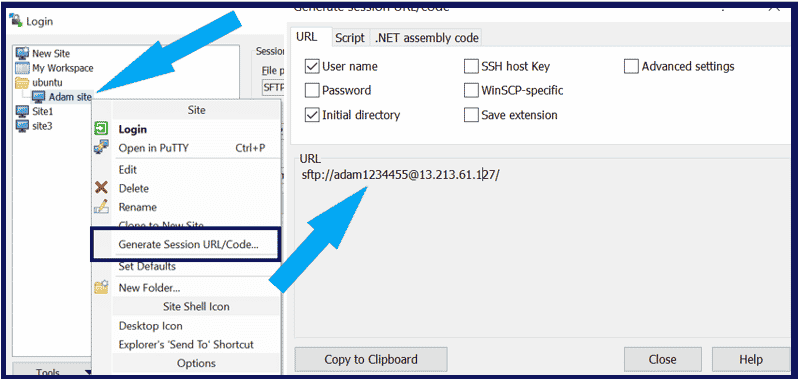
In the Session URL dialog box above, you have various options to customize the session URL, which will dictate how WinSCP connects to a remote host.
- Initial directory – The remote directory that WinSCP will bring up when first connecting.
- SSH host key – An existing SSH key to authenticate to the remote host.
- WinSCP-specific – Generates a “WinSCP-specific” session URL such as
WinSCP-sftp://orwinscp-<ftp://>. A WinSCP-specific URL is useful when you only need WinSCP to understand the URL. If you’d generate a session URL for FTP, for example, you’d be contending with your default web browser if you’d click the link. - Save extension – This option is sometimes used with the WinSCP-specific option to prevent other applications from conlficting when accessing the URL.
The syntax of the session URL with all options enabled should look like the following.
<protocol>://<username>:<password>@<host name>/<folder path><save extension>

Generating Session Connection Code
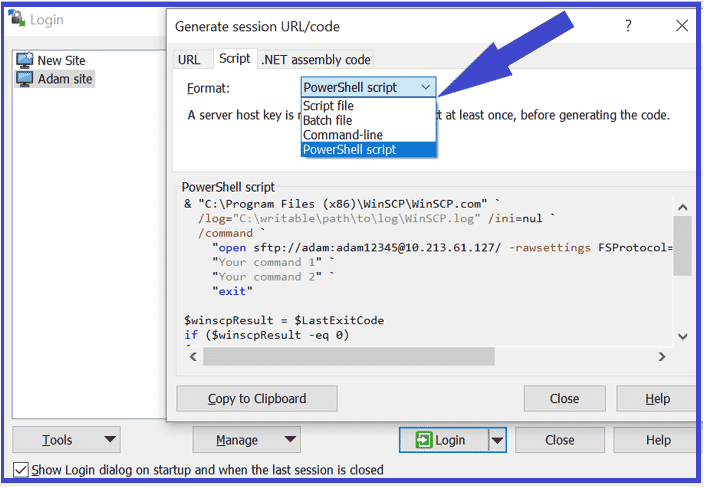
Once you have created the session URL, WinSCP also provides code examples via the Script tab in the Generate session URL/code window. By selecting the type of code:
- Script file
- Batch file
- Command-line
- PowerShell script
WinSCP will create the syntax to connect to the remote host with WinSCP in any of these script types.
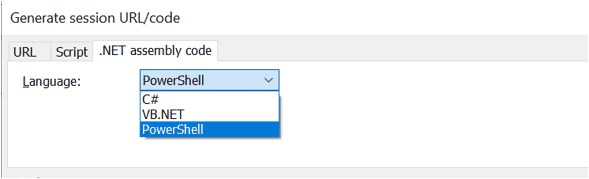
Similarly, to discover the code to execute WinSCP as .NET, C#, or PowerShell, click on the .NET assembly code tab, as shown below.
WinSCP.exe vs. WinSCP.com
Now that you know how to generate a session URL, it’s time to actually use one and learn how to connect to a host with WinSCP on the command line. But first, you must understand the two different WinSCP CLI tools; winscp.exe and winscp.com.
Winscp.exe is actually the same utility used to invoke the GUI, but you can also perform some command-line tasks with it too. But, you can perform some simple commands with it on the command line if you specify a few parameters.
Winscp.exe is only a command-line way to interact with various features of the WinSCP GUI.
Although winscp.exe is great on the command-line for simple, ad-hoc transfers, if you need to run WinSCP in a script, it won’t work. In that case, you need winscp.com. Winscp.com is a utility that comes with WinSCP that supports only console operations and is great for automation scripts.
Winscp.com can perform a lot of SSH functions you may be familiar with. WinScp.com is a true, non-interactive, command-line experience you’ll learn a bit later.
Regardless of which tool you choose, you must open a command prompt (either cmd.exe or PowerShell) and navigate to the WinSCP installation directory.
cd 'C:\Program Files (x86)\WinSCP'
Now that you’re in a command prompt, let’s get started!
WinSCP.exe: Connecting to Remote Hosts with Session URLs
The simplest way to connect to a remote host with WinSCP is running winscp.exe with the session URL as a parameter. In the example below, WinSCP will connect to the 54.179.19.216 host using a username and automate and a password of automate over sftp. When connected, it will drop into the /tmp directory.
WinSCP.exe sftp://automate:[email protected]/tmp/
Rather than use a password, you could also connect to a remote host using a private key by specifying the /privatekey parameter. Using a private key is more secure than using a simple password but is out of the scope of this tutorial.
Related:How to Create SSH keys
Below you can see an example of connecting to the 54.179.19.216 host using a username and automate over scp with a private key called mykey.ppk.
winscp.exe scp://[email protected]/tmp/ /privatekey=mykey.ppk
WinSCP.exe: Downloading Files without a Site
Using winscp.exe on the command line, you can transfer files using a quick, ad-hoc connection, or you can call upon a pre-created WinSCP site. Let’s first download a file without using a site. To demonstrate, perhaps you’d like to download all files in the remote host 54.179.19.216’s /tmp directory using SFTP.
1. First, generate a session URL. The below example shows connecting to the remote host with a username of automate and a password of automate dropping into the /tmp remote directory.
 # Generated Session URL
 sftp://automate:[email protected]/tmp
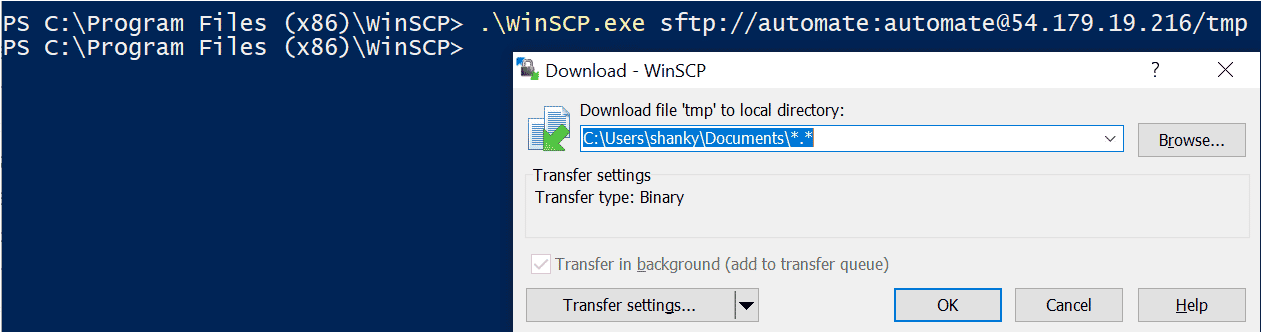
2. Next, run winscp.exe to connect to the remote host to bring up the graphical WinSCP transfer settings dialog box. You’ll see that the local directory will be, by default ~\Documents, as shown below.
WinSCP will also default to the \\*.* pattern meaning to download all files with any name (*) with any file extension (*).
 # Syntax of the command is winscp.exe [/path/[file]]
 winscp.exe sftp://automate:[email protected]/tmp
3. Click OK to begin the transfer. WinSCP will attempt to download all files in the remote /tmp directory over SFTP to the local directory chosen in the popup box.
WinSCP.exe: Uploading Files without a Site
Now that you have learned how to download files on a local machine from a remote host let’s check now perform the opposite and upload files to a remote host.
Uploading files with winscp.exe without a site isn’t much different than downloading files. You must still provide your session URL. But this time, you must also use the /upload switch followed by the folder or file name, as shown below.
# Uploading the file a.txt using winscp.exe on the remote server without site.
 .\WinSCP.exe sftp://automate:[email protected]/tmp/ /upload  C:\Users\shanky\Desktop\a.txt
After you run the winscp.exe command above, WinSCP will bring up the graphical WinSCP upload dialog box, as shown below, indicating that all files defined with /upload (*.*) will upload to the remote host’s /tmp directory.

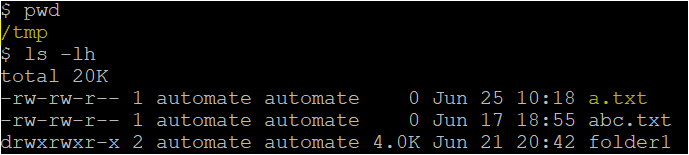
Logging into the remote host with an SSH client and running pwd to check the file andls -lh to list all files in the directory, you’ll see the file was uploaded successfully.
WinSCP.exe: Downloading Files using a Site
In the previous examples, you had to specify a session URL. Session URLs are useful when you don’t have a WinSCP site to reference, containing all of the connection settings. If you’ve been using WinSCP for a while, chances are you have a few sites created.
Using winscp.exe, you can leverage those sites created with the GUI and use them to connect to a remote host saving yourself from remembering how to create a session URL!
To find saved sites in WinSCP, click on the Session menu —> Sites —> Site Manager.
To demonstrate using sites with winscp.exe, let’s first cover downloading files using a site.
1. First, connect to the remote host defined in the site. The example below already has a WinSCP site created called Adamsite.
 # winscp.exe site|workspace|folder
 winscp.exe Adamsite
WinSCP will then display a status notification, as shown below.

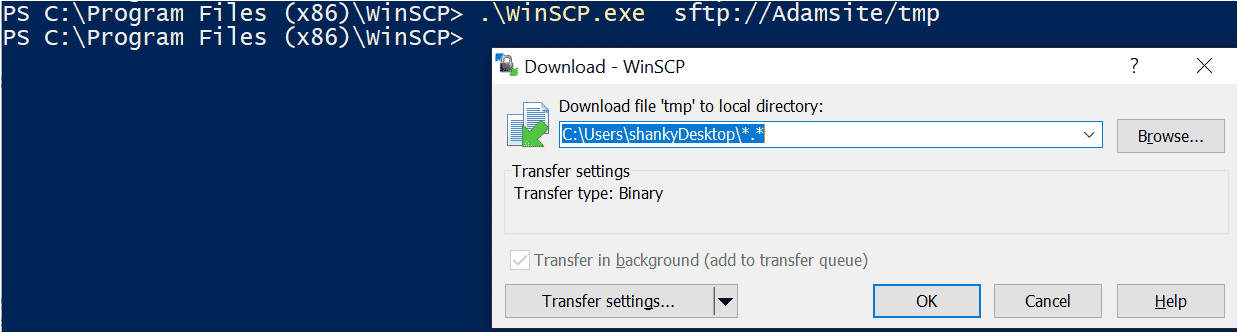
2. Once connected, run winscp.exe to open a session providing just the protocol (sftp), site name (Adamsite), and remote directory (/tmp) this time.
WinSCP will bring up the graphical WinSCP transfer settings dialog box again with the folder to download the files to and the pattern (\*.*) indicating all files in the directory.
 # Connecting to remote mahine with Site
 winscp.exe  sftp://Adamsite/tmp
Click OK, and WinSCP will attempt to download all files in the /tmp directory on the remote host over SFTP to the local directory chosen in the popup box.
Downloading Files using a Site
Uploading a file or entire folder from your local machine to a remote host is similar. But, you must also specify the
/uploadswitch with the file or directory path to upload, e.g.,winscp.exe Site3 /upload .\license.txt. Note that you don’t have to use the full URL (sftp://Adamsite/tmp).
WinSCP.exe: Editing Remote Files
Once you have a text file on a remote host, maybe you’d like to keep it there, but you need to edit it. Rather than manually downloading, editing, and uploading a file with WinSCP, you can do everything in one shot with the /edit parameter.
To edit a file, provide the site name (Adamsite), the /edit parameter, followed by the remote file path to edit.
# Syntax: winscp.exe Site /edit <path>
.\WinSCP.exe Adamsite /edit /tmp/a.txt
Once you execute the above command, your default editor will pop up, allowing you to edit the file as necessary.

When complete, simply save the file and WinSCP will save the file on the remote host!
WinSCP.exe: Session Logging
As you run commands with winscp.exe, you may want a record of what commands you’ve run. If so, WinSCP’s session logging is for you. WinSCP logs commands via the command line on a per-session basis defined when you connect to the session.
To enable session logging requires up to three different parameters when connecting to a session, as shown below.
/log="<log file path>" /loglevel=<level 1,2> /logsize=<size>
/log– The path to the local file to store command history in./loglevel– An optional parameter changing the level of verbosity logged. By default, the log level is set to Normal. But, you can change the level to Reduced or1for the least granular logging to Debug or2for the most granular logging./logsize– An optional parameter used to define how big the log file can get and how long until WinSCP rotates the log file. This parameter value is defined as<total archived logs>*<max log file in K, M, or GB>.
You can see an example below. In this example, winscp.exe will connect to the 54.179.19.216 host and log all activity to the C:\winscp.log file at a Debug level and will keep (5) 10MB log files (5*10MB).
winscp.exe sftp://[email protected]/tmp/ /log="C:\\winscp.log" /loglevel=2* /logsize=5*10M
WinSCP.com: Running Commands Interactively
Although you have seen various ways to connect to a remote host and do many different things, you were doing so with training wheels on. You were using winscp.exe.
WinSCP.exe is only a small part of what you can truly do on the command line. If you want to really learn about the command line, it’s time you learned winscp.com.
Assuming you’ve still got a command line up and you’re still in C:\Program Files (x86)\WinSCP, let’s begin using winscp.com and first connecting to a remote computer.
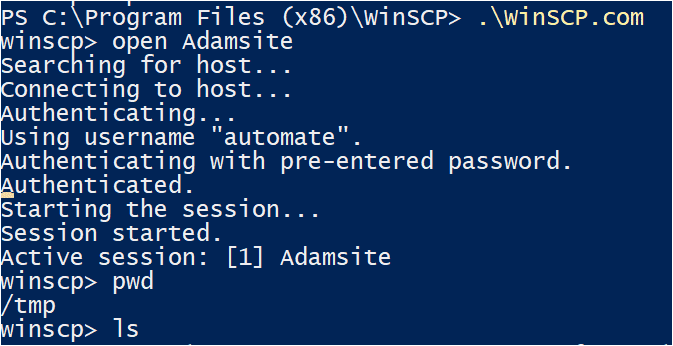
Run winscp.com with no parameters, which will bring you into an interactive session similar to SSH. You’ll know you’re in a WinSCP session when the prompt changes to winscp>.
.\WinSCP.com
Next, run the open command to open a session followed by the site you’d like to connect to.
open Adamsite
You’ll now see below that WinSCP connects to the remote host defined in the site (Adamsite), in this case. Once connected, you can initiate commands and receive output just like you were in a typical SSH session.
Connecting to a Session with a New Key Pair (Host Key)
If you’d like to connect to a session via public-key authentication, you may do so by first finding the host key fingerprint for your site’s session. To do that, you’ll need to execute the ssh-keygen command in the WinSCP folder using the syntax below.
The ssh-keygen command below verifies an SSH key pair which you’ll use to authenticate to the remote host. Run the command as shown below. You’ll soon see a fingerprint you’ll need to then provide to winscp.com to connect to a session.
ssh-keygen -l -f /etc/ssh/ssh_host_rsa_key

Once you have the fingerprint, run the open command to create a session using the hostkey parameter providing the fingerprint you just generated.
Always preface the fingerprint with
ssh-rsa 2048if usingssh-keygenas described above.
winscp.com open sftp://automate:[email protected]/ -hostkey="ssh-rsa 2048 x4DeZzv4jcWEk2zeeJgr5JeJ+z0xA+lGa3LC0q/B+88="
WinSCP.com: Running Commands with the /command Parameter
Previously, you’ve created an interactive session and ran some commands inside of it while connected. You only established a session once and kept it open. Although this method is efficient, it doesn’t allow you to run scripts or other commands that need to be run non-interactively.
To run winscp.com in “non-interactive” mode, you must use the /command parameter. This parameter allows you to connect to a new session, run a command, and disconnect from that session all in one command.
To demonstrate, run the below winscp.com command to copy the local file stored at C:\abc\abc.txt to the remote host’s (13.213.61.127) /tmp directory.
You’ll notice that the /command parameter supports two arguments as strings: the command to create the session (open sftp://adam:[email protected]/tmp) and the command to actually run in the session (put C:\abc\abc.txt).
# Copying the file abc.txt using winscp.com on the remote servers tmp directory.
WinSCP.com /command "open sftp://adam:[email protected]/tmp" "put C:\\abc\\abc.txt"
Searching for host...
Connecting to host...
Authenticating...
Using username "adam".
Authenticating with pre-entered password.
Authenticated.
Starting the session...
Session started.
Active session: [1] [email protected]
C:\abc\abc.txt            |            0 B |    0.0 KB/s | binary |   0%
WinSCP.com: Running Scripts with the /script Parameter
Running single commands on remote computers is fine when you’re performing some ad-hoc management task. But single commands won’t work if you’re trying to automate some process in a remote session. To do that, you need to look into the /script parameter.
1. To demonstrate the /script parameter, open your favorite text editor and create a text file called upload_file_script.txt on your desktop using your favorite editor.
2. Create a blank text file called a.txt in the /tmp directory of your remote computer.
3. Create the local directory C:\abc.
4. Paste the below contents into upload_file_script.txt and save it. You’ve now created a WinSCP script!
In summary, the below script downloads the a.txt file from the /tmp remote directory and uploads it back to /tmp as new_file.txt.
 # Connect to remote machine
 open sftp://automate:[email protected]/  -hostkey="ssh-rsa 2048 x4DeZzv4jcWEk2zeeJgr5JeJ+z0xA+lGa3LC0q/B+88="
 # Change remote directory
 cd /tmp
 # Download file to the local directory C:\abc
 get a.txt C:\abc\
 # Disconnect
 close
 # Again Connect
 open sftp://automate:[email protected]/ -hostkey="ssh-rsa 2048 x4DeZzv4jcWEk2zeeJgr5JeJ+z0xA+lGa3LC0q/B+88="
 # Change the remote directory
 cd /tmp
 # Upload the file to current working directory
 put C:\abc\new_file.txt
 # Disconnect
 close
 # Exit WinSCP
 exit
5. Now, execute the script file with the following WinSCP command using the /script parameter providing the path to the script just created.
The
/ini=nulparameter switch tells WinSCP to ignore the site configuration you’re currently connected to and will not save the configuration on exit.
   > winscp.com /ini=nul /script=upload_file_script.txt
   Searching for host…
   Connecting to host…
   Authenticating…
   Using username "automate".
   Authenticating with pre-entered password.
   Authenticated.
   Starting the session…
   Session started.
   Active session: [1] [email protected]
   /tmp
   a.txt                     |           10 B |    0.0 KB/s | binary | 100%
   Session '[email protected]' closed.
   No session.
   Searching for host…
   Connecting to host…
   Authenticating…
   Using username "automate".
   Authenticating with pre-entered password.
   Authenticated.
   Starting the session…
   Session started.
   Active session: [1] [email protected]
   /tmp
   C:\abc\new_file.txt       |            0 B |    0.0 KB/s | binary |   0%
   Session '[email protected]' closed.
   No session.
WinSCP.com: Converting Keys
As you learned earlier, WinSCP can connect to a remote host in one of two ways; password or certificate-based or public-key authentication. If using public-key authentication, you must provide winscp.com with a private key. But not all private keys are created equal.
Related:Your Guide to X509 Certificates (For Mortals)
If, for example, you have a private key in PEM format generated by the AWS EC2 service but want to use the popular SSH utility, Putty, you’re stuck. But WinSCP can help by converting keys for you.
Using the /keygen parameter, winscp.com can convert keys to various formats for you. To do that:
- Use the
/keygenparameter followed by the key to convert (PEM in this case). - Specify the
-oparameter and provide the output file path of the new key type. - Optionally, specify the
-cparameter and provide a comment.
.\WinSCP.com /keygen C:\Users\shanky\Desktop\testing.pem -o C:\Users\shanky\Desktop\testing.ppk -c "Converted from OpenSSH format"
Conclusion
WinSCP is a free tool with a whole lot of features. With this CLI guide and the WinSCP GUI Guide, you should now understand what’s possible with this feature-rich tool! From transferring files, running commands, running scripts, and even converting key types for you, WinSCP can do a lot.
What are you plans for using WinSCP now?