Source: https://www.linuxserver.io/blog/2019-06-28-getting-started-with-diskover-in-docker
Running a media center PC with any large amount of storage, for many of us, can have a ‘set it and forget it’ mentality. But over time, storage can get away from you and I find myself having to perform a ‘purge’. This is where diskover comes in.
Diskover is a filesystem crawler which crawls your storage locally or over NFS/SMB and scrapes file/directory metadata into Elasticsearch. It then uses this metadata to generate visualizations and allows for instant searching of files on your storage servers.
As everyone may use diskover a little differently, this post isn’t necessarily a guide on usage, but basic setup and what it can do for you.
“Abandon all hope, ye who enter here”
Let me preface this post by saying that the diskover container is an involved docker stack compared to others we have released. It requires separate Redis and ElasticSearch (v5.6.9) containers running to use and has several environment variables you can use to tweak your setup.
TL;DR Caveats
If you don’t read anything, at least read this:
- ElasticSearch MUST be v5.x.x.
- You may need to run a sysctl command on your operating system to get ElasticSearch to work properly. See this link for details.
- ElasticSearch doesn’t always create its volume folders with the proper permissions. Once the container starts, if it is throwing a bunch of Java errors, stop the container, fix the permissions on its folder, and start it back up.
That being said, once up and running, diskover is an invaluable tool when managing large storage, whether that be a SAN, unRAID build, etc.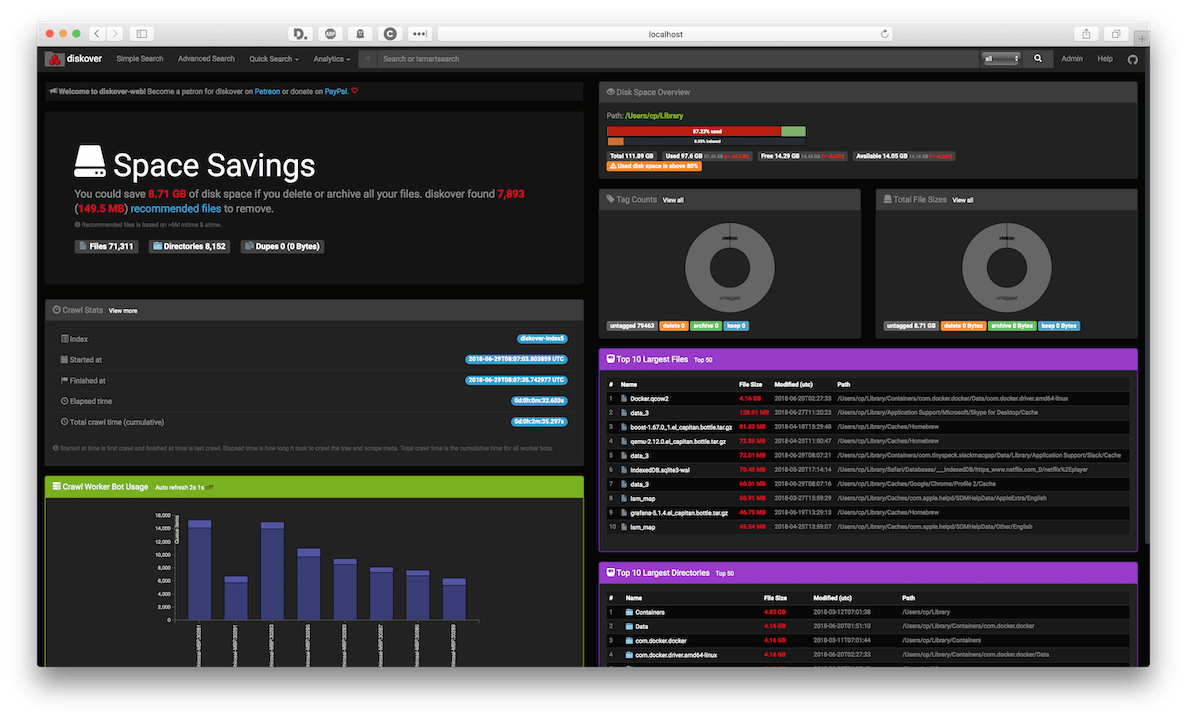 Once the scan is complete, the dashboard will give you overall metrics of your storage.
Setup
In addition to our diskover container, Redis and ElasticSearch v5.6.9 is required. We recommend the official images and our GitHub pagehas basic compose examples for both. There are several (mostly optional) environmental variables available to pass to the diskover container but for an initial run I would recommend omitting most of them.
The two main environmental variables that are required to start up crawls of your filesystem are RUN_ON_START and USE_CRON. By default, diskover only hosts the web UI. The crawler, since it is not a daemon, will need to be initiated. RUN_ON_START will cause the crawler to start crawling /data every time the container is started / restarted. This is best and recommended for an initial run if you are anxious to get things moving. USE_CRON is recommended once diskover is set up to your liking. This places a crontab file in your /config mount that you can edit to control the schedule in which diskover will run. By default, a new crawl will initiate daily at 3 am.
NOTE: A crawl can take quite awhile. Please be aware that if the redis queue still has workers running, then there are features of diskover that may still not be available. You can view the redis queue by navigating to
http://localhost:9181.
You can refer to our documentation regarding additional environment variables that are supported, but a basic configuration to get up and running, which should be suitable for 99% of users, is the following:
version: '3'
services:

  # This config, env variables, and ulimits are per the official
  # ElasticSearch docs
  elasticsearch:
    container_name: elasticsearch
    image: docker.elastic.co/elasticsearch/elasticsearch:5.6.9
    volumes:
      - ELASTICSEARCH_DATA:/usr/share/elasticsearch/data
    environment:
      - bootstrap.memory_lock=true
      - "ES_JAVA_OPTS=-Xms2048m -Xmx2048m"
    ulimits:
      memlock:
        soft: -1
        hard: -1

  redis:
    container_name: redis
    image: redis:alpine
    volumes:
      - REDIS_DATA:/data

  diskover:
    container_name: diskover
    image: linuxserver/diskover
    volumes:
      - CONFIG_DIR:/config
      - DATA_DIR:/data
    environment:
      - PGID=${PGID}
      - PUID=${PUID}
      - TZ=${TIMEZONE}
      - RUN_ON_START=true
Copy
Depending on your operating system, you may need to adjust some system level settings to get ElasticSearch to run properly. Please see the production mode section of the ElasticSearch documentation.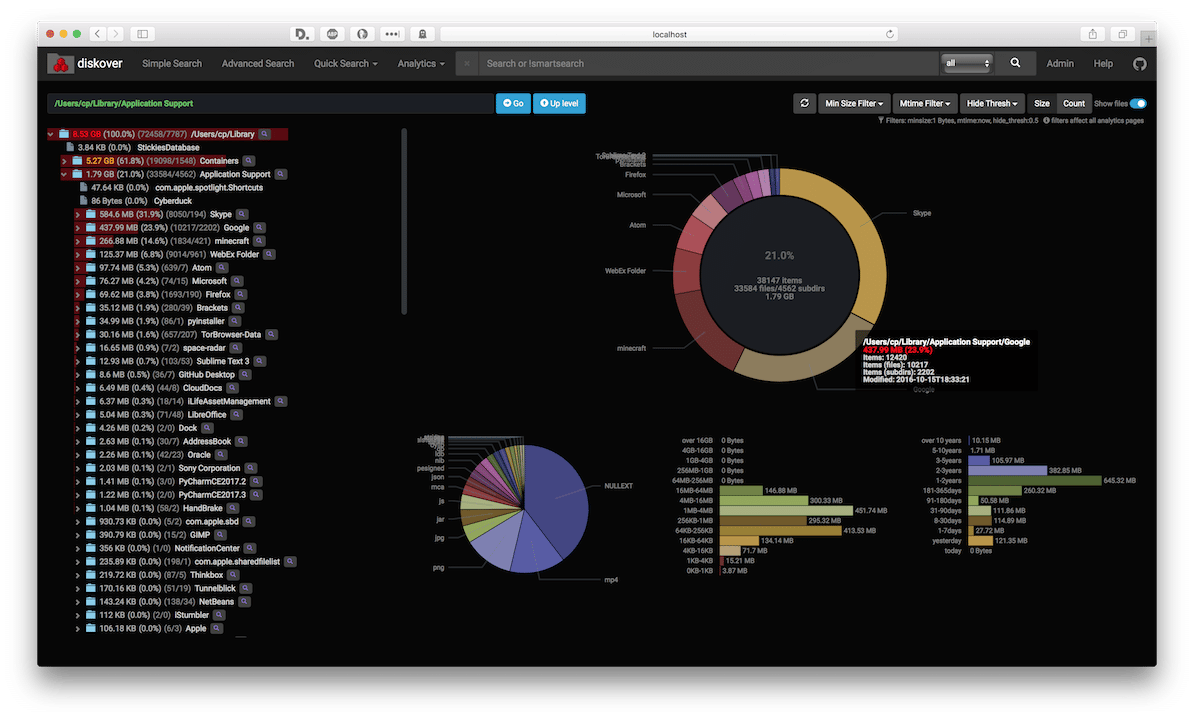 Diskover gives several different ways of breaking down and viewing your overall disk usage.
Power in History
Having diskover run and scan your disk is great and all, but if you wanted to merely see the size of folders you could use any disk analyzer software. Where it really starts to shine is the ability to compare disk scans against each other. Once you have two diskover runs in ElasticSearch, diskover will allow you to select two indices to compare. By default, each scan is timestamped to easily keep track of the history.
When comparing these, diskover will now present you with additional features, such as heatmaps, to help you find which directories have the most fluctuation in size, either growing or shrinking.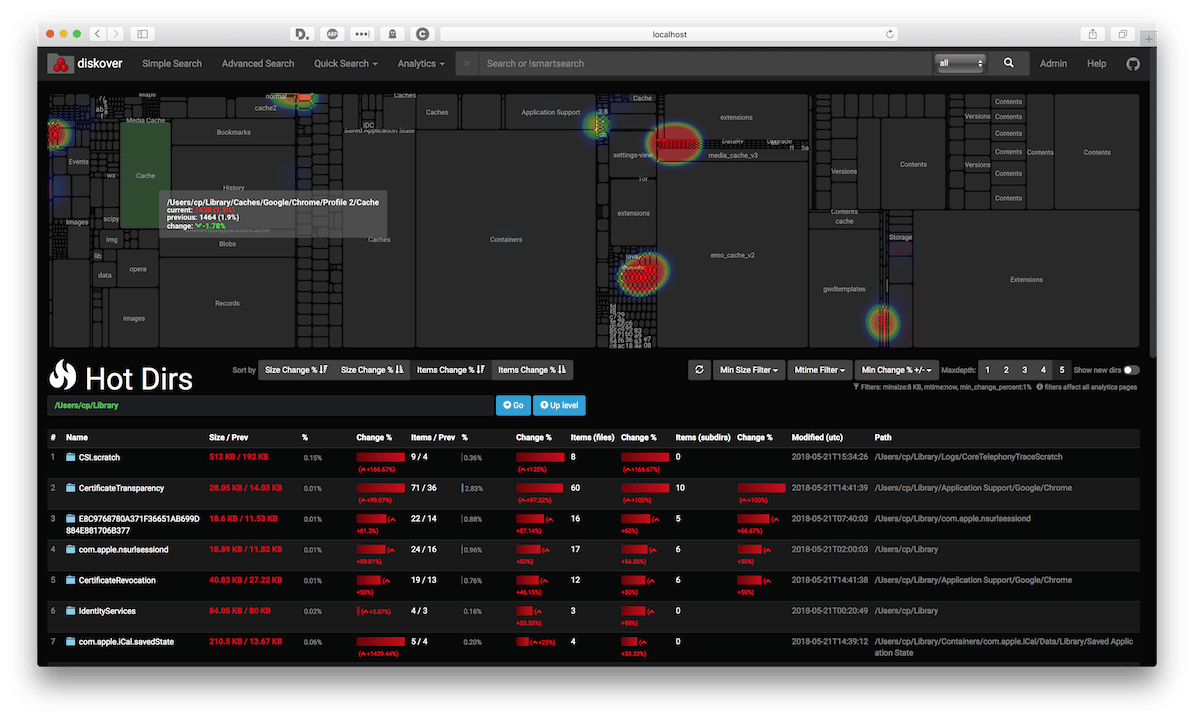 Heat maps will display where your data is changing the most After a run, diskover can then post-process the data gathered to help you determine md5 checksums of your files and break down which files are duplicates.
Configuring additional options
The other two important environmental variables on the container, which aren’t required, but power users will find useful are DISKOVER_OPTS and WORKER_OPTS. I will defer to the official diskover docson what all is available, but it is important to note that the WORKER_OPTS are any arguments meant to be passed to diskover_worker_bot.py while the DISKOVER_OPTS are any arguments meant for diskover.py.