Source: https://lazyadmin.nl/home-network/howto-setup-unifi-guest-portal/
If you want to provide your guests with free and easy internet access, setting up a Unifi Captive Portal might be a good idea. While you just can create an extra wireless network (SSID) with a simple password, you also need to keep the security of your network in mind. You don’t want to give your guests access to your systems. By using the Unifi Guest Portal you can isolate the clients on your network and give them access for only a few hours.
Settings up the captive portal in the Unifi Control is pretty simple. By using the guest isolation option we can prevent the guest from accessing our network without creating VLANs. Another advantage is that you can use the captive portal to promote some of your products or services.
In this article, I am going to walk you through setting up and customizing the Unifi Captive Portal in the Unifi Controller. To the portal, you will need to make sure the controller is running 24/7. So if you have a controller running on your computer that you turn off or take with you, then you really need to buy the Unifi Cloud key.
Create a Guest User group
You might want to limit the amount of bandwidth the guests can use on your network. So before we start creating a Guest Network we first need to create a new user group. This allows us to set upload and download limits for the guests later on.
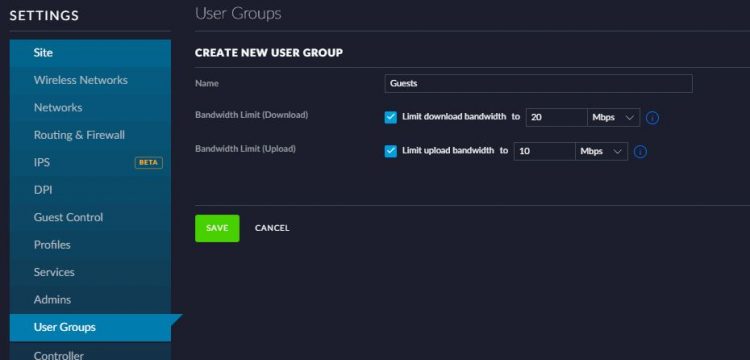
- Open Settings > User Groups
- Click Create New User Group
- Give the group a name: Guests
- Limit the upload and download bandwidth. For simple internet browsing, 5mbit download and 1mbit upload are enough. If you want to allow streaming you they need atleast 10mbit download.
- Click on Save
Creating a Unifi Guest Network
We need to create a new wireless network for our guests. We will make this a Guest Network which will add a few important restrictions:
- Pre and Post-Authorization Access. This will make sure the guest can access the captive portal for authentication. After they authenticated they won’t have access to the local network.
- Client Isolation. This will prevent the clients from sending broadcasts or unicast message to other clients in the same network.
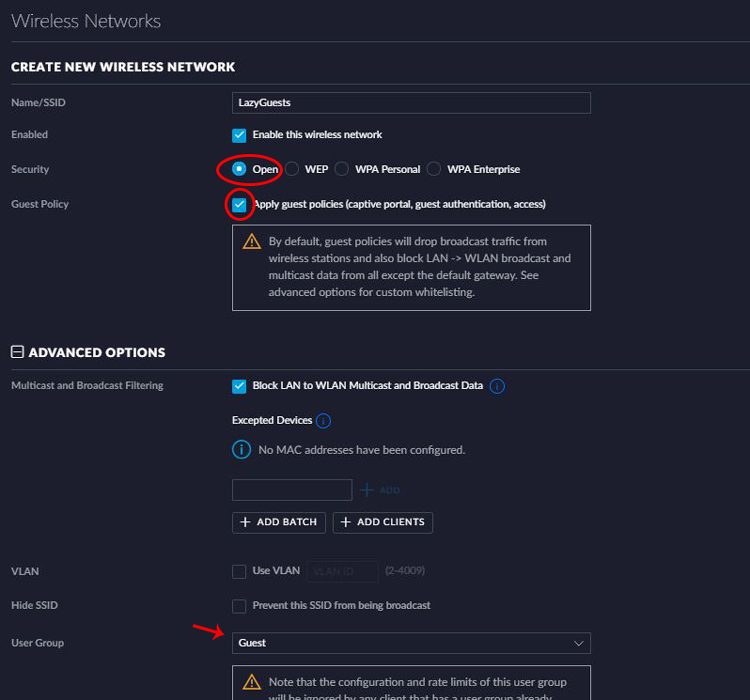
To create the guest network open the Unifi Controller
- Go to Settings > Wireless Networks
- Click on Create New Wireless Network
- Give the wireless network a name. Something your guest will recognize as a guest network.
- Set the security to open. We will secure the network with the captive portal)
- Select Apply guest policies (captive portal, guest authentication, access)
- Expand the Advanced Options
- Select the User Group we just created.
We now have a guest network, but we still need to Set up the captive portal.
Configuring the Unifi Guest Portal
So we have the wireless network for our guest and limited the bandwidth they can use. Now all is left is to create the captive portal. Within the Unifi Controller under the Guest Control section, we can create our Guest Portal, set the authentication and duration of access. So if you have a barbershop you might want to give your customers only 2 hours of access. But if you are running a B&B you can give them a couple of days access to the wifi network.
Setting up the Guest Policies
First, we are going to set up the guest policies. Open the Guest Control page in the Unifi Controller under settings.
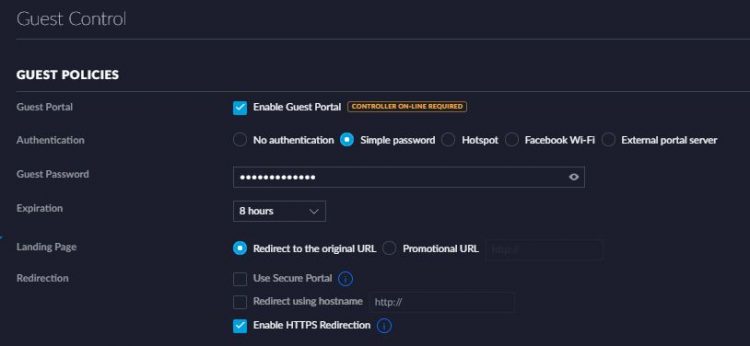
- Enable the Guest Portal
- Set a simple password, something your customers can easily fill in. welkom@mybusiness for example 😉
- Set the expiration, you can choose anything you like here.
- Landing Page: you can either redirect the customer back to the page he attempted to visit or send them to a promotion URL. This can be your business website with the latest deal on it for example.
- Enable the HTTPS Redirection.
Customize the Unifi Captive Portal
The next step is to customize the captive portal. This allows you to do some corporate branding and inform your guests about the wifi network. There are a few things you will need to keep in mind when you customize the portal.
- You can add a background picture, which is nice. But make sure you can still read the text. If you have a coffee shop for example, using a picture of coffee beans and your logo might work better then adding a photo of your shop.
- Inform the users what they get, free access for x hours or days.
- Add different language if you have foreign guests.
- Add the terms of service with what is allowed and what not.
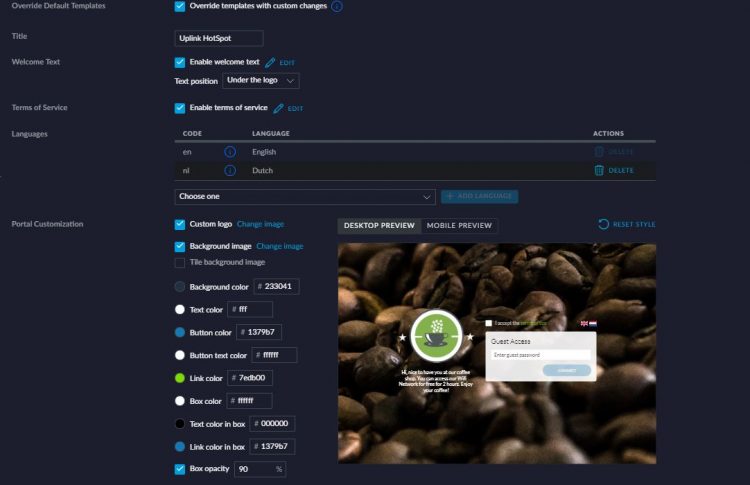
Unifi recommends a background image of 920px width and 640px high. On some screens, this will result in borders besides your image. So use at least an image of 1280px by 720px. Also make sure your images are not big, adding a photo straight from your camera will take a few seconds to download. Compress the image before uploading it.
Access Control
The last step is to limit the access of the guest to your local network. Below the portal customization, you will find the access control. With the access control we can give users access to part of our network before they are authorizited and block access to our internet network after authorization.
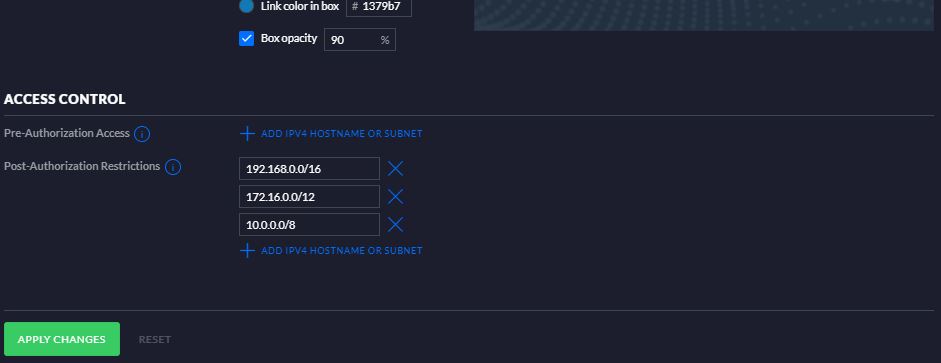
Pre-Authorization Access
The Pre-Authorization Access can be left blank by default. By default you want guests to have only access to the Guest Portal, this is built-in. So we don’t need to enter the Ip Address for the controller here.
But if you are using a custom Guest Portal (an other then the Unifi), then you will have to enter the Ip Address here.
Post-Authorization Restrictions
For the Post-Authorization Restrictions, we enter the subnet of our local network. By default, all possible local network address are blocked, so you could leave this as is. But if you have a printer for your guest that you want to give them access to, but not the rest of you network, then you can block it here. (make it your self easy to use different subnets for your guest and your own network)
Managing the connected clients
Your Unifi Guest Portal is now ready for use. The guests can log in and access the internet, but how can you manage them? Within the controller, we can see on the Dashboard how many guests are connected to our network. If you click on the guest you will go to the Clients page filter on the Guests.
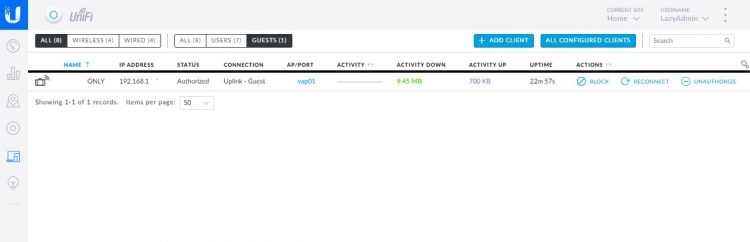
Here we can see all devices that are connected, how much data they used, to which access point they are connected and the uptime. But more important, this is also the place to block a client or to revoke the authorization.
Professional Guest Portal System
The built-in guest portal from Unifi is a great feature to start with, but what if you can do more with your guest wifi system? What if you wanted to know more about your customers, who they are, how to reach them?
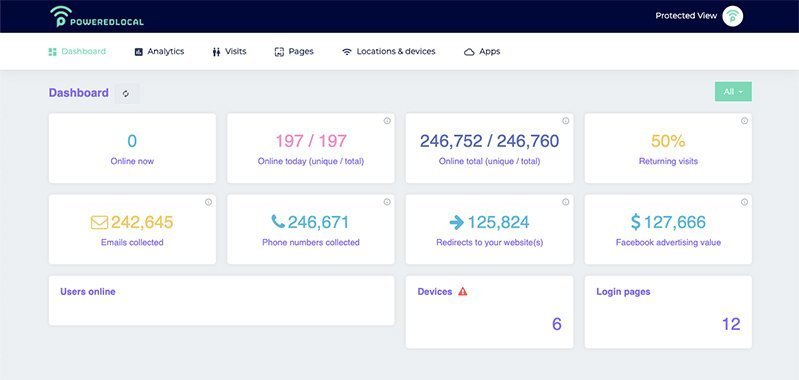
The guys from PoweredLocal reached out to me, they have a guest portal system that is not only really easy to setup but even better, it gives you a lot of (marketing) data back from your customers. Who they are, there contact details, when they visited your place, etc.
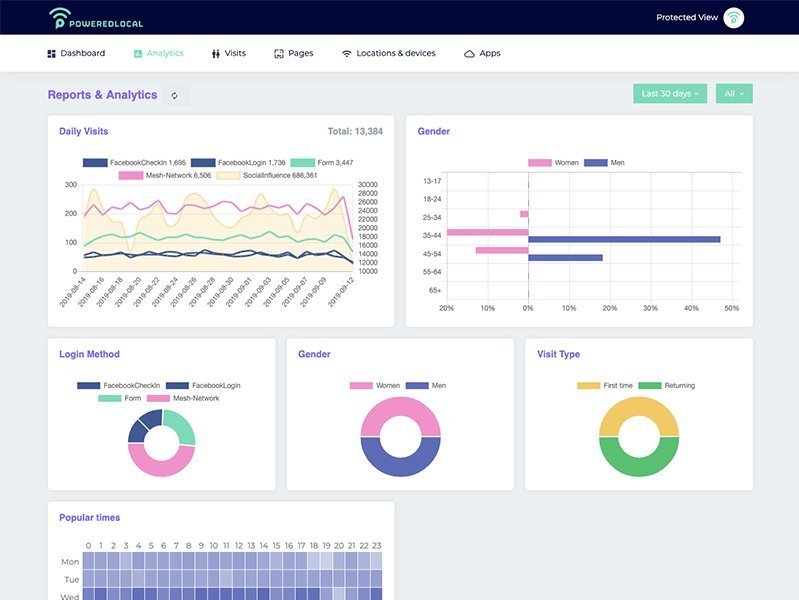
Their product integrates really easy with the Unifi Controller, it can be set-up in minutes. But, more importantly, it not only integrates with Unifi, you can also connect PoweredLocal to pretty much any marketing or CRM system (MailChimp, Campaign Monitor, Facebook or thousands of other platforms). This way you offer free Wifi to your customers, grow your mailing list and engage your customers at the same time.
With a price starting around $7 per month per access point is it a really interesting product. For this, you get the ability to retarget your customers with custom ads, send them personalized emails and know your customers better in general. This way you could the investment back in no-time by the increase of (returning) customers and their engagement.