Source: https://lazyadmin.nl/powershell/powershell-gui-howto-get-started/
I have created many PowerShell scripts for the last couple of years. All with a single purpose to automate my IT work as much as possible. But this week I needed to create a script that could be run by the users themselves. And users and command line isn’t the best combination, so let’s take a look at using the PowerShell GUI.
We all love PowerShell for the simplicity and efficientness when it comes to scripting, but for normal users working with a CLI isn’t something they are used to. In this article, I will explain how you can create a simple GUI for your script and help you through the basic obstacles.
The example project
In this article I will use one of my own projects as an example, so let me first tell a bit about the problem I needed to solve.
I work for a construction company and our construction sites are connected over a 4G IPVPN network with the datacenter. Because of double natting, we can’t deploy printers with a print server.
Our users can install a printer themselves, but because they are not listed on the print server they can easily search for the printer. They will need to create a TCP/IP port, find the IP Address of the printer, select the driver and give a printer name.
I created a PowerShell script that I could run remotely to do this in the background, but that would require them to call me, so I could run the script in the background. Now I could just install all the printers, but that would only be confusing and resulting in a long list of printers.
So I figured, the PowerShell script only needs the printer model, Ip Address and a name. We can look up the Ip Address so if the user can select a model and fill in a name we are done. Saving me 2 calls a week.
The basics of the PowerShell GUI
Before we start creating a form is it important to know that the PowerShell script is run sequentially. So you define your form and show it. But any code after you displayed the form won’t be executed until you close the form.
This is something that took me 30 minutes to figure out… I simply thought I could show the form and handle the input below it in PowerShell.
Creating the form
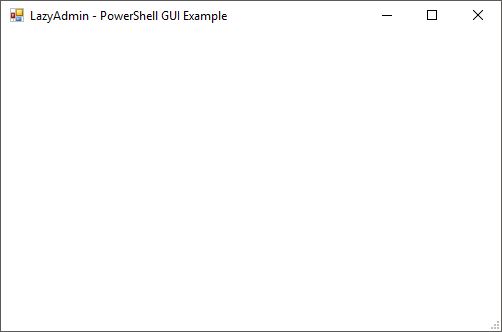
We start with a blank form. First, we add the .Net Windows. Forms. Also, we need to define a size for the form (width, height), title and background color. Just copy-paste the code below in the PowerShell ISE and click on run
# Init PowerShell Gui
Add-Type -AssemblyName System.Windows.Forms

# Create a new form
$LocalPrinterForm                    = New-Object system.Windows.Forms.Form

# Define the size, title and background color
$LocalPrinterForm.ClientSize         = '500,300'
$LocalPrinterForm.text               = "LazyAdmin - PowerShell GUI Example"
$LocalPrinterForm.BackColor          = "#ffffff"

# Display the form
[void]$LocalPrinterForm.ShowDialog()
You will see a simple form just like this one below:
Adding elements to your form
On our form, we can add elements. These can be used to display information and gather user input. The place of the input is based on points/pixels from the left side and the top side. So the location 20,50 is 20 pixels from the left side and 50 points from the top side.
We have the following elements that we can use on our forms:
- TextBox (to get user input)
- Label
- Button
- PictureBox
- CheckBox
- ComboBox (Dropdown list)
- ListView
- ListBox
- RadioButton
- Panel
- Groupbox (To group elements together)
- ProgressBar
- DataGridView
So let’s create some elements on our form. Add the code below to your script. Make sure that ShowDialog is at the end of your script.
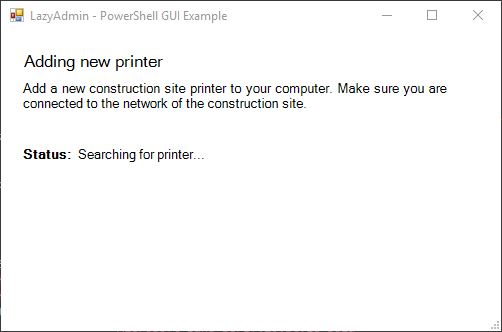
# Create a Title for our form. We will use a label for it.
$Titel                           = New-Object system.Windows.Forms.Label

# The content of the label
$Titel.text                      = "Adding new printer"

# Make sure the label is sized the height and length of the content
$Titel.AutoSize                  = $true

# Define the minial width and height (not nessary with autosize true)
$Titel.width                     = 25
$Titel.height                    = 10

# Position the element
$Titel.location                  = New-Object System.Drawing.Point(20,20)

# Define the font type and size
$Titel.Font                      = 'Microsoft Sans Serif,13'

# Other elemtents
$Description                     = New-Object system.Windows.Forms.Label
$Description.text                = "Add a new construction site printer to your computer. Make sure you are connected to the network of the construction site."
$Description.AutoSize            = $false
$Description.width               = 450
$Description.height              = 50
$Description.location            = New-Object System.Drawing.Point(20,50)
$Description.Font                = 'Microsoft Sans Serif,10'

$PrinterStatus                   = New-Object system.Windows.Forms.Label
$PrinterStatus.text              = "Status:"
$PrinterStatus.AutoSize          = $true
$PrinterStatus.location          = New-Object System.Drawing.Point(20,115)
$PrinterStatus.Font              = 'Microsoft Sans Serif,10,style=Bold'

$PrinterFound                    = New-Object system.Windows.Forms.Label
$PrinterFound.text               = "Searching for printer..."
$PrinterFound.AutoSize           = $true
$PrinterFound.location           = New-Object System.Drawing.Point(75,115)
$PrinterFound.Font               = 'Microsoft Sans Serif,10'

# ADD OTHER ELEMENTS ABOVE THIS LINE

# Add the elements to the form
$LocalPrinterForm.controls.AddRange(@($Titel,$Description,$PrinterStatus,$PrinterFound))

# THIS SHOULD BE AT THE END OF YOUR SCRIPT FOR NOW
# Display the form
[void]$LocalPrinterForm.ShowDialog()
What you see here is that every element is created. These are all simple text or labels elements. You can define the width and height of each element, but if your content is longer then the element it will only be partially displayed. So by setting the Autosize to true, you are assured that the user can read the whole label.
Every element is given a location, the first digit is the number of pixels from the left side, the second the number of pixels from the top.
The result will look like this:
Using a dropdown list
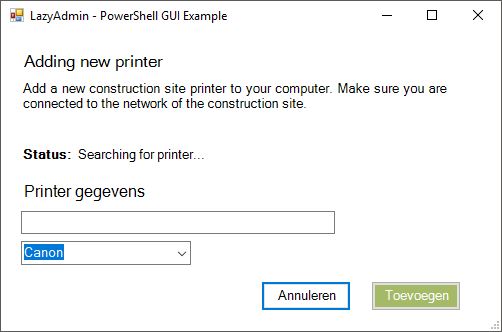
Our user needs to select the printer manufacturer, we only use two brands, so I radio button could work too. We use generic print drivers so I don’t need to know the specific model of the printer.
$PrinterType                     = New-Object system.Windows.Forms.ComboBox
$PrinterType.text                = ""
$PrinterType.width               = 170
$printerType.autosize            = $true

# Add the items in the dropdown list
@('Canon','Hp') | ForEach-Object {[void] $PrinterType.Items.Add($_)}

# Select the default value
$PrinterType.SelectedIndex       = 0
$PrinterType.location            = New-Object System.Drawing.Point(20,210)
$PrinterType.Font                = 'Microsoft Sans Serif,10'
The code above is pretty clear I think, we create the combo box and add the items with a single line foreach loop to the list. Again we also define the position and I have set a minimum width for the element.
You can set a default value for your dropdown list by selecting the index. Make sure you add the variable of the element to the $LocalPrinterForm.controls.AddRange, otherwise it won’t be displayed.
Adding buttons
We are also going to add some buttons to our form. A button can have a standard action, like (
OK, Cancel, Abort, Retry, Ignore, Yes, or No) or you can assign a custom function to it.
The buttons we are going to add are Cancel and Add Printer. Cancel will just close the form and does nothing else, while AddPrinter will run our logic to add the printer. Add the buttons with the code below, again make sure you add the variables of the buttons to the $LocalPrinterForm.controls.AddRange
$AddPrinterBtn                   = New-Object system.Windows.Forms.Button
$AddPrinterBtn.BackColor         = "#a4ba67"
$AddPrinterBtn.text              = "Add Printer"
$AddPrinterBtn.width             = 90
$AddPrinterBtn.height            = 30
$AddPrinterBtn.location          = New-Object System.Drawing.Point(370,250)
$AddPrinterBtn.Font              = 'Microsoft Sans Serif,10'
$AddPrinterBtn.ForeColor         = "#ffffff"

$cancelBtn                       = New-Object system.Windows.Forms.Button
$cancelBtn.BackColor             = "#ffffff"
$cancelBtn.text                  = "Cancel"
$cancelBtn.width                 = 90
$cancelBtn.height                = 30
$cancelBtn.location              = New-Object System.Drawing.Point(260,250)
$cancelBtn.Font                  = 'Microsoft Sans Serif,10'
$cancelBtn.ForeColor             = "#000"
$cancelBtn.DialogResult          = [System.Windows.Forms.DialogResult]::Cancel
$LocalPrinterForm.CancelButton   = $cancelBtn
$LocalPrinterForm.Controls.Add($cancelBtn)
Now a lot of examples on other websites discard the results of the dialog by using [void]$form.ShowDialog(). But the return value of the dialog should be used to tell how the user has closed the form.
So we are going to modify the ShowDialog cmd.
$result = $LocalPrinterForm.ShowDialog()
This way we can check if the user has pressed Cancel or any other default button in the form
if ($result –eq [System.Windows.Forms.DialogResult]::Cancel)
{
    write-output 'User pressed cancel'
}
Adding a custom function to a button
When the user clicks Add Printer a custom script should be executed. We can create a function with our logic and assign the function to the button with the following cmd
$AddPrinterBtn.Add_Click({ AddPrinter })And our function
if ($result –eq [System.Windows.Forms.DialogResult]::Cancel)
{
    write-output 'User pressed cancel'
}
Result
So after we added all elements, and I added some extra-label, our final PowerShell GUI form looks like this:
Now we only have to finish our script so a printer is added.
Adding the logic
So with our form in place, we can start by adding the logic. During the execution of your script, you might want to change text, show or remove fields or perform a specific action. Lets first start with outlining our PowerShell script.
#------------[Initialisations]------------

# Init PowerShell Gui
Add-Type -AssemblyName System.Windows.Forms
Add-Type -AssemblyName System.Drawing


#---------------[Form]-------------------

# Our form goes here

[System.Windows.Forms.Application]::EnableVisualStyles()

$LocalPrinterForm                    = New-Object system.Windows.Forms.Form
$LocalPrinterForm.ClientSize         = '480,300'
$LocalPrinterForm.text               = "LazyAdmin - PowerShell GUI Example"
$LocalPrinterForm.BackColor          = "#ffffff"
$LocalPrinterForm.TopMost            = $false
$Icon                                = New-Object system.drawing.icon ("./form.ico")
$LocalPrinterForm.Icon               = $Icon

# THE REST OF THE FORM

$LocalPrinterForm.controls.AddRange(@( "<ALL FORM ELEMENTS>" ))

#------------[Functions]------------

function AddPrinter {
    # Function that is triggered with the add printer button
}

#------------[Script]------------

$AddPrinterBtn.Add_Click({ AddPrinter })

# REST OF YOUR SCRIPT


#------------[Show form]------------

# Show the form
$result = $LocalPrinterForm.ShowDialog()

# Catch any output of the form
if ($result –eq [System.Windows.Forms.DialogResult]::Cancel)
{
    write-output 'User pressed cancel'
}
In your functions or script section, you might want to give some feedback to the user or use the data from the input fields.
Reading and changing PowerShell GUI Elements
Reading data from the textbox is pretty straight forward. In our example, we want to use the name the users have entered and check if the printer name already exists. If the name exists we want to show an error.
if (Get-Printer -Name $printerName.text) {
  $PrinterStatus.ForeColor = "#D0021B"
  $PrinterStatus.Text = 'Printer name already exists.'
}
In the example above we check the given printer name, if it exists we change the font color of the label “PrinterStatus” to read and change the text of the label to show a message to the users.
There is no need to refresh the form or input, you can just change the text as you go.
Showing and hiding fields
Before the form is loaded I check if there is a printer available on the expected network address. If not then there is no need for the user to continue. So when I initialize the form elements I have hidden some elements.
If we have a connection, then I show the elements or change the label of the buttons for example. Hiding and show elements in PowerShell GUI can be done with the following code:
$PrinterNameLabel.Visible = $false # or $true of course 😉
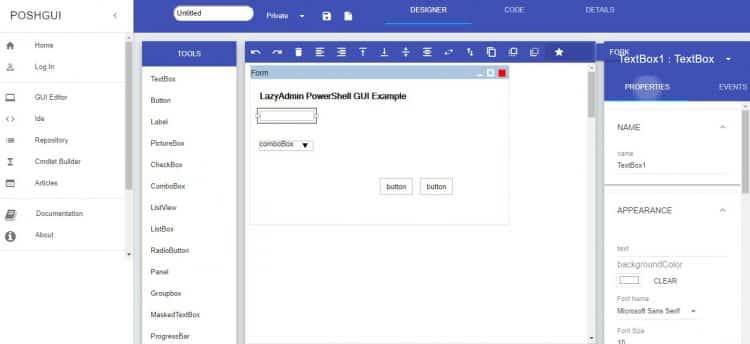
Online PowerShell GUI Editor PoshGUI
Creating a bigger or complex form from the command line only can be a bit challenging. You will have to position all the elements in the correct place, create all the necessary code. Luckily there is an online PowerShell GUI editor PoshGUI.
This is a great tool to create your initial form layout. You can download the PS1 file and continue working on your form in your favorite editor.
Conclusion
So I hope this article helpt you to get started creating your first PowerShell form. While PowerShell isn’t really meant for creating forms, it can be a great way to make a script more usable to your user or colleagues.
Subscribe to the newsletter to receive the latest article about PowerShell or Office 365 in your mailbox.
The complete code looks as follows:
#---------------------------------------------------------[Initialisations]--------------------------------------------------------
# Init PowerShell Gui
Add-Type -AssemblyName System.Windows.Forms
Add-Type -AssemblyName System.Drawing


#---------------------------------------------------------[Form]--------------------------------------------------------

[System.Windows.Forms.Application]::EnableVisualStyles()

$LocalPrinterForm                    = New-Object system.Windows.Forms.Form
$LocalPrinterForm.ClientSize         = '480,300'
$LocalPrinterForm.text               = "Printers"
$LocalPrinterForm.BackColor          = "#ffffff"
$LocalPrinterForm.TopMost            = $false
$Icon                                = New-Object system.drawing.icon ("//thunnissen.local/netlogon/printer.ico")
$LocalPrinterForm.Icon               = $Icon

$Titel                           = New-Object system.Windows.Forms.Label
$Titel.text                      = "Add new printer"
$Titel.AutoSize                  = $true
$Titel.width                     = 25
$Titel.height                    = 10
$Titel.location                  = New-Object System.Drawing.Point(20,20)
$Titel.Font                      = 'Microsoft Sans Serif,13'

$Description                     = New-Object system.Windows.Forms.Label
$Description.text                = "To add a printer, make sure you are connected to the same network as the printer.."
$Description.AutoSize            = $false
$Description.width               = 450
$Description.height              = 50
$Description.location            = New-Object System.Drawing.Point(20,50)
$Description.Font                = 'Microsoft Sans Serif,10'

$PrinterStatus                   = New-Object system.Windows.Forms.Label
$PrinterStatus.text              = "Status:"
$PrinterStatus.AutoSize          = $true
$PrinterStatus.width             = 25
$PrinterStatus.height            = 10
$PrinterStatus.location          = New-Object System.Drawing.Point(20,115)
$PrinterStatus.Font              = 'Microsoft Sans Serif,10,style=Bold'

$PrinterFound                    = New-Object system.Windows.Forms.Label
$PrinterFound.text               = "Searching for printer..."
$PrinterFound.AutoSize           = $true
$PrinterFound.width              = 25
$PrinterFound.height             = 10
$PrinterFound.location           = New-Object System.Drawing.Point(100,115)
$PrinterFound.Font               = 'Microsoft Sans Serif,10'

$PrinterDetails                  = New-Object system.Windows.Forms.Label
$PrinterDetails.text             = "Printer details"
$PrinterDetails.AutoSize         = $true
$PrinterDetails.width            = 25
$PrinterDetails.height           = 10
$PrinterDetails.location         = New-Object System.Drawing.Point(20,150)
$PrinterDetails.Font             = 'Microsoft Sans Serif,12'
$PrinterDetails.Visible          = $false

$PrinterNameLabel                = New-Object system.Windows.Forms.Label
$PrinterNameLabel.text           = "Name:"
$PrinterNameLabel.AutoSize       = $true
$PrinterNameLabel.width          = 25
$PrinterNameLabel.height         = 20
$PrinterNameLabel.location       = New-Object System.Drawing.Point(20,180)
$PrinterNameLabel.Font           = 'Microsoft Sans Serif,10,style=Bold'
$PrinterNameLabel.Visible        = $false

$PrinterName                     = New-Object system.Windows.Forms.TextBox
$PrinterName.multiline           = $false
$PrinterName.width               = 314
$PrinterName.height              = 20
$PrinterName.location            = New-Object System.Drawing.Point(100,180)
$PrinterName.Font                = 'Microsoft Sans Serif,10'
$PrinterName.Visible             = $false

$PrinterTypeLabel                = New-Object system.Windows.Forms.Label
$PrinterTypeLabel.text           = "Brand:"
$PrinterTypeLabel.AutoSize       = $true
$PrinterTypeLabel.width          = 25
$PrinterTypeLabel.height         = 20
$PrinterTypeLabel.location       = New-Object System.Drawing.Point(20,210)
$PrinterTypeLabel.Font           = 'Microsoft Sans Serif,10,style=Bold'
$PrinterTypeLabel.Visible        = $false

$PrinterType                     = New-Object system.Windows.Forms.ComboBox
$PrinterType.text                = ""
$PrinterType.width               = 170
$PrinterType.height              = 20
@('Canon','Hp') | ForEach-Object {[void] $PrinterType.Items.Add($_)}
$PrinterType.SelectedIndex       = 0
$PrinterType.location            = New-Object System.Drawing.Point(100,210)
$PrinterType.Font                = 'Microsoft Sans Serif,10'
$PrinterType.Visible             = $false

$AddPrinterBtn                   = New-Object system.Windows.Forms.Button
$AddPrinterBtn.BackColor         = "#ff7b00"
$AddPrinterBtn.text              = "Add"
$AddPrinterBtn.width             = 90
$AddPrinterBtn.height            = 30
$AddPrinterBtn.location          = New-Object System.Drawing.Point(370,250)
$AddPrinterBtn.Font              = 'Microsoft Sans Serif,10'
$AddPrinterBtn.ForeColor         = "#ffffff"
$AddPrinterBtn.Visible           = $false

$cancelBtn                       = New-Object system.Windows.Forms.Button
$cancelBtn.BackColor             = "#ffffff"
$cancelBtn.text                  = "Cancel"
$cancelBtn.width                 = 90
$cancelBtn.height                = 30
$cancelBtn.location              = New-Object System.Drawing.Point(260,250)
$cancelBtn.Font                  = 'Microsoft Sans Serif,10'
$cancelBtn.ForeColor             = "#000"
$cancelBtn.DialogResult          = [System.Windows.Forms.DialogResult]::Cancel
$LocalPrinterForm.CancelButton   = $cancelBtn
$LocalPrinterForm.Controls.Add($cancelBtn)

$LocalPrinterForm.controls.AddRange(@($Titel,$Description,$PrinterStatus,$PrinterFound,$PrinterName,$PrinterNameLabel,$PrinterType,$AddPrinterBtn,$cancelBtn,$PrinterTypeLabel,$PrinterDetails))

#-----------------------------------------------------------[Functions]------------------------------------------------------------

function AddPrinter {
  $PrinterFound.ForeColor = "#000000"
  $PrinterFound.Text = 'Adding printer...'
  # Check printer port
  $portName = "TCPPort:"+$printerIp
  $portExists = Get-Printerport -Name $portname -ErrorAction SilentlyContinue

  # Create port if it not exists
  if (-not $portExists) {
    $PrinterFound.Text = 'Creating printer port...'
    Add-PrinterPort -name $portName -PrinterHostAddress $printerIp
  }

  # Select the correct driver
  if ($PrinterType.SelectedItem -eq 'Canon') {
    $printerDriverName = "Canon Generic Plus PCL6"
  }else{
    $printerDriverName = "HP LaserJet M227-M231 PCL-6"
  }

  # Check if printer driver exists
  $printDriverExists = Get-PrinterDriver -name $printerDriverName -ErrorAction SilentlyContinue

  # Install printer or printer driver and printer
  if ($printDriverExists) {
    $PrinterFound.Text = 'Installing printer...'
    Add-Printer -Name $printerName.text -PortName $portName -DriverName $printerDriverName
  }else{
    $PrinterFound.Text = 'Installing printer driver...'
    Add-PrinterDriver -name $printerDriverName

    $PrinterFound.Text = 'Installing printer...'
    Add-Printer -Name $printerName.text -PortName $portName -DriverName $printerDriverName
  }

  if (Get-Printer -Name $printerName.text) {
    $PrinterFound.ForeColor = "#7ed321"
    $PrinterFound.Text = 'The printer is installed'
  }
  else {
    $PrinterFound.ForeColor = "#D0021B"
    $PrinterFound.Text = 'Installation failed'
  }
  $PrinterNameLabel.Visible = $false
  $PrinterName.Visible = $false
  $PrinterType.Visible = $false
  $AddPrinterBtn.Visible = $false
  $PrinterDetails.Visible = $false
  $PrinterTypeLabel.Visible = $false
  $cancelBtn.text = "Close"
}

#---------------------------------------------------------[Script]--------------------------------------------------------
# Get printers IP Address
$clientIP = (
    Get-NetIPConfiguration |
    Where-Object {
        $_.IPv4DefaultGateway -ne $null -and
        $_.NetAdapter.Status -ne "Disconnected"
    }
).IPv4Address.IPAddress

$networkAddress = $clientIP.Split('.')
$networkAddress = $networkAddress[0]+"."+$networkAddress[1]+"."+$networkAddress[2]

# Check if printer is online
$printerIp =  $networkAddress + ".31"
$testConnection = Test-Connection $printerIp -count 1 -Quiet

If ($testConnection) {
  $PrinterFound.text = "Printer found"
  $PrinterFound.ForeColor = "#7ed321"
  $PrinterNameLabel.Visible = $true
  $PrinterName.Visible = $true
  $PrinterType.Visible = $true
  $AddPrinterBtn.Visible = $true
  $PrinterDetails.Visible = $true
  $PrinterTypeLabel.Visible = $true
}else{
  $PrinterFound.text = "No printers found"
  $PrinterFound.ForeColor = "#D0021B"
  $cancelBtn.text = "Sluiten"
}

$AddPrinterBtn.Add_Click({ AddPrinter })

[void]$LocalPrinterForm.ShowDialog()