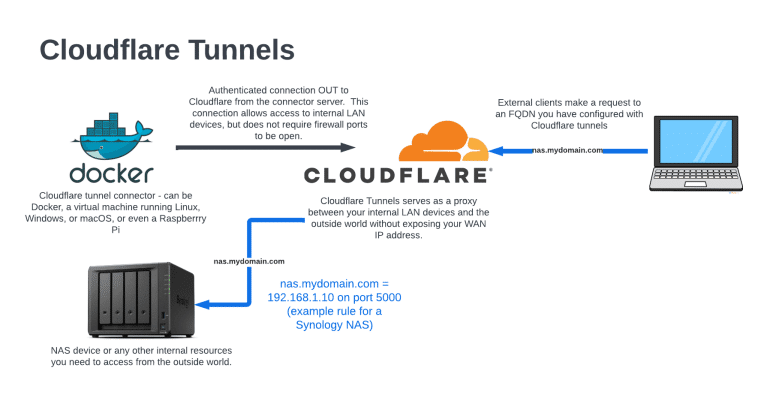
Cloudflare Tunnels is an AWESOME service for home users and businesses alike. But what is it exactly? Cloudflare Tunnels is kind of like a VPN connection in that it’s a secure way to access resources on your internal private network from the outside world. So for instance, say you have a Synology NAS device that has a local GUI interface, and you want to change some settings – how can you log into that device and make those changes when you’re travelling? There are a number of ways to skin this cat.
The difference with Cloudflare Tunnels vs. your traditional VPN is that you don’t have to open ports in your firewall. With VPN, you connect into your VPN server (or sometimes directly to your router) through a hole that you’ve poked in your firewall.
With Cloudflare Tunnels, you install a client inside your network that maintains a secure connection out to Cloudflare. You then create different FQDNs (Fully Qualified Domain Names aka. DNS names aka. CNAME records) that associate with your internal services. So in our NAS example, perhaps you create a ‘synology.mydomainname.com’ for your NAS device and tell Cloudflare what the private IP address and port is. In the case of Synology, it’s an HTTP interface that runs on port 5000. BUT – when we go through Cloudflare Tunnels, it becomes an HTTPS connection on port 443 (standard) – so this is not only a convenient way to access internal resources, you also get some bonus features like that HTTP port 5000 to HTTPS port redirect. Since you’re connecting to an FQDN that Cloudflare manages, you’re also obscuring your own WAN IP address.
I recently dug deep into this technology, and it definitely took me a while to wrap my head around…so in this post, I will try to make your life easier and explain it in simple easy terms – THEN – we’ll set up our own Cloudflare Tunnel so that we can connect to our internal private devices from the outside world safely and securely. Let’s do this!
What You Need to Get Started
Domain Name – you’re going to have to give Cloudflare a domain name to use for routing FQDNs to your internal resources. Let’s say you use ‘mydomain.com.’ You’ll first set up the tunnel, and then you can add multiple resources onto this domain name such as webserver.mydomain.com, nas.mydomain.com, pihole.mydomain.com – whatever you need to connect to from the outside world can be connected to Cloudflare Tunnels…but it all starts with that domain name.
There are a number of ways to get free domain names, and you can absolutely Google search those out – for me though, I like to use Namecheap.com for my domains. Namecheap has very cost effective domain names without all the extra fluff. They also often have $0.99 sales on new domain name purchases.
The domain name that I’m going to use for this tutorial is crosstalkwireless.net – which is a spare domain that I’m not using for anything else.
Cloudflare Account – This is pretty straight forward – head over to cloudflare.com and click the ‘Sign Up’ button in the upper right. You’ll be walked through the sign-up process, and eventually you’ll be logged into the Cloudflare dashboard. It’s free!
Cloudflared Connector – This is a server or Docker container on your local network that connects out to Cloudflare. The service that it runs is called ‘cloudflared’ (short for cloudflare daemon). Essentially, this is a device on your network that authenticates and holds open a connection to Cloudflare’s services. Cloudflare allows you to install the cloudflared connector on Windows, macOS, Linux, Docker – lots of options.

In this tutorial, we’re going to be using Docker on a Synology NAS since it’s very lightweight. I have also successfully set up cloudflared in Ubuntu running on a virtual machine in my Synology NAS, which was pretty easy, but the overhead of the operating system takes away from the resources of the NAS vs. Docker which isn’t quite as resource intensive. You can pick the best way to set up the connector for your own environment – as long as it connects and authenticates to Cloudflare, it’ll work. We’ll dig more into the connector a bit later in this tutorial.
Let’s Get Started!
The first thing you want to do is add your domain name to Cloudflare and switch over the root nameservers for that domain. From the Cloudflare dashboard, click on Websites in the left-hand menu and then click ‘Add a Site.’
Enter in your domain name and click ‘Add site.’

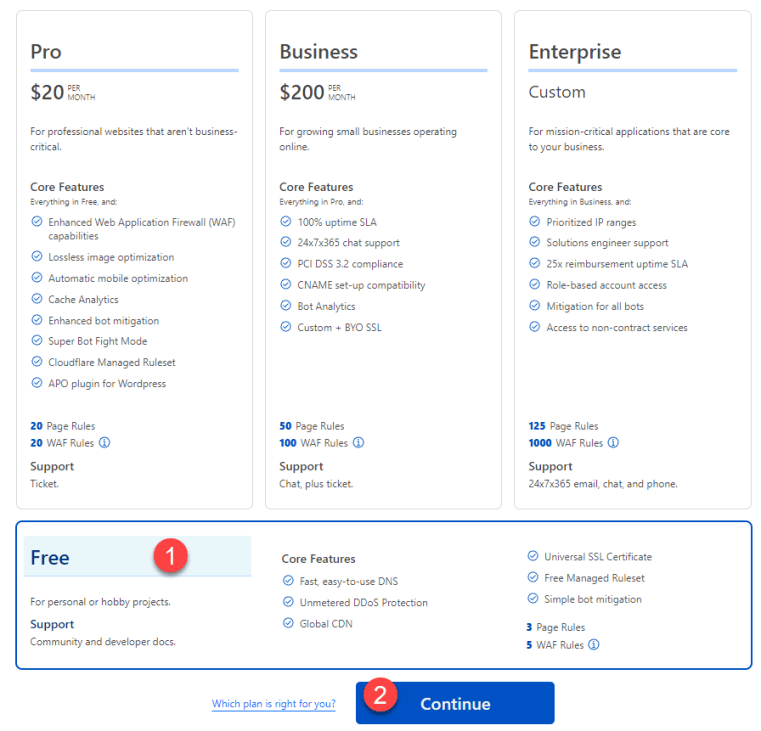
You’re going to be presented with some pricing options, but if you scroll down to the bottom, you have the option to click on a Free version of Cloudflare – pick the Free version and then click ‘Continue.’
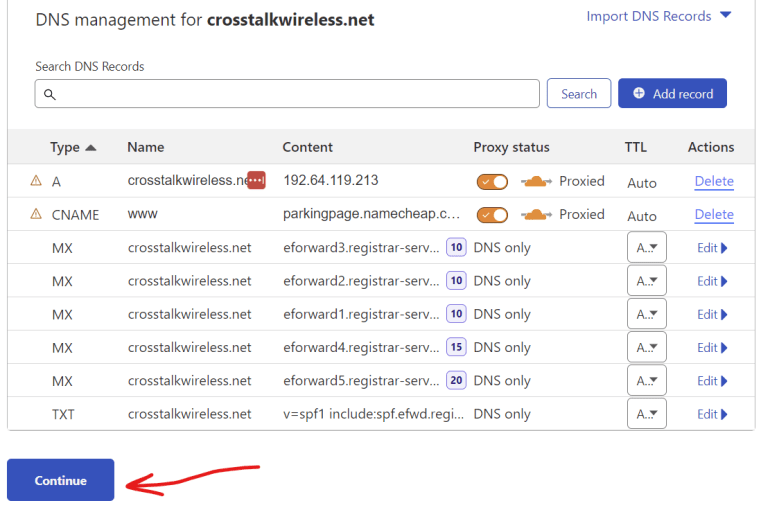
Cloudflare then scans your domain and replicates any existing records for you – since this is a brand new domain that we’re using for our Tunnels setup, we can just click on ‘continue’ at the bottom.
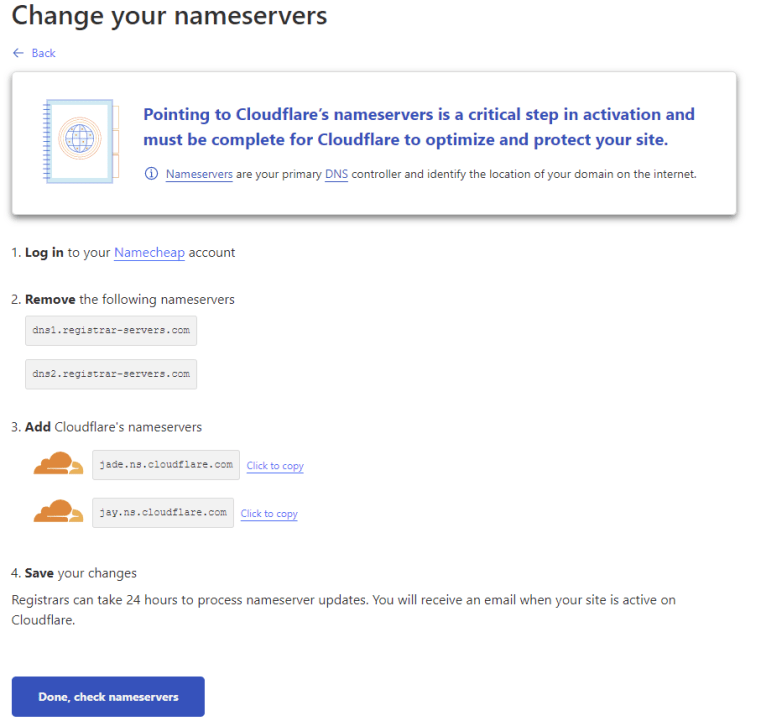
Next, Cloudflare is going to give us the DNS names for the DNS servers that we should use as the root domain servers for our domain name. Basically, this just means that right now, when you perform a DNS lookup to crosstalkwireless.net, that lookup is being handled by Namecheap’s DNS nameservers. We want to change our domain name so that all DNS lookups are instead handled by Cloudflare’s nameservers.
Every domain name provider is going to give you a way to do this, and they’ll all be slightly different. If you’re using Namecheap for your domain names, these instructions will work – but if you’re using a different domain name provider, you’ll have to search out how it’s done for your own DNS host.
Logging into Namecheap.com, first click on Domain List in the left-hand menu, and then click the ‘Manage’ button next to the domain name you’re using with Cloudflare.
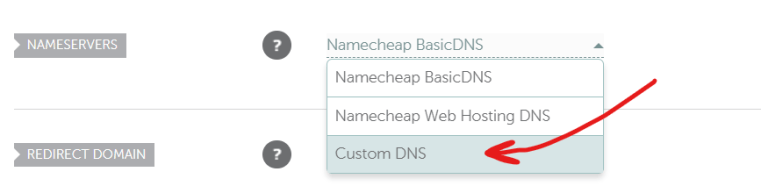
In the section that says ‘Nameservers,’ by default it’s going to be set to ‘NameCheap Basic DNS.’ Drop down that option and instead choose ‘Custom DNS.’
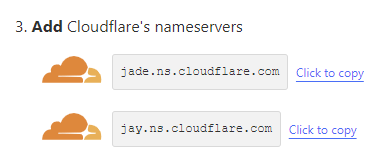
Cloudflare already gave us the nameservers to enter in here – so go back to Cloudflare and copy each of those nameservers and then paste them into Namecheap (or your own domain hosting provider):

Once those are pasted in, click the green checkmark to save.
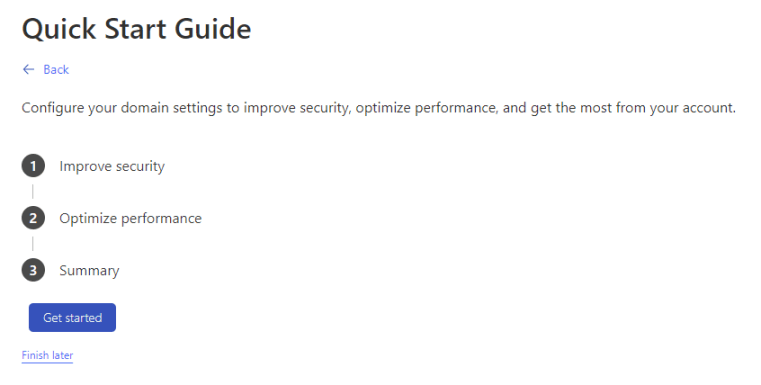
Go back to Cloudflare and click the ‘Done, check nameservers’ button. You should be routed to the Quick Start Guide – you can just click ‘Finish Later’ or you can take all the defaults.
Back in the Overview screen, you may be given a button to check Nameservers again – just click it and you’ll see this notification:

This process can take some time, but you’ll receive an email once Cloudflare has detected the name server change. Now would be a great time to go grab a cup of coffee!
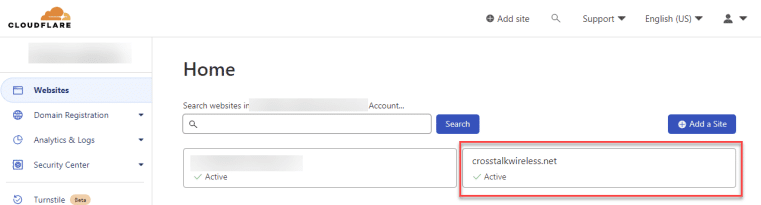
Once your nameservers have been updated and verified by Cloudflare, you’ll see the domain as ‘Active’ in the Cloudflare dashboard.

Create a Tunnel
The next step is to set up our Cloudflare tunnel. This is the connection between your LAN and the Cloudflare services. There are two pieces to this puzzle – creating the tunnel itself, and then creating a connector on our LAN that will communicate outbound with the tunnel that we created. When we have both of these pieces working, we have effectively created a secure connection between our LAN and Cloudflare that we can then build upon to access our internal services.
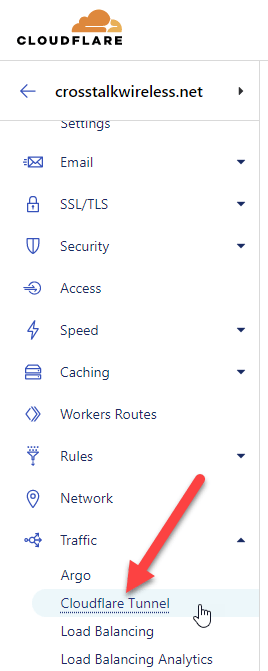
In the Cloudflare dashboard (you can get there by clicking the Cloudflare logo in the upper left-hand corner), you should see all of your Cloudflare-managed domains. Click on the domain that you just added.
Then click on ‘Cloudflare Tunnel’ which is located in the left-hand menu underneath ‘Traffic.’
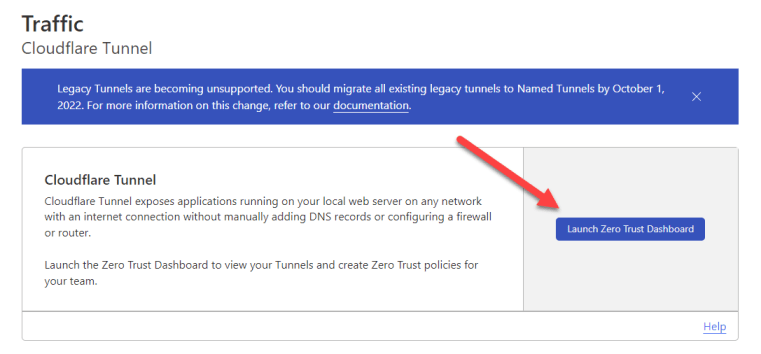
This will get us to the link to the Zero Trust Dashboard, which is where we will do the bulk of configuration with our tunnel.
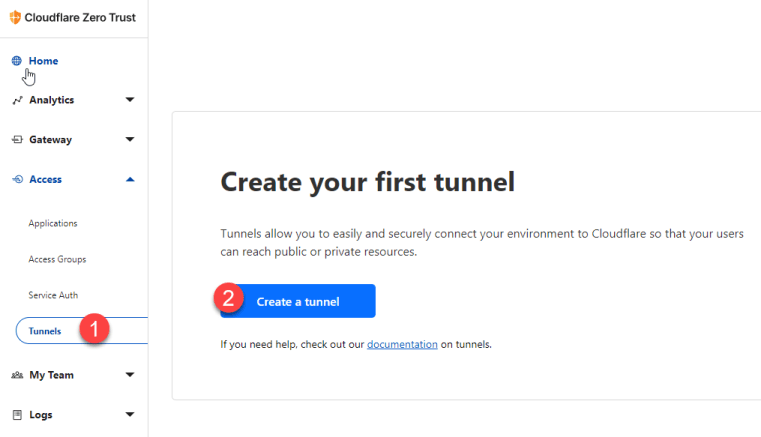
Click on ‘Tunnels’ under the ‘Access’ section of the left-hand menu and then click on ‘Create a Tunnel.’
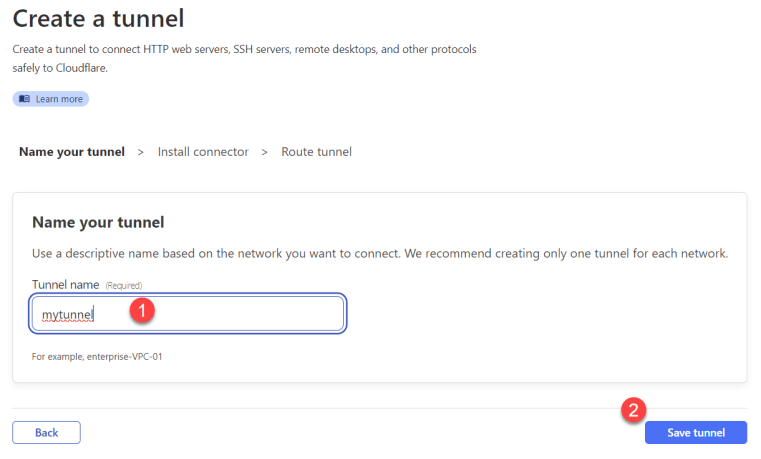
Give your tunnel a descriptive name such as the highly imaginative name ‘mytunnel’ that I used in the screenshot below, and then click ‘Save tunnel.’
On the next screen, you’re going to be asked about the environment in which your tunnel will be installed. For the purposes of this tutorial, we’re going to be using Docker, but if you’re using Windows, Linux, macOS, etc., you’ll want to pick the appropriate environment and then follow the instructions in the box below your selection.
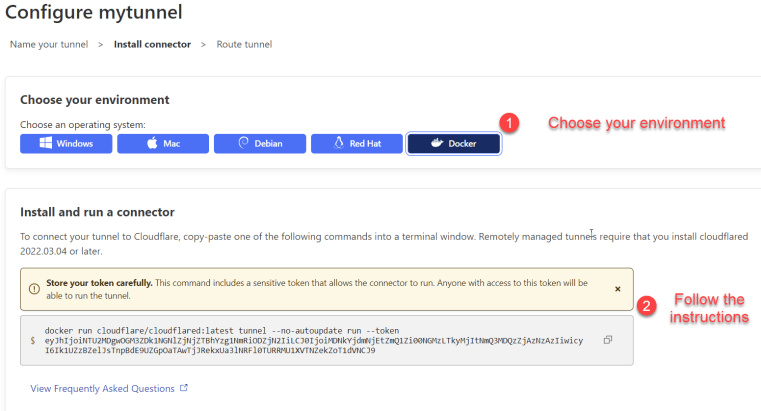
Below those instructions, you’ll see the connector status – this will be blank for now since we haven’t set up our connector yet, but when you do create the connector, this is where you can check if it’s connected and working properly.
REMEMBER THIS PAGE! We’re going to be back here in just a minute.
Create the Connector
We’re going to be using Docker for this tutorial, and more specifically, we’re going to be using the Docker application in the Synology NAS. If you’re using more traditional command-line based Docker, you can simply copy/paste the Docker command that Cloudflare gives you right into your CLI. If you’re using something like Portainer to manage your Docker containers, you’ll have to modify the command similar to what we’re going to do with Synology’s Docker application, but all the info you need is in that command line string.
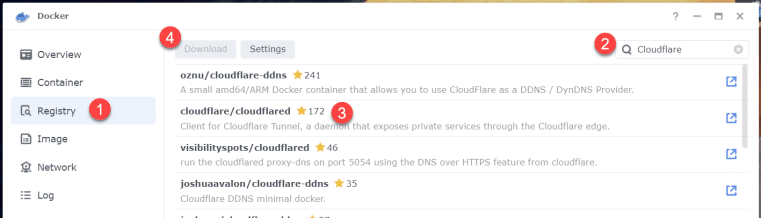
These next steps will be in the Synology Docker application, so head over to your Synology NAS, log in, and then install and/or run the Docker application. Once you’re in Docker, click on ‘Registry’ in the left-hand menu and then search for Cloudflare in the search box. You will see a list of Cloudflared-related items in the resulting window – click on the one that says ‘cloudflare/cloudflared’ and then click the ‘Download’ button in the top bar.
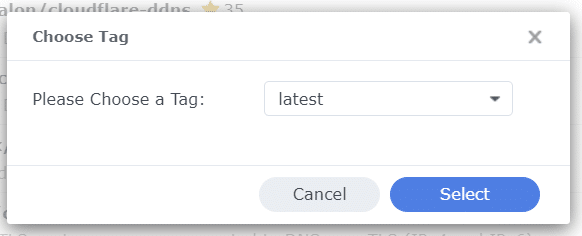
Pick ‘latest’ when prompted and then click ‘Select.’
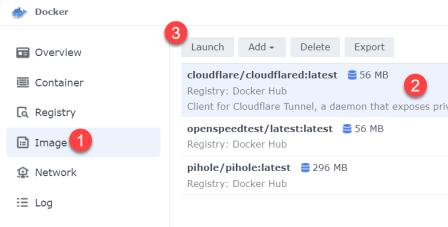
The Cloudflare Docker image will download and you’ll get a notification when it’s done (should just take a few seconds). You can now click on ‘Images’ in the left-hand menu, and you’ll see the Cloudflare Docker image that was just downloaded.
Click on the image and then click ‘Launch.’
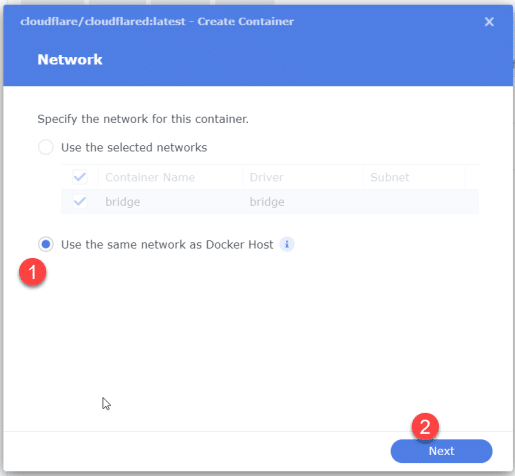
This will start the Create Container wizard. For the first step, we don’t really need this Docker container to have its own IP address on the network, so we can choose ‘Use the same network as the Docker Host. Click Next.
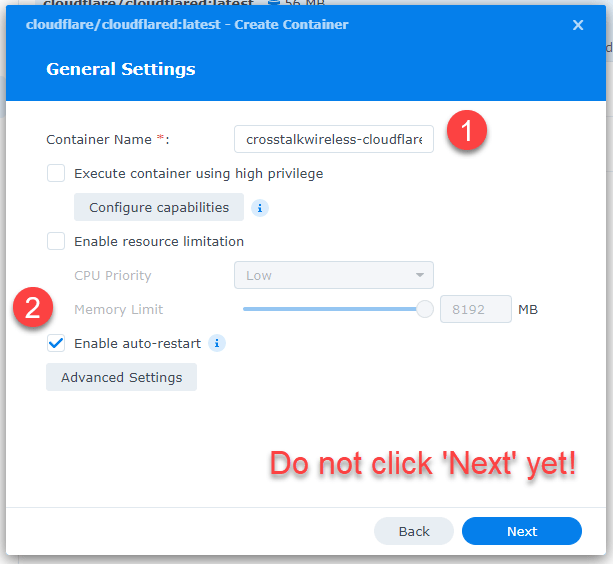
On the next screen, give your connector container a name – I’m calling mine ‘crosstalknetworking-cloudflared.’ Then check the box for ‘Enable auto-restart.’ DO NOT click ‘Next’ yet.
Here’s the trickiest part of creating this connector – we have to give it a specific execution command that includes the cloudflared token for authentication with Cloudflare.
Remember the Docker configuration page in Cloudflare that had our instructions for the Docker container? Let’s go back to that page.
We’re going to want to copy the Docker command that Cloudflare gives us – click the ‘copy’ button to copy the whole string to your clipboard – then open a text editor like Windows Notepad and paste it in. Let’s take a closer look at that command:
docker run cloudflare/cloudflared:latest tunnel --no-autoupdate run --token eyJhIjoiNTU2MDgwOGM3ZDk1NGNlZjNjZTBhYzg1NmRiODZjN2IiLCJ0IjoiMDNkYjdmNjEtZmQ1Zi00NGMzLTkyMjItNmQ3MDQzZjAzNzAzIiwicyI6Ik1UZzBZelJsTnpBdE9UZGpOaTAwTjJRekxUa3lNRFl0TURRMU1XVTNZekZoT1dVNCJ9
There are a few components here – I have indicated in BOLD the ones we need to keep…but first, let’s take a close look at this string.
- docker is the executable command we would run if we were doing this in the Linux CLI. That can be disregarded since we’re using Synology’s Docker application.
- run means ‘run’ this command – we’ll need to keep the ‘run’ but we’re going to move it to a different spot.
- cloudflare/cloudflared:latest is the Docker container that we want to run – but since we’ve already selected cloudflare/cloudflared:latest in the Synology application, we can disregard it here.
- tunnel means create a tunnel.
- run again! (we’ll leave this one)
- –no-autoupdate means that we want to manually run updates for this Docker container.
- –token is our authentication token (don’t worry that I’ve shown mine here – this tunnel will be destroyed by the time this article is published.
So now we’ve broken down the various components of this command, we need to adjust it a bit – here’s what we need to do in Notepad:
- delete out anything that is not in BOLD above (docker, cloudflare/cloudflared:latest, and –no-autoupdate)
- second, just to be sure – make sure you deleted the first ‘run’ but not the second one
When you’re finished, the string should look like this:
tunnel run --token eyJhIjoiNTU2MDgwOGM3ZDk1NGNlZjNjZTBhYzg1NmRiODZjN2IiLCJ0IjoiMDNkYjdmNjEtZmQ1Zi00NGMzLTkyMjItNmQ3MDQzZjAzNzAzIiwicyI6Ik1UZzBZelJsTnpBdE9UZGpOaTAwTjJRekxUa3lNRFl0TURRMU1XVTNZekZoT1dVNCJ9
Copy this new command to the clipboard and then head on back over to the Synology Create Container wizard.
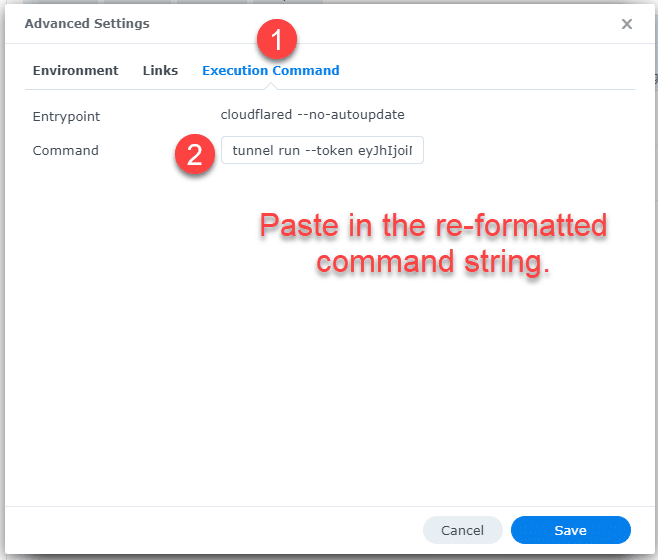
Back at the Wizard, click on ‘Advanced Settings.’

In Advanced Settings, click the ‘Execution Command’ tab and then paste our re-formatted command string into the ‘Command’ box. Side note – notice how the ‘Entrypoint’ has –no-autoupdate? This is why we were able to remove that portion of the original command string. Once that’s done, click ‘Save.’
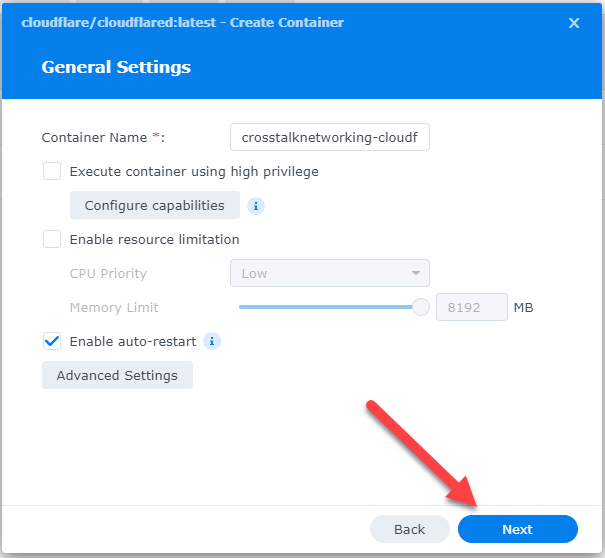
Once you’ve saved the Advanced settings, you can click ‘Next’ on the General Settings window.
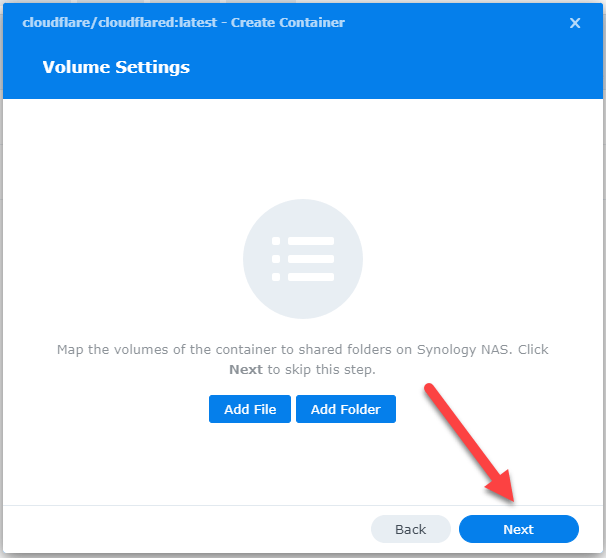
On the Volume Settings step, you can just click ‘Next.’ This is where we would normally tell Docker where we are storing files or folders outside of the Docker container. Since this Cloudflare Connector is basically just a command we’re executing, we don’t need any external files or folders.
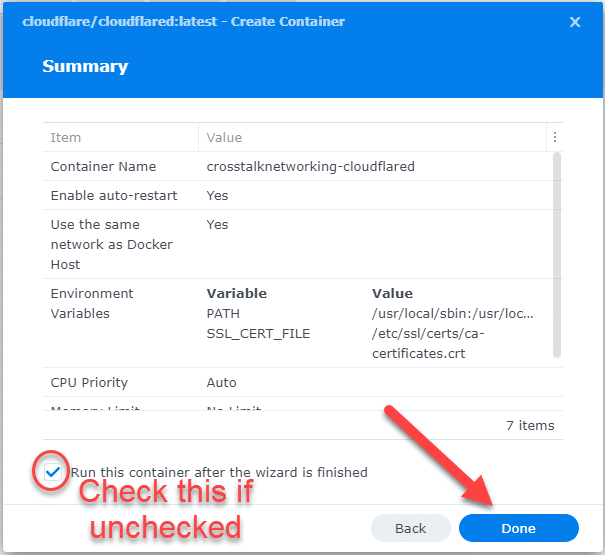
Finally, on the Summary page, click ‘Done.’ Make sure ‘Run container after the wizard is finished’ is checked (it is by default).
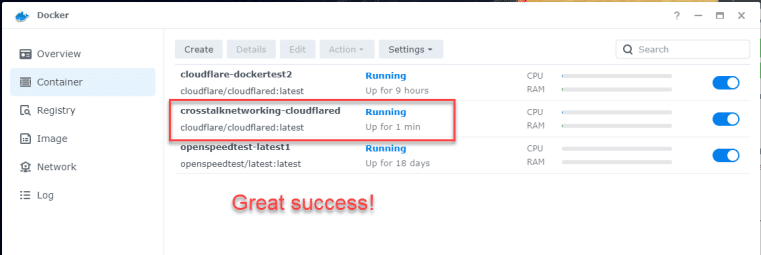
After a few seconds, you should see the Docker Container show up under Containers. It should be ‘Running’ with no issues. If there are any problems, it will likely just restart over and over, and you’ll see error messages popping up. If that happens, just delete it and go back through the container creation – you probably messed up the command string.
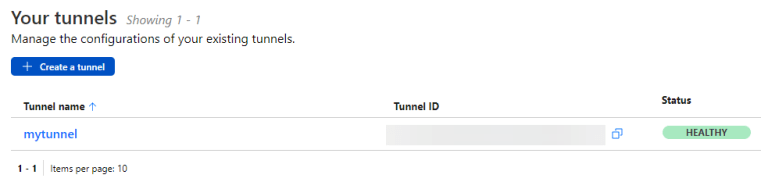
Back in the Cloudflare Zero Trust Dashboard, if we click on Tunnels we should see that our tunnel is now active and healthy!
OK – so at this point, our connector is done, and we can start the REAL configuration of opening up access to our LAN resources. We’re done with the Synology NAS portion – it’s basically set it and forget it.
Adding LAN Services
In order to gain access to our internal resources, we need to add them to the Cloudflare Tunnel. When we add a new service, such as the GUI interface of our Synology NAS, Cloudflare will automatically create a DNS CNAME record and route it through the tunnel for us.
This routing gives us a bunch of really cool advantages:
- HTTP to HTTPS – the surfing done through the Cloudflare tunnel is HTTPS…even if the GUI interface we’re pointing to is only HTTP!
- Port redirection – we can use standard HTTPS port 443 for all LAN device interfaces that we push through the tunnel – even if the GUI port is not 443. For example, the Synology NAS interface runs on port 5000 – but when we push it through the tunnel, it will be HTTPS port 443 and we never have to remember that port number again.
- IP address obfuscation – Cloudflare creates a CNAME record that points to a Cloudflare IP address – our own WAN IP address is never exposed to the Internet, which adds an additional layer of security.
Let’s add our first LAN server! I’m going to start off with the GUI interface of my Synology NAS which exists on my LAN at http://192.168.200.11:5000. Notice that this interface is HTTP, not HTTPS:

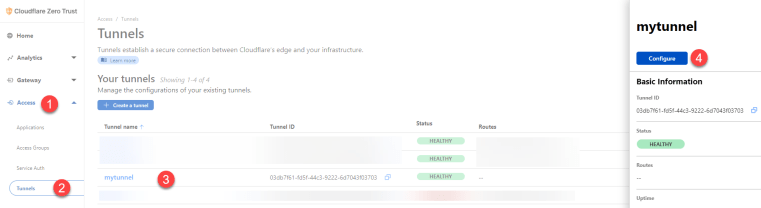
Head over to the Cloudflare Zero Trust Dashboard and navigate to Access –> Tunnels. Then click on the tunnel that we just created. A right-side window will pop out – click the ‘Configure’ button.
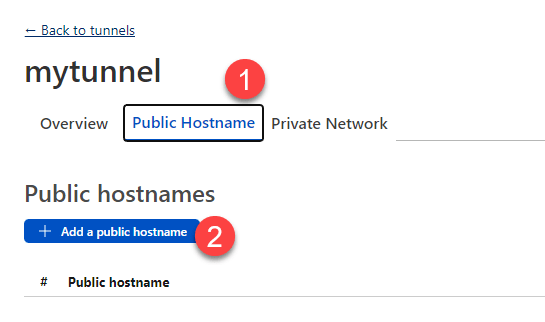
Once you’re in ‘mytunnel,’ (what you named your tunnel may be different), click on the Public Hostname tab, and then click ‘+ Add a public hostname.’
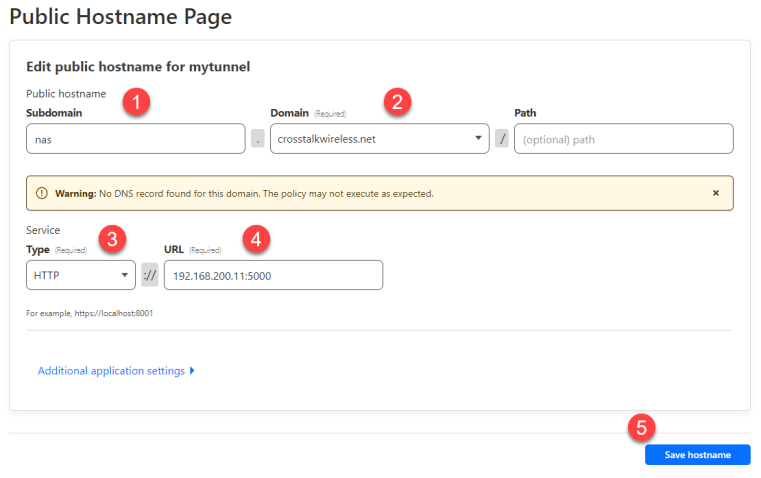
Now, we need to enter in some info:
- Subdomain – this is the beginning of the FQDN (the hostname in front of our domain name). Since I’m opening up access to my NAS, I’m just calling it ‘nas’ – the resulting full domain name will end up being nas.crosstalkwireless.net.
- Domain – select the domain for the FQDN – if you have only set up one domain, it should be the only one in the list.
- Service Type – this is going to be HTTP since we’re redirecting internally to an HTTP interface.
- URL – this is what I would type into my browser locally on the LAN to access my NAS – in this case it’s the IP address (:) port number – or 192.168.200.11:5000.
Click ‘Save hostname’ when you’re done.
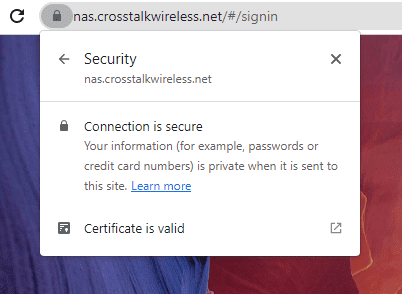
Now, if we open up that FQDN (nas.crosstalkwireless.net) in a browser, we’re redirected to the NAS interface – this should happen pretty much immediately after you click ‘Save hostname.’ Amazing!
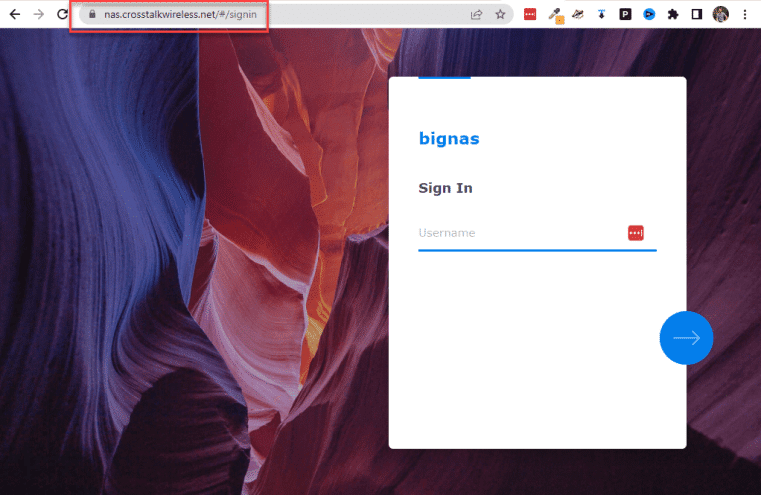
Notice also that the connection is HTTPS secure with a valid certificate:
Let’s add another one! I use PiHole for network-wide ad-blocking on my LAN. It runs on http://192.168.200.50/admin – let’s create a tunnel for that service as well:
In the Cloudflare Zero Trust dashboard, navigate to Access –> Tunnels. Click on ‘mytunnel’ and then the ‘Public Hostname’ tab. Click ‘Add a public hostname.’
In this example, PiHole runs on standard HTTP port 80, so we don’t need to add a port after the IP address:
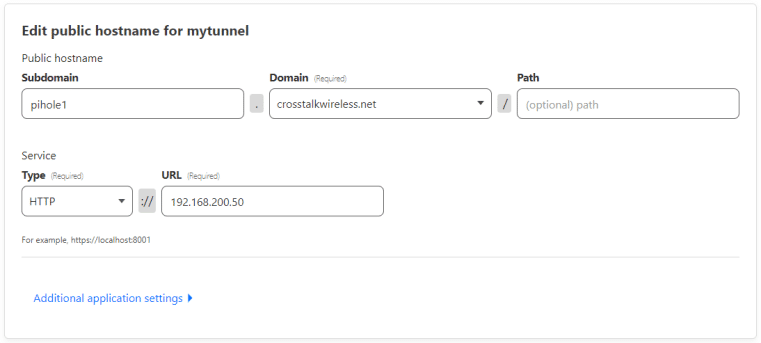
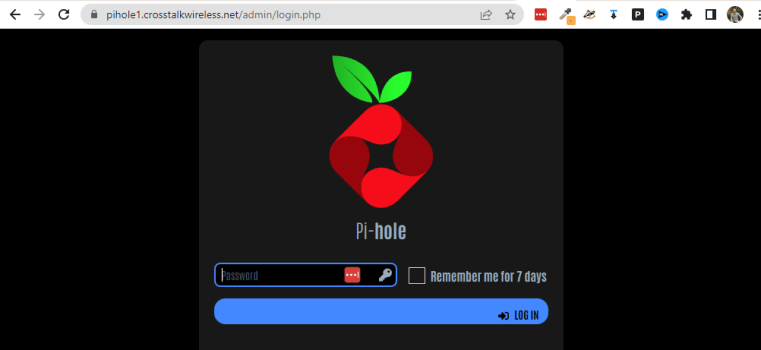
Once saved, we can now open up our PiHole through the tunnel – the only caveat with this one is that we have to remember to add /admin to the FQDN since the PiHole interface runs locally on my LAN on 192.168.200.50/admin.
Let’s add one more – the GUI interface of my firewall which is an EdgeRouter 4 running on https://192.168.200.1 (note HTTPS not HTTP):
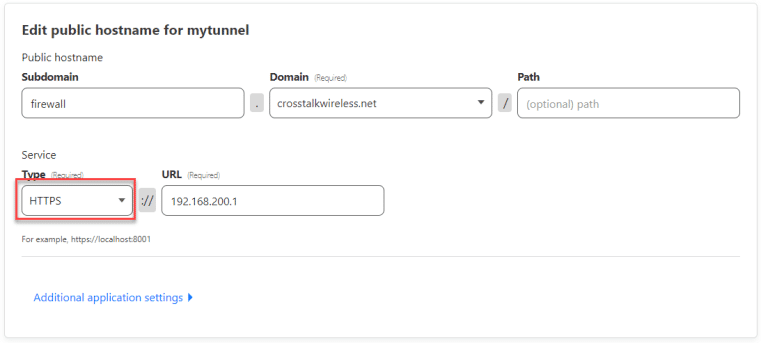
Let’s try going to firewall.crosstalkwireless.net!
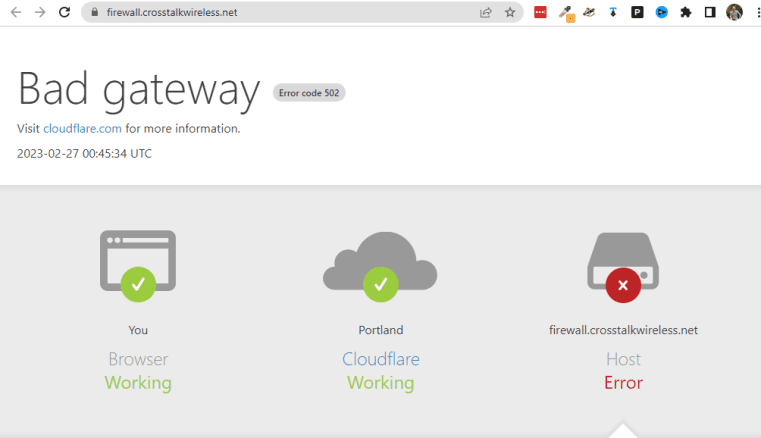
OH NO!! Massive error screen – what happened here?? Well, in this case, the internal protocol for connecting to my firewall is HTTPS, which requires a certificate (or else you get an error in the browser that you have to click past). In this case, the certificate being provided by Cloudflare is a mismatch to what the EdgeRouter is expecting, so it throws an error. In order to fix this, we’re going to have to get into the ‘Additional application settings’ of our tunnel rule for this firewall.
Back in the ‘Public hostnames’ tab of our ‘mytunnel’ tunnel, click on the firewall rule that was created, then click ‘Configure.’
Open up the ‘Additional application settings’ and then open up the TLS sub-menu. There’s a setting called ‘No TLS Verify’ – shift that to Enabled:
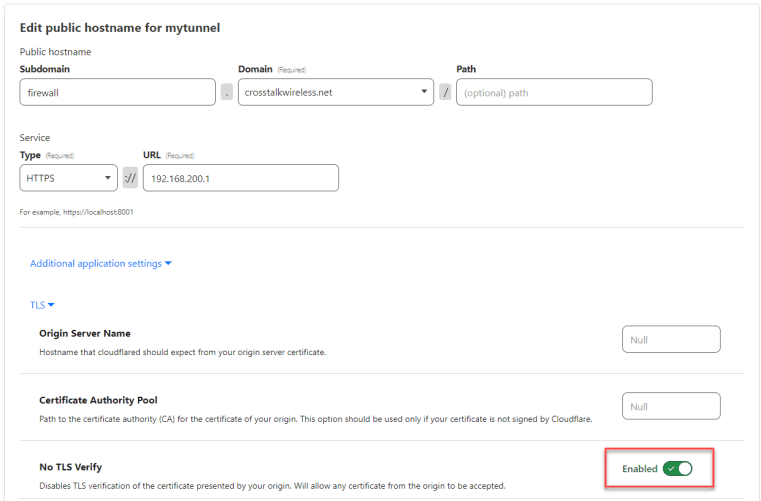
Now scroll to the bottom and click ‘Save hostname.’ Let’s try to open up that firewall interface again:
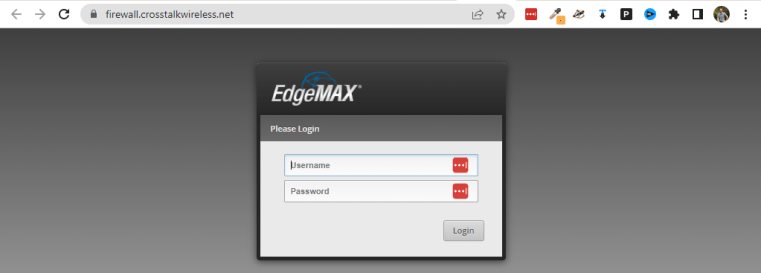
This time it works perfectly. Moral of the story here is that sometimes, you’ll have to dig into the advanced settings to make a tunnel rule work, but by and large, this is pretty straight forward.
So now we’re done right?? Absolutely not. At this point, we have our tunnel up and running but literally ANYONE can connect to these FQDNs and get into our network…now, there may be cases where you DO want to open up a tunnel connection to the whole wide world (such as if you’re running a public web server), but in this case, we’re just trying to access some stuff on our own local LAN – we absolutely do not want the whole wide world to be able to connect in – we only want to be able to access it ourselves!
Lock That S#!& Down!
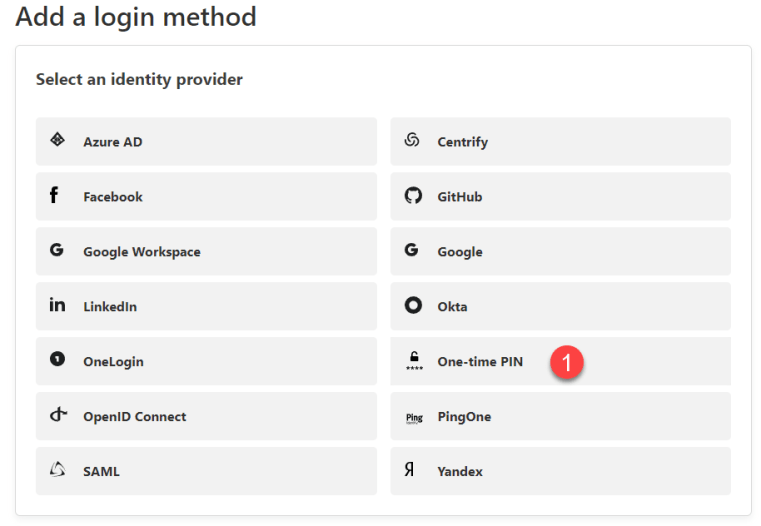
The security options for Cloudflare Tunnels are pretty robust – see the screenshot below…you can use basically any of the popular SSO services such as Google/Facebook/GitHub/Azure/etc. Each one of these is going to have its own way to do the initial setup. I have personally done the Google integration, and it wasn’t too difficult as long as you can follow directions.
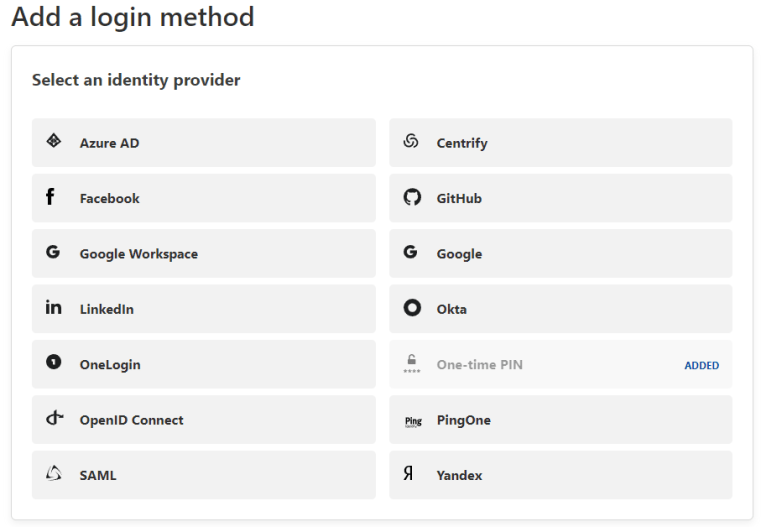
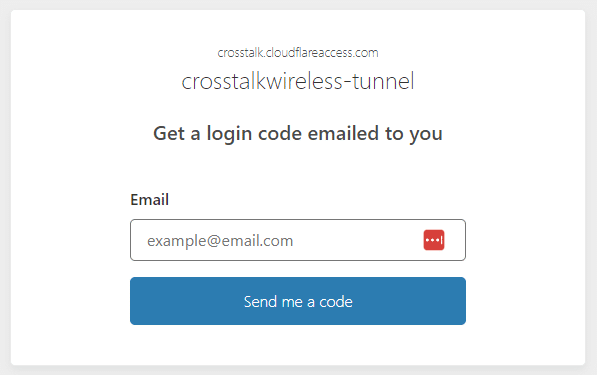
For the purposes of this tutorial however, we’re going to just use a One-time PIN. This means that when you first try to access any resource you’ve shared through the Cloudflare tunnel, you’ll be prompted for your email address (this can be individual email addresses, or an entire domain such as *@crosstalkwireless.net). When you input an email address that matches the rules you have set up, you receive an email with a PIN code that can then be used to provide access to your tunnel. Keep in mind though that you will STILL have to log into whichever resource you’re trying to reach.
For instance, the whole process for me logging into my Synology NAS through the tunnel is 1. Open the FQDN and enter my email address when prompted. 2. Receive the PIN code in email and authenticate to the Cloudflare tunnel. 3. Log into the Synology NAS.
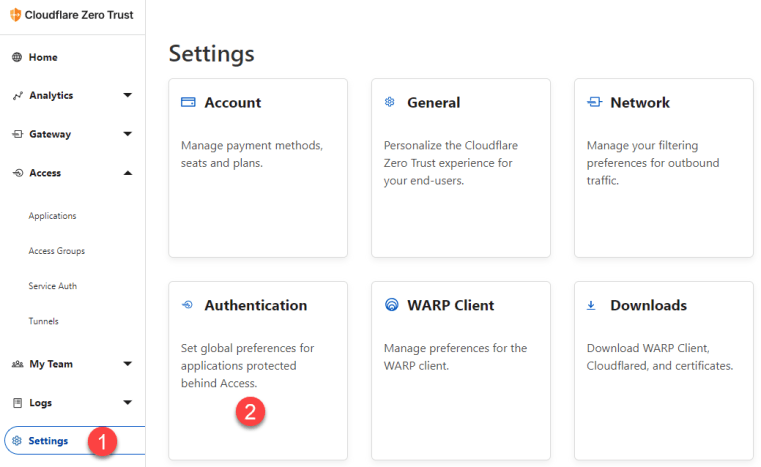
Let’s get started with the lockdown! The first thing you need to do is open the Cloudflare Zero Trust dashboard and click Settings –> Authentication.
Under Login methods, click ‘Add new’ and then select One-time PIN.

On the next screen, just click One-time PIN.
That’s it! We can now use One-time PIN as our Login method – let’s now create an access rule that uses it.
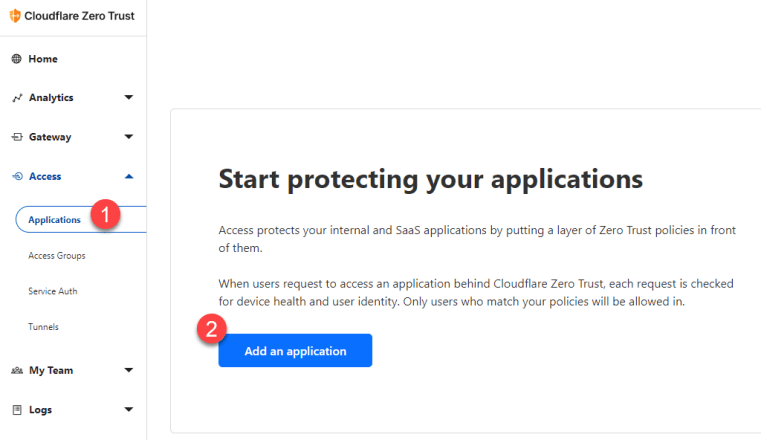
In the Zero Trust dashboard, click Applications under the Access menu. Then click ‘Add an application.’
For the type of application, choose Self-hosted.

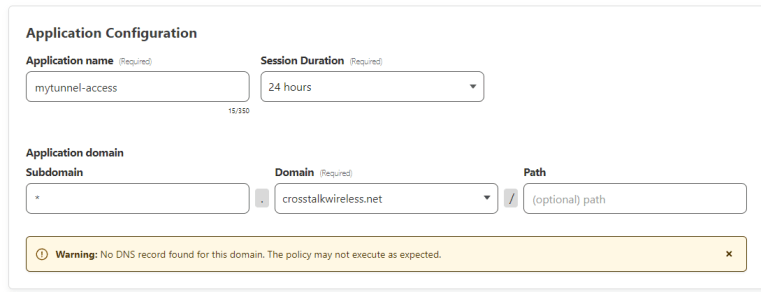
Now we get into the Add an application wizard. First, give your application a name such as ‘mytunnel-access.’ Then you can either lock down individual FQDNs and have different access rules for different resources, or you can use a wildcard for the subdomain which is what I’m going to do here. Add an ‘*’ into the subdomain field, and then drop down the Domain box to pick your domain.
This means that “anything” (dot) crosstalkwireless.net will be protected by this rule.
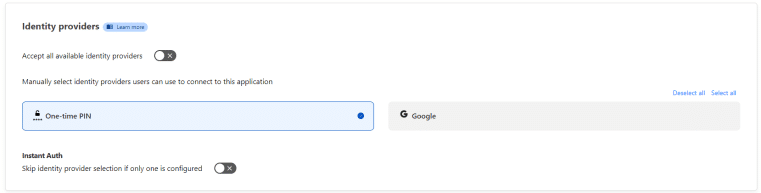
Now, scroll down to the Identity Providers section. Accept all available identity providers should be enabled by default, which means that any of the authentication/login methods that you configured will be used for access to this resource. Typically you just want to leave this default, but do understand that you can individually select login methods – in the screenshot below, I have disabled ‘Accept all available identity providers’ and specifically selected One-time PIN (this is just for the purposes of this tutorial). Click Next.
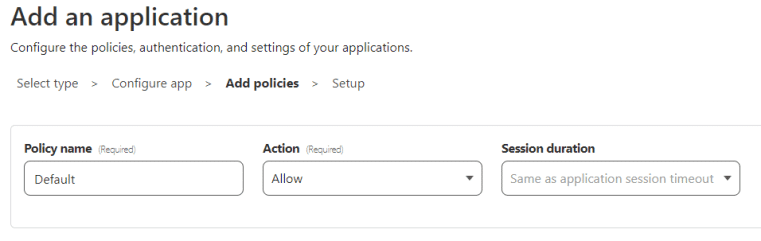
On the next screen, we can name our policy – I’m going to call it Default, and the Action is set to ‘Allow.’
If this is your first time configuring Cloudflare Tunnels, you likely won’t have anything in the ‘Assign a group’ section, but it is good to understand what this section is for. Basically, if you click on Access –> Access Groups in the Zero Trust sidebar, you have the option of pre-configuring access rules that can be used in your application policies. This way, if you are administering multiple tunnels, but you want to re-use the access rules, you can do it as a group instead of having to modify each Application individually. For our purposes however, we’re going to skip over this.
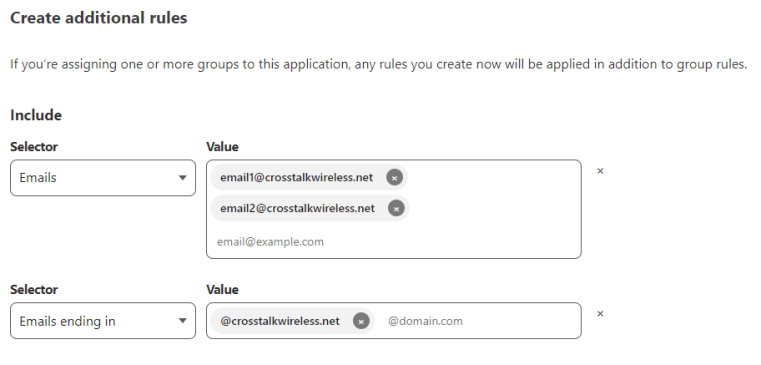
Down in the ‘Create additional rules’ section – this is where we will input the list of emails that we want to grant access to. In the ‘Include’ section, choose ‘Emails’ for the selector and then type in your email address, or multiple email addresses if you need multiple people to connect.
You can also optionally choose ‘Emails ending in’ as the selector and then put in your whole email domain such as @crosstalkwireless.net if you want anyone with an email address in your domain to have access. Just like with individual email addresses, you can add multiple email domains here.
To add more than one Selector, you can just click ‘+ Add include’ down toward the bottom of this section.
There are other types of Selectors you can use as well – such as ‘Anyone with IP range XYZ’ or ‘Anyone from Country X.’ All sorts of different ways you can grant access.
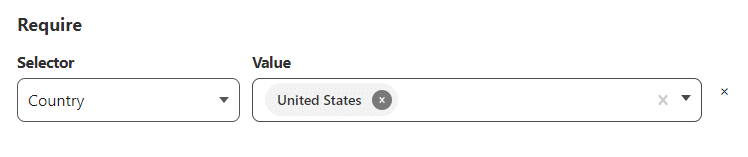
Below the ‘Include’ section is the ‘Require’ section. This is where you can even further lock things down. For instance, I’m going to choose ‘Country’ and then select United States. This means that only people with IP addresses originating in the US will have access…which isn’t super locked down since everyone knows how to use a VPN, but it does still lock it down somewhat.
Scroll down to the bottom and click ‘Next.’ Leave everything default and click ‘Add application’ on the final wizard step to create this access rule.
*** NOTE: It seems that when you add access/application rules to your tunnel, it can take a few minutes to take effect.
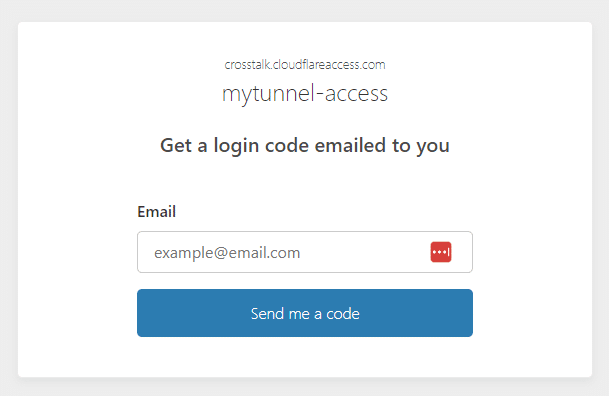
You should now see your Application in the list when you go to Access –> Applications. Let’s try it out! Try browsing to one of your tunnel FQDNs (you may have to clear cache first). You should be given the One-time PIN screen like this:
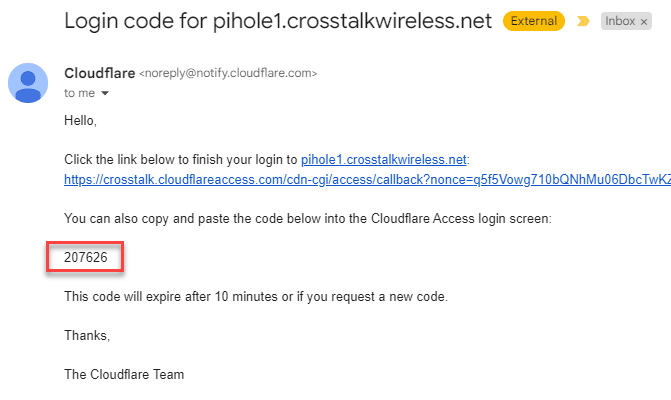
Now when you enter in a valid email address, you will receive an email with a One-time PIN code.
Enter in that PIN, and you should then be redirected to the resource you requested!
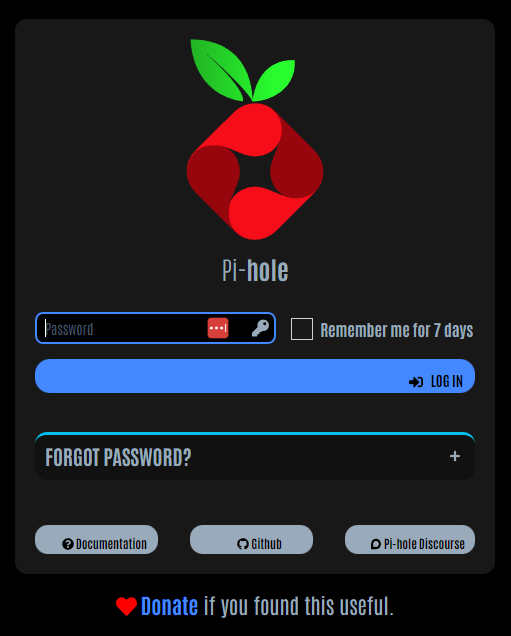
Congrats! You’re in! Your Cloudflare Tunnel is configured and secure.
Let’s now try something – I’m going to use Private Internet Access to change my geographical location to London, England.
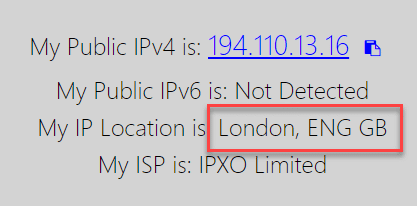
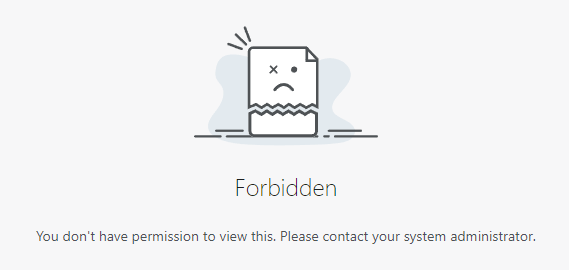
Navigating to that same PiHole FQDN, I’m straight blocked by Cloudflare:
Final Thoughts
There is SO MUCH that can be done with Cloudflare’s Zero Trust interface – we’ve barely even scratched the surface with Tunnels, but hopefully this gives you a good foundation from which to build upon. Once this is set up and working, you may never go back to VPNs again.