Source: https://lazyadmin.nl/office-365/microsoft-flow-tutorial-part-1/
As an IT guy, I really like to automate things. So I am always on the lookout for repetitive tasks that can be automated or opportunities to share data between applications. Data shouldn’t be entered twice and with tools like Microsoft Flow is it really easy to automate it. In this tutorial, I am going to help you setup your first Flow and give you tips on howto get the most out of it.
Now, this won’t be your standard tutorial explaining what each button does. I am going to pick a use case and we are going to create a Flow for it. Along the way, I will give you tips and explain how you can solve common issues you might run into.
This tutorial will be the first part of a small series. If you like it, make sure you subscribe to the newsletter so you get a notification when the next part is published.
Power Automate is receiving an update that improves the Expression Editor. Read this article on how to enable the new features. It will make working with Expressions a lot easier!
Example use case for Microsoft Flow
In our corporation, we use Microsoft Planner to manage our team tasks. We are not your standard IT department, we also develop some internal web applications. To keep track of all the features and bugs we use Planner. A great tool for this, everybody can open the Planner and see what we are working on. They can add a bug or feature to it and see the progress.
But as a programmer, we really like to use Github issue tracking. Not because the interface is better, but it allows us to reference code changes to the issue. So when we solve a bug, we can commit the code to the server and reference the issue number to it. This way we can always see how an issue is resolved or why a particular piece of code is changed.
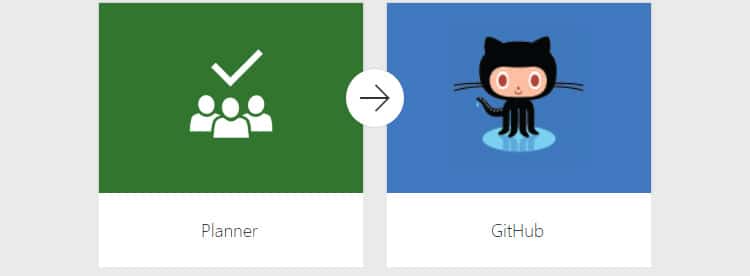
So what was happening is that the business side was keeping tracking of the issues in Planner, while the developers were recreating the issues in Github… entering data twice.
In this tutorial we are going to use Microsoft Flow to automatically create a task in Github with the proper details.
What are you going to learn?
You might not be working with Github or Planner, but that doesn’t matter. Both are free products so you can flow this Microsoft Flow Tutorial. But more importantly, what you are going to learn here can you use in your own Flows.
In this tutorials you are going to learn the following:
- Start a Flow based on a trigger
- Read the test / debug data to find solutions
- Working with dates
- Adding conditions to your Flow
Requirements
To follow this Microsoft Flow Tutorial you need a Microsoft Planner plan and a free GitHub account. Create a new repository (top right corner + sign).
Step 1 – The trigger
Every Microsoft Flow that you create starts with a trigger. A trigger is something that happens on what you want to act. In this case we want to start the Flow when a new tasks is created in our Planner.
In Microsoft Flow we select New > Create from blank. We can search for the connectors and triggers, so type in Planner.
When you start Planning a new Flow it’s always a good idea to lookup the available Triggers and Actions up front. This way you know if it’s possible to create the flow that is you want and sometimes give you extra ideas on how to make the Flow even better.
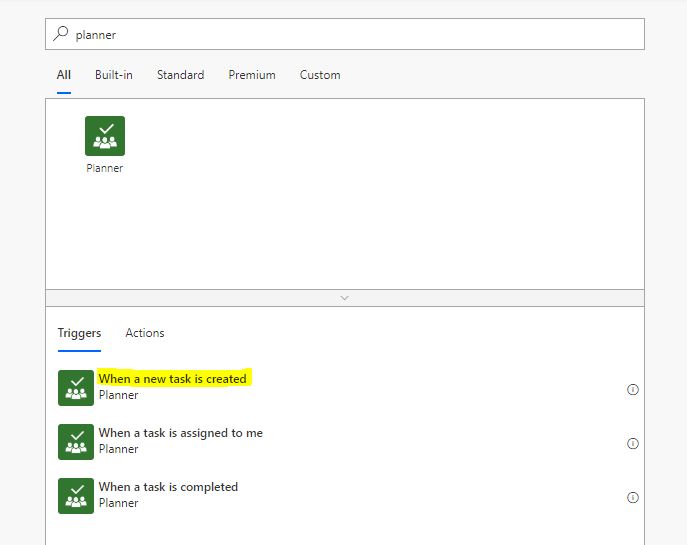
When you search for Planner, you will see the Planner connector and the possible Triggers and Actions. We want to start are Flow when a new task is created. So select the Trigger When a new task is created.
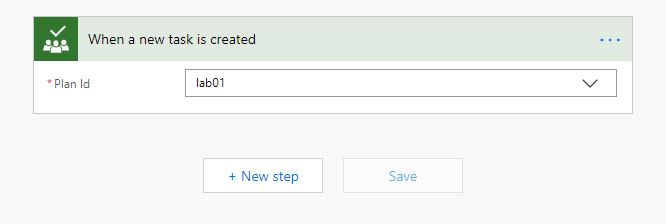
Your Flow will open with the Trigger, in this case we need to select the Plan Id (the name of the plan that you want to use).
Step 2- Get the data of the task
The Planner new task trigger returns some of the tasks details, but not all we need. If you are familiar with Planner, you notice that when you create a task, the task self is first created and then you open the task to add a description.
When creating a task you can only place it in the correct bucket, assign somebody to it and add a due date. So this data (title, assigned user, due date) is immediately available in the trigger, but we also want the description.
Get the data
Add a new step below the trigger and search for Planner. The action tab is now selected by default, if we look through the possible actions you will find the action Get task details. This will return the description and other data, exactly what we need.
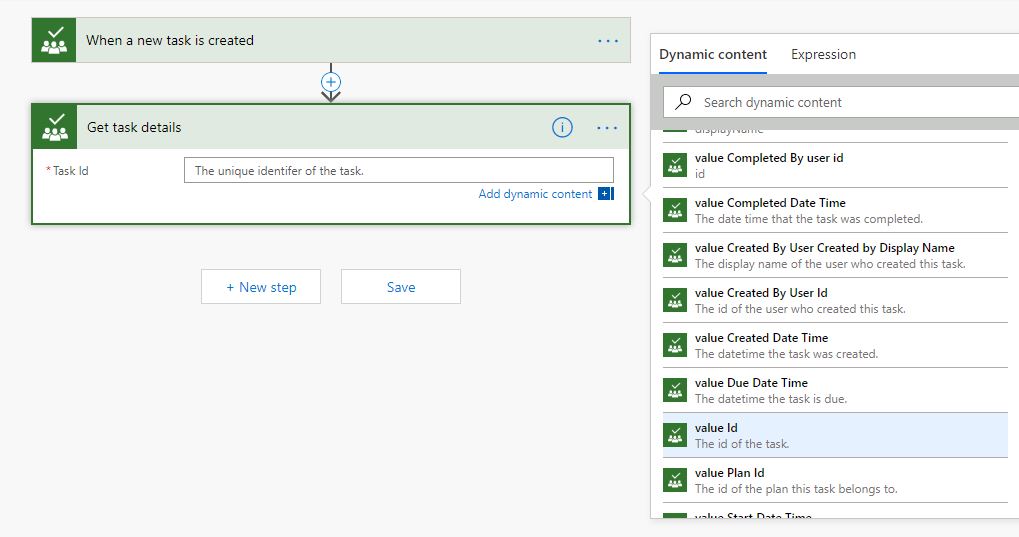
- Select the Get task details action and click in the Task Id field.
- We need to add the Task Id, select the value Id from the dynamic content.
In Microsoft Flow you have the ability to use the data from triggers and actions. This dynamic content allows you to pass data along or to add conditions based on the data.
Adding a timeout in Microsoft Flow
If we would run the Flow this way we could have a problem. The task is created first, the description is added later. But as soon as the task is created, the Flow will be triggered and start running. The Get task details action won’t be able to retrieve the desciption, because the user is still adding it. So we need to add a timeout to our flow.
In Flow, you can always add actions between existing ones. Just hover over the arrow between the two and click on the plus sign.
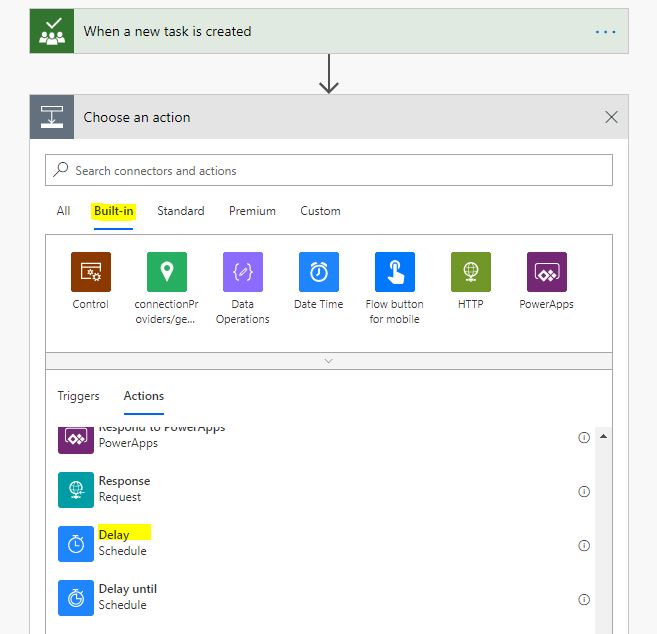
We are going to add an action between the trigger and the get task details. We are using a Built-In action, the Delay action.
A delay action allows you to specify the amount of the time the Flow needs to wait before it continues. The minimum is 5 second. For testing purpose we set it to 5, but for production 1 minute will do fine in this case. (assuming they don’t write to long descriptions 😉 ).
Step 3 – Creating the GitHub issue
We have the task details so we can start creating the GitHub issue. For the readers that are unfamiliar with GitHub, lets first create a new repository to work with.
Create a repository in GitHub
After you are logged in to GitHub you can create a new free and private repository.
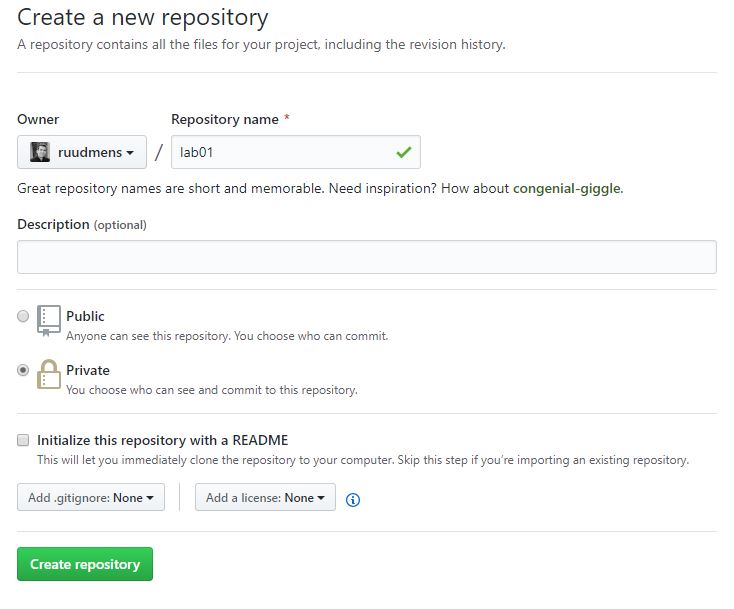
- Click the + in the upper right corner, next to your avatar or identicon, and then select New repositor
- Name your repository lab01
- Select private
- Click create repository
Your repository will open. Just click on the issue tab below Lab01 to open the issue page.
Creating the GitHub Issue with Microsoft Flow
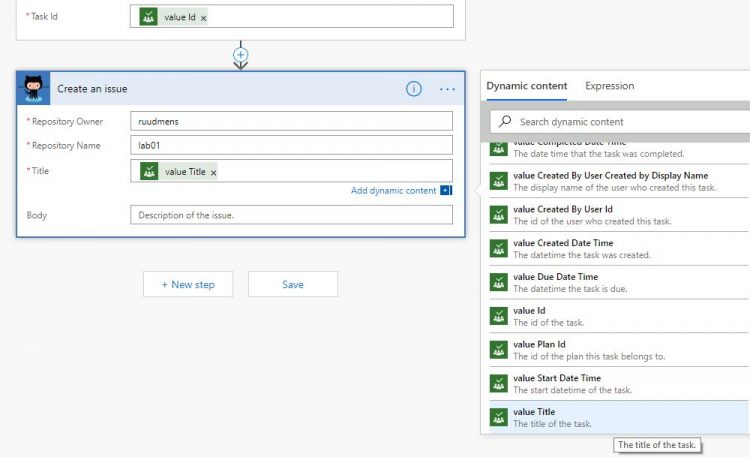
We now have a repository to work with, back to our Flow. We are going to add a New Step. Search for GitHub and select Create an Issue in the action tab. To create the issue the action need some information:
- Repository owner: your GitHub name (in my case ruudmens)
- Repository name: lab01
- Title: Here we want the title from the planner task. Select value Title from the dynamic content.
- Body: Select Description from the dynamic content
Save your flow (top right corner) and do a small test. Create a Planner task and wait a few second to see if the issue in GitHub is created before you continue.
Step 4 – Enhancing the issue body
In basic we have our flow working. A Planner task is created, the flow is triggered and will create a new issue in GitHub. But our programmers want to working in GitHub, so we are going to make sure they have all the information they need.
In Flow every input is a multi line input (or textarea). So for the body we are not limited to one line. This allows us to create and format our issue body with more data.
We might want to add the user who created the task in Planner, contact details, due date and of course the .
Adding the created by user
We start with the user who created the task. In the dynamic content from the When a new task is created you will find the value Completed By user Completed By Display Name. This sound like the data we need. Add it to your body and test the flow.
To test a flow you really should use the built-in test function. In the top right corner, next to save, you will find Test. Test allows you to re-use data from a previous run. This way you don’t need to create new tasks all the time. Also, the Test function will show where your flow failed.
Now if you look at your issue in GitHub you might notice that the username isn’t in the body of the issue. Sometimes the values or labels of the values in the dynamic content don’t match with the actual data that is returned.
Find the missing data
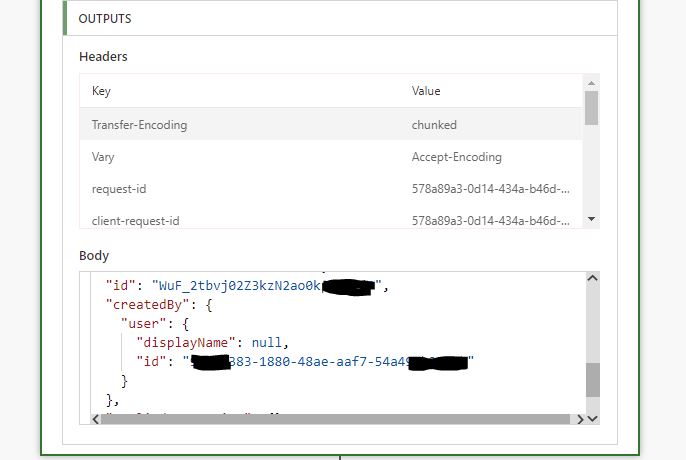
In the test function, you can expand all the actions after a run, seeing the Inputs and Outputs of each action. This is a great resource for finding the correct data and to solve this kind of issues.
Run a test and expand the When a new task is created trigger. Scroll down through the outputs, you will see that the CreatedBy -> User > Displayname value is null. So we can’t use this. But we do have a user id.
What we are going to do is first retrieve the user information based on the created by user id and then continue creating the body content for the GitHub issue.
Retrieving the user information
Add a new action before the Create an Issue action. Search on User and select Get user profile (V2) from the Office 365 users.
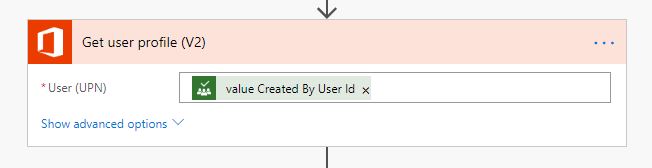
It asks for the users UPN (Unique Principal Name) or email id so we are going to add the value Created By User Id here from the dynamic content.
We can now go back to the body of the GitHub issue and remove the Completed by Display Name value that we added before. Instead we are going to use the Given Name from the Get user profile action.
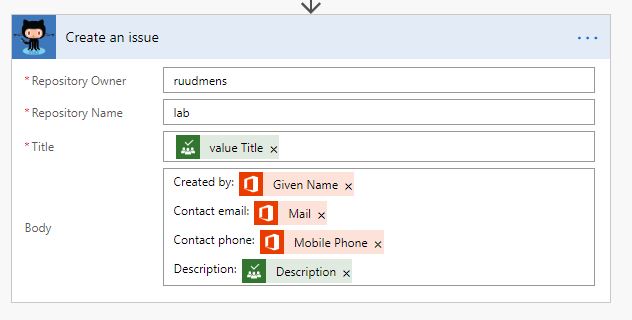
As an bonus we now also can access the users emailaddress and phone number. Lets add that as well in case the programmer has a question about the task.
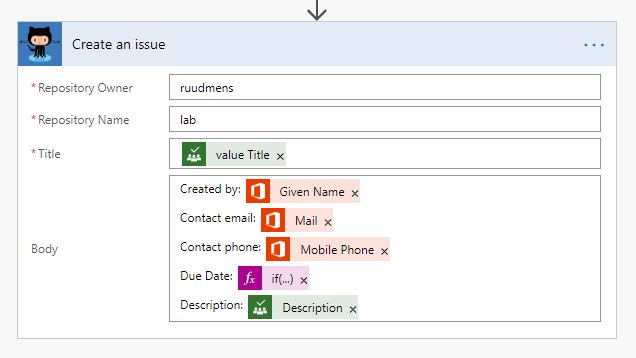
Adding the due date
It’s also good to know when the issue needs to be completed. In Planner the user can set the due date, so we are going to add that to the body as well. By default the date that Planner returns is formatted like 2019-02-08T10:00:00Z. Not very user friendly.
So we need to format the date. In Microsoft Flow you can also add expressions. Click in the body field, the Dynamic Content panel will open. Click on the expression tab and search for formatdatetime. the function requires a string that contains the date and a format in which you want it to return the date.
For the date time, we need to use the value Due Date Time (listed in the dynamic content). To use this value in the expression we can’t simply select it in the dynamic content. We need to type in the correct function (Trigger or Body) and select value we want.
formatDateTime(triggerBody()?['dueDateTime'],'dd-MM-yyyy')
Working with expressions requires some practice. The input field is small and at the beginning is might be a bit difficult to find the correct data. I have written an article on working with expression in Microsoft Flow. Make sure you check it out.
Checking if data exists
One of the most common problems in Microsoft Flow is relying on data that might not exists. In this flow we have a potential similar issue. We want to show the due date and we want to format it to a readable date.
But the expression, formatDateTime, requires a datetime string. If you don’t supply it, it will return an error resulting in failing your flow. In Planner it’s not required to set an due date. So in this case it’s important to check if we have a due date before we try to format it.
With another expression we can simply check if the value is empty or not. And combining it with an If statement allows us to format the date only when it exists.
if(empty(triggerBody()['dueDateTime']),null,formatDateTime(triggerBody()['dueDateTime'],'dd-MM-YYYY'))
What we are doing is first checking if the triggerbody value dueDateTime is empty. If it’s then we don’t do anything (null). Otherwise, we are formatting the date in a readable date.
Adding Conditions in Microsoft Flow
The last part of Microsoft Flow that we are going the handle in this Microsoft Flow Tutorial are conditions. Conditions allow you to do action based on a value.
In our case we are working with Microsoft Planner and in Planner you have multiple buckets (lists with tasks in it). The business side keeps a backlog with ideas they want to work out. So there is a bucket called backlog. When a task is added in this bucket we don’t want to create a GitHub issue for it.
So we are going to add a condition to our Flow. We add it immediately after the trigger, there is no need to continue the flow if the task is created in the backlog.
- Click on the + sign under the trigger
- Add an action
- Select Control
- Select the value Bucket Id
- Choose the condition Is not equal to
- And then we need a bucket id…
Unfortunately, we couldn’t select a bucket based on its name. So we need to find the bucket id. Now there aremultiple way to this, using the Graph Explorer, PowerShell (won’t cover that one here) or using the developer tools in your browser.
Using the Graph Explorer
We are getting of course here, so I will keep it short. Graph is the API from Microsoft, allowing you to connect data from Office 365 to other applications. Flow is using Graph in the background. So Graph is a great tool to find what data is available.
In Graph Explorer we are going to run the following query:
https://graph.microsoft.com/v1.0/planner/plans/<planID>/buckets
You see we need the Plan Id. Yes we can use Graph again to find the PlanId, but then your need your GroupId. An easy way to find the Plan Id is to open the Plan in look into your addressbar. Ad the end of the url you will find &planid=<a_lot_of_characters>

Run the query and you will find the names of your buckets with their ID’s.
Using the Browser
Most of the time your can find data like this also in the HTML code of the webpage. Just right click on the title of the column (backlog) and click Inspect.
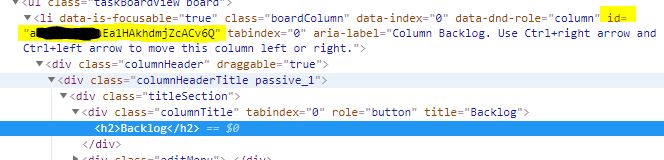
You see the HTML code the Planner page. Just hover with your mouse over the code and the corresponding elements will highlight in your browser. If you to a look at the code you will find the ID of the bucket Backlog.
Finishing the condition
Now we have the ID of the bucket we can finish our condition. Add the bucket ID into the condition. Under the condition you will have an If Yes and If No section. Drag all the action into the If yes.
In this case we don’t want to do anything if the condition returns no.
Result
In this first part of the Microsoft Flow Tutorial we created a Flow that creates a GitHub issue based on a Planner task. There is a lot more to learn when it comes to Microsoft Flow, but the best way to learn it is to start creating Flows.

Use this Microsoft Flow as an example and use your own creativity to work further on it. If you have any questions or you have case you need a Flow for but can’t figure out how, just drop a comment below.
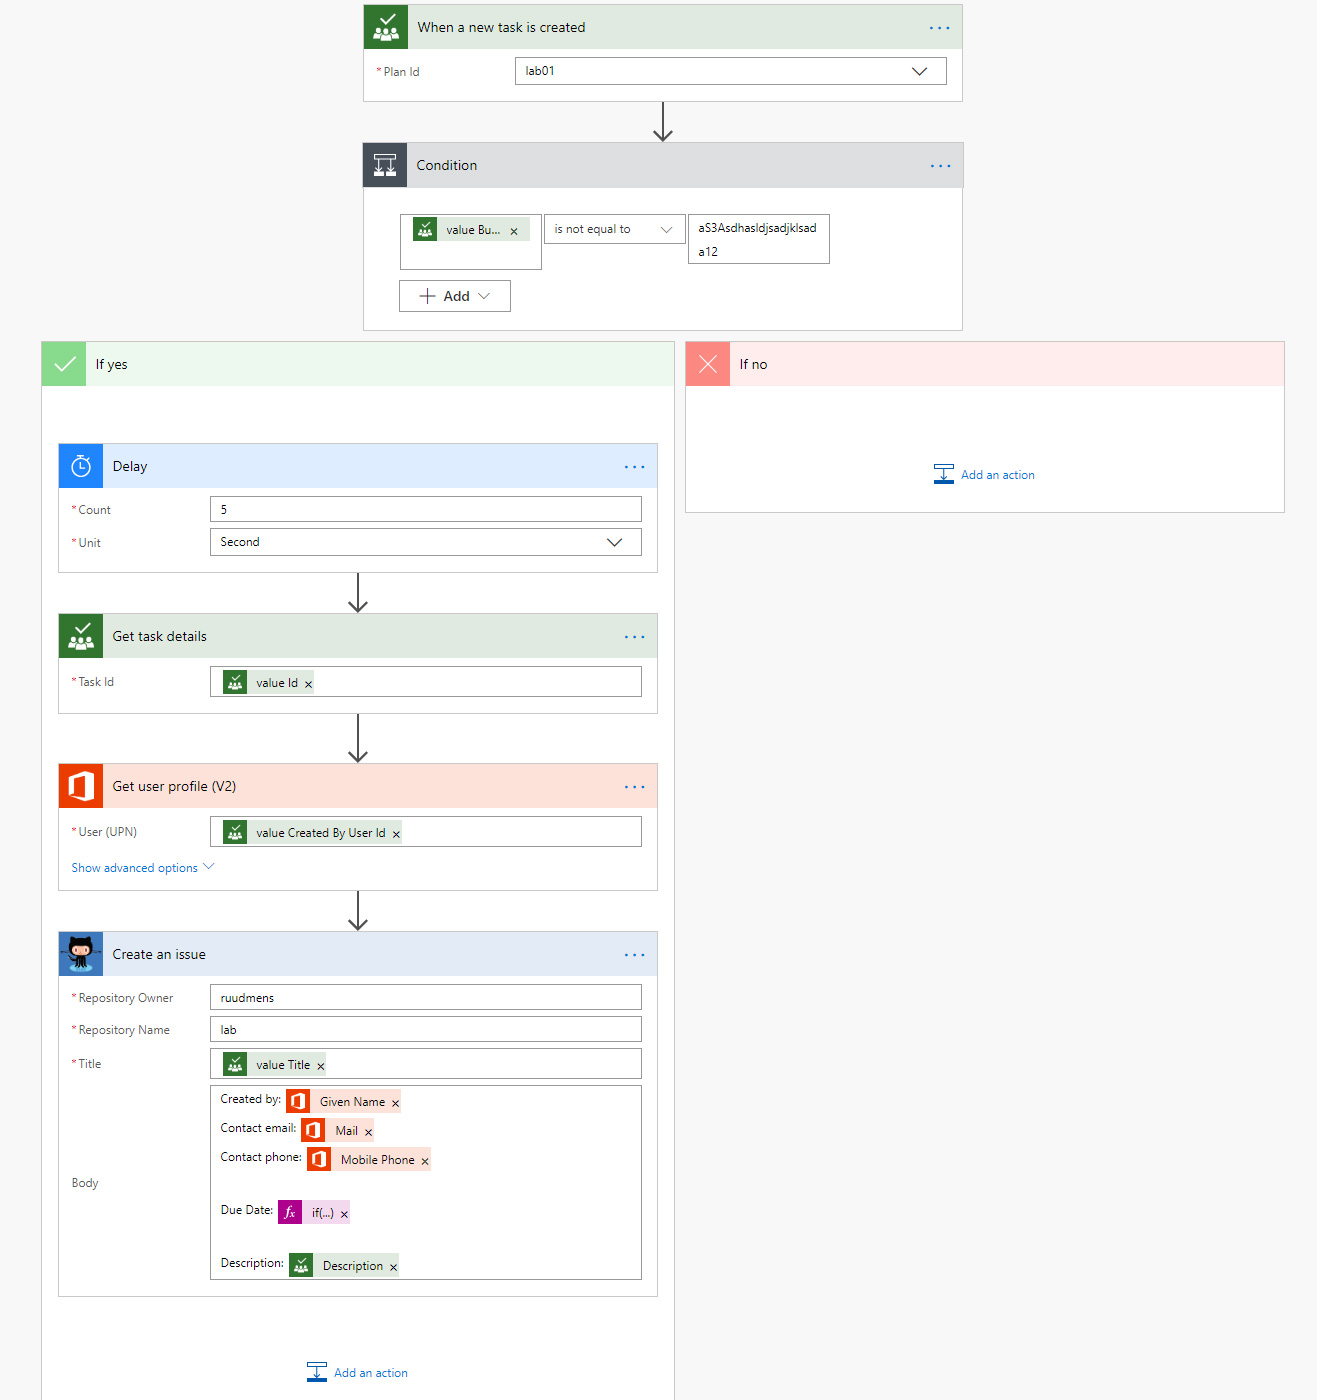
The final result of the flow after this tutorial will look like:
More stuff like this: