Source: https://adamtheautomator.com/autohotkey/
Going through the same tasks manually in your daily routine can be tiring, especially if you have other tasks on your plate. Why not automate those repetitive tasks? AutoHotkey (AHK) is a powerful and customizable way to automate your daily tasks.
In this ultimate guide, you’ll master the basics of creating and running scripts with AutoHotkey. You’ll also go through some advanced topics like hotkeys and variables, so you can eventually create AHK scripts for yourself.
Ready? Dive right in, and automate your workflow!
Prerequisites
This tutorial will be a hands-on demonstration. If you’d like to follow along, be sure you have the following.
- A Windows 10 computer.
- AutoHotkey installed on your computer.
What is AutoHotkey?
Before you dive deeper into this tutorial, what is AutoHotkey anyway? AutoHotkey is a free scripting language for Windows that allows you to automate tasks by creating scripts. These scripts can do anything from remapping keys on your keyboard to creating complex macros.
AutoHotkey was created in 2003 by Chris Mallett, and the language has continued to grow and evolve over the years. The AHK community is active and friendly, and there are many online resources to help you get started.
A wide range of people uses AutoHotkey, from gamers to software developers to power users:
- Gamers who want to create custom macros to improve their gameplay.
- Software developers who want to automate tasks or create custom shortcuts.
- System administrators who want to speed up their workflow.
One thing to note is that AutoHotkey is a portable application. You can combine the AutoHotkey executable with your scripts and create a self-contained portable application that you can run on any computer.
You can put the application on a flash drive and take it wherever you go. A portable version can be handy if you plan to use AutoHotkey on multiple computers without having to install the application on each one.
Is AutoHotkey Safe?
AutoHotkey is a safe language to use and is not known to cause any harm to your computer. But it’s worth noting that some anti-virus programs may mistakenly identify AHK scripts as viruses or malware.
Why some anti-virus programs identify AHK scripts as a virus is beyond the scope of this tutorial. But if your anti-virus blocks your AutoHotkey scripts, add your scripts to the list of approved programs or exceptions in your anti-virus software.
You can also report false positives to the anti-virus software vendor so that they can correct the issue.
Creating Your First AHK Script
Now enough with the introduction and dive into creating your first AHK script. You’ll start with a basic script that prints the words “Hello World.”
This script is a good starting point for beginners as it helps you familiarize yourself with the basics of the AHK language.
1. Create a project folder on your Desktop, and give it a name. But in this tutorial, the folder is named /ATA.
2. Open File Explorer, and navigate to your Desktop.
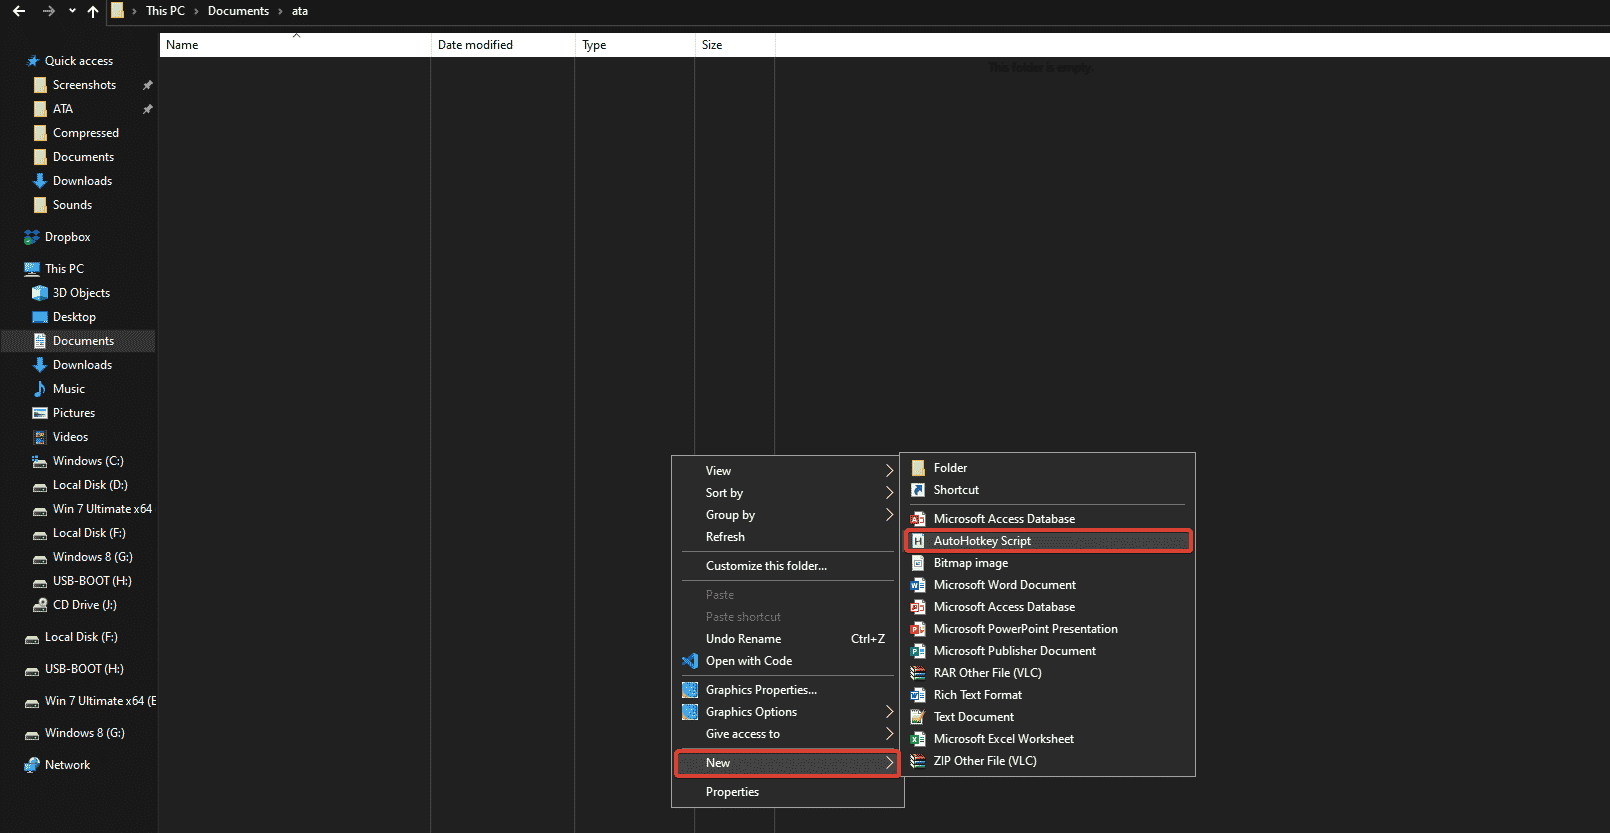
Right click in a space inside the folder and select New —> AutoHotkey Script. Provide a name for your script, such as HelloWorld.ahk.
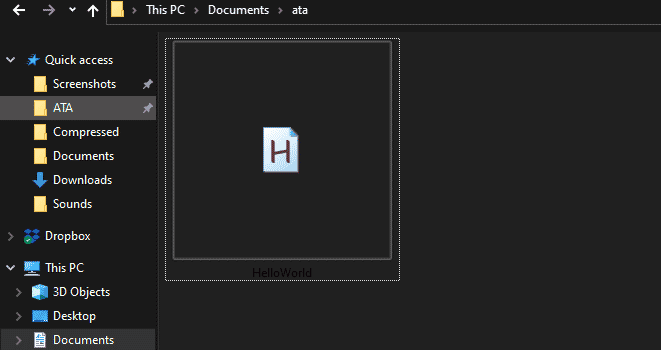
You should now have a new AHK script file named HelloWorld.ahk, as shown below.
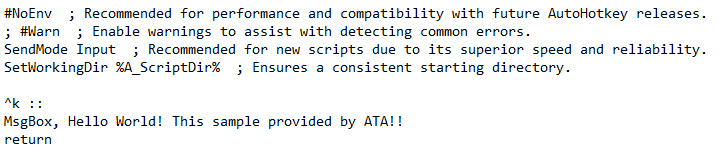
3. Next, open the HelloWorld.ahk file in your favorite text editor, and you’ll see the file contains the basic skeleton of an AutoHotkey script like the one below.
Throughout this tutorial, you’ll be working on only one script (HelloWorld.ahk). Be sure not to remove the code below (basic skeleton of the AutoHotkey) each time you modify the script.

Related:How to Edit Files with a Real PowerShell Text Editor
4. Populate the code below at the bottom of the HelloWorld.ahk file’s content. Be sure to save the changes and close the file.
This code below simply opens a message dialog box (MsgBox) when you press the Ctrl+K keys (^k::) on your keyboard. The message box displays the message saying Hello World! This sample provided by ATA!!.
^k::

MsgBox, Hello World! This sample provided by ATA!!

Return
Copy
You can select any key combination you want, but it’s best to choose a key combination that isn’t already used to prevent conflicts. For example, Alt+Tab is a bad choice because Windows already uses this key shortcut to cycle through open applications.
5. Now, right-click on the file and select Run Script from the context menu to run the script.
Don’t change the default app for opening or running your AHK scripts when you’re editing the scripts, like Notepad. Or else, you won’t see the Run Script option in the context menu.

You’ll see the AutoHotkey icon with the H letter on top of a green square in your system tray, as shown below. This icon confirms that your code is correct and is running.

6. Press the Ctrl+K hotkey on your keyboard, and you’ll see the same message box pop-up, as shown below.

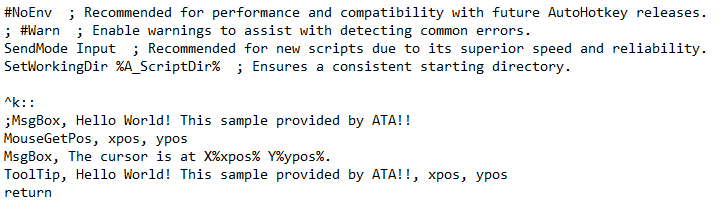
7. Next, replace the code you added in the HelloWorld.ahk file with the code below, save the changes and close the file.
The code below captures (MouseGetPos) and prints the mouse cursor’s position (xpos, ypos) to a message box. At the same time, the code displays a ToolTip containing the text Hello World! This sample provided by ATA!! next to the mouse cursor.
^K::

MouseGetPos, xpos, ypos

MsgBox, The cursor is at X%xpos% Y%ypos%.

ToolTip, Hello World! This sample provided by ATA!!, xpos, ypos

Return
Copy
ToolTip lets you display a message next to the mouse cursor to provide additional information for the end-user on a GUI.
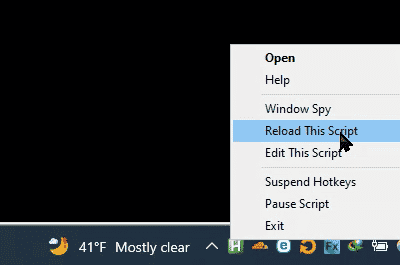
8. Now, right-click on the AutoHotkey icon at the system tray and select Reload This Script for the changes to take effect.
Note this step as it’s always essential to run an updated version of your scripts.
9. Finally, press the Ctrl+K hotkey to run the script.
You’ll see the cursor’s location displayed on the screen and the tooltip message beside the mouse cursor, as shown below.

Adding Comments in AHK Scripts
You’ve just created your first AHK script, but as you may have noticed, the codes can be confusing without comments. Luckily, AutoHotkey lets you add comments to leave notes and instructions for yourself or others who may be working on the same script.
Comments don’t affect your program – the interpreter simply ignores them. But AHK code comments are handy if you’re sharing your code with someone else or plan to come back to it later and need a reminder of what it does.
A code comment in AHK starts with a semicolon (;) and continues to the end of the line. You can place a code comment above or at the end of the line of command/function, as shown below.
When you place the comment at the end of the command, be sure to put a space before writing the semicolon. Or else, AutoHotkey will consider the comment as part of the command or function, leading to an error.
; A comment placed above a line of command/function
MsgBox, Hello, world!

MsgBox "Hello, world!" ; A comment placed at the end of a line of command/function.
Copy
To see how to add descriptive code comments in your AHK scripts:
1. Edit your HelloWorld file and replace your code with the one below, including comment lines, save the changes, and close the file.
; Adding Code Comments above the line of command/function

; Sets the Ctrl+K Hotkey. The ^ symbol represents the Ctrl key.
^K::

; Type Hello to the active window, like Notepad.

Send Hello {enter}

; Wait one second before continuing with the script

Sleep 1000

; Adding Code Comments at the end of the line of command/function

Send Holla {enter} ; Types Hello to the active window.

Sleep 1000 ; Waits one second before continuing.

Send Bonjour ; Sends the bonjour text to the active window.

Return ; Stop the script.
Copy
2. Reload the script to apply all changes you made to the HelloWorld.ahk script.
3. Finally, press the Ctrl+K keys to execute the code to test your code comments. You’ll see that the script prints one word per second, each in a new line, as shown below.
This output confirms that the interpreter ignores the comment lines in your script and your code comments syntax is correct.
Disabling a Code Block
When scripting in AHK, there are times you’ll want to disable a code block temporarily. For instance, you have a long sequence of code. But you only want to test a particular section of code without having to run the entire script.
Putting the semicolon (;) in each line is tedious. But luckily, there’s a better way! You can use the /**/ comment style to comment out a code block. This comment style tells the interpreter to completely ignore the code between the /* and */ characters.
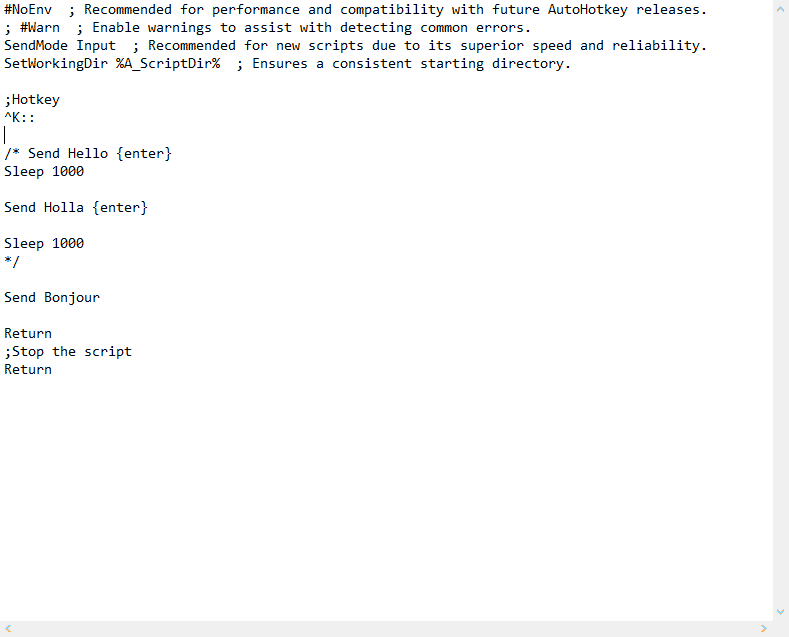
1. Edit your HelloWorld.ahk file, and add the /**/ characters accordingly, as shown below, to comment out the code block. Save the changes and close the file.
; Sets Ctrl+K hotkey
^K::

Sleep 2000 ; Waits two seconds before continuing

; This code block is disabled/commented-out
/* Send Hello {enter}
Sleep 1000

Send Holla {enter}

Sleep 1000
*/

Send Bonjour ; Sends the Bonjour text to the active window.

; Stop the script
Return
Copy
2. Reload the HelloWorld.ahk script to apply the changes.
3. Finally, press the Ctrl+K keys to execute the script and test your commented-out code block.
This time, your script types only Bonjour, as shown below. Notice the interpreter entirely ignored the commented-out code block.
Pausing the Script with the Sleep Command
Commands are the most critical part of the AutoHotKey language. Different commands allow you to perform various tasks, such as manipulating text, running applications, and interacting with the user.
For example, user input is required before the script continues. The Sleep command will do the trick. As the name suggests, the Sleep command causes your script to wait a certain milliseconds before continuing.
The syntax for the Sleep command is as follows. Replace timer with the number of milliseconds of wait time you prefer.
Sleep timer
Copy
The
timervalue can be 1 to 2147483647 milliseconds (about 24 days).
1. Open your HelloWorld.ahk script on a text editor, replace the code you previously added with the following lines. Save the changes and close the file.
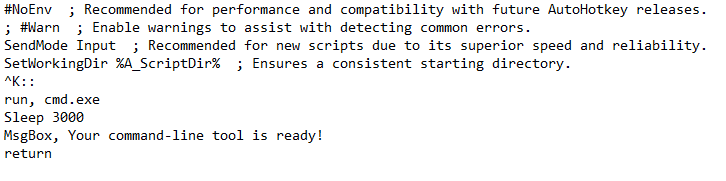
The code below opens the command prompt when you press Ctrl+K and waits three seconds before displaying a message box that says, “Your command-line tool is ready!”.
You use the Sleep command to add a three-second delay before running the MsgBox command. Doing so ensures that the command prompt is truly open before displaying the message.
; Sets Ctrl+K hotkey
^K::

; Run command prompt
run, cmd.exe

; Sets a sleep timer of three second
Sleep 3000

; Displays a message on the command prompt
MsgBox, Your command-line tool is ready!

; Stops the script
return
Copy
2. Reload the script to apply the changes you made to the HelloWorld.ahk file.
3. Finally, press the Ctrl+K keys to run the script. The command prompt opens, and a message box is displayed after a three-second delay, as shown below.

Randomizing a Value with the Random Command
Suppose your office has ten conference rooms, and you want to randomly choose one of the conference rooms to hold your meeting. If so, adding the Random command in your script is what you need. The Random command generates a random number in a specified range of numbers.
The syntax for the Random command is as follows where:
OutputVar– the variable to store the random number.Min– the lowest number you want the random number to be.Max– the highest number you want the random number to be.
Random, OutputVar, Min, Max
Copy
To demonstrate how the Random command works:
1. Replace the code you’ve added so far in the HelloWorld.ahk file with the following lines, save the changes and close the file.
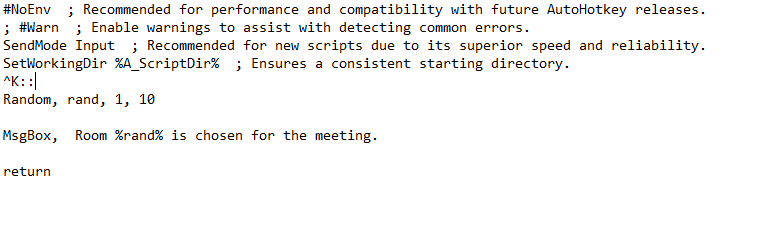
This code chooses a random number between 1 and 10, stores the result in the rand variable, and displays the room number in a message box.
; Sets Ctrl+K hotkey
^K::

; Randomizes a number from 1-10 and store the result to rand variable
Random, rand, 1, 10

; Prints a message with the randomized number in a message box
MsgBox,  Room %rand% is chosen for the meeting.

; Stops the script
return
Copy
2. Reload the script to apply the changes.
3. Lastly, press Ctrl+K to run the HelloWorld.ahk script. You’ll see a message box displaying the room number that was randomly chosen, as shown below.
Close the message box and run the script multiple times to see room number changes each time.

Locating a Pixel with the PixelSearch Command
The PixelSearch command is like Google Image search on steroids. PixelSearch locates a pixel or group of pixels in a region of the screen or an image and returns the coordinates of the found pixel(s).
Gamers can use the PixelSearch command to help with in-game photo hunting tasks or create an aiming bot to improve accuracy exactly to every pixel.
Below is the syntax for the PixelSearch command, where:
OutputVarXandOutputVarYvariables – Store the coordinates of the found pixel(s).X1,Y1– The upper-left coordinates of the region or image you want to search.X2,Y2– The lower-right coordinates of the region or image you want to search.ColorID– The color of the pixel(s) you want to find, which can be a hex value (e.g., FF0000) or an RGB value (e.g., 255,0,0).Variation– The tolerance of the search, the number of pixels that can be off from the target color for the pixel(s) to be considered a match. The value can be from 0 to 255. For example, a variation value of “2” is provided with a ColorID of 0x444444. ThePixelSearchcommand will search for all pixels with a color value range of 0x424242 to 0x464646. This option can be helpful when the target color is not an exact match for the pixel(s) you are searching for.
The Mode argument can be one of the following:
Fast– Searches for the target color in the least amount of time.RGB– Searches for the target color using RGB values.
PixelSearch, OutputVarX, OutputVarY, X1, Y1, X2, Y2, ColorID, Variation, Mode
Copy
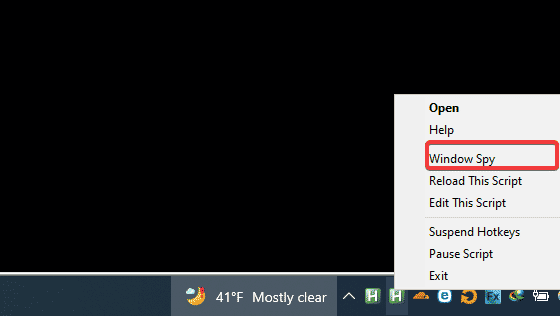
You must have the ColorID of the pixel(s) you want to find before running the PixelSearch command. Window Spy is a tool that allows you to get the RGB values of any pixel on the screen.
1. Right click on the AutoHotkey icon and select Window Spy from the context menu to open Window Spy.
2. Navigate to the pixel’s location you want to get the RGB values. This tutorial uses a bullseye image.
The RGB values for the pixel will be displayed automatically in the Window Spy window, as shown below. Copy the values as you’ll need to put them in your AHK script in the following step.
3. Replace the code you added in the HelloWorld.ahk file with the code below, save the changes and close the file. Be sure to replace the placeholders in the PixelSearch command with the values of the target pixel you noted in step two.
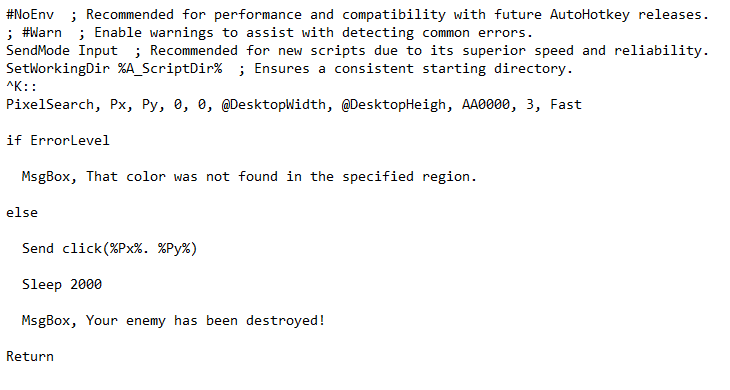
This code will search the whole screen for the specified color (in this case, AA0000 or red) and send a mouse click to that location. In gaming, this code would send a shoot command to the target pixel if it’s found.
; Sets Ctrl+K hotkey
^K::

; Locate a specified pixel
PixelSearch, Px, Py, 0, 0, @DesktopWidth, @DesktopHeigh, AA0000, 3, Fast

if ErrorLevel ; If the pixel is not found, print an error message

  MsgBox, That color was not found in the specified region.

else ; If the pixel is found, send a mouse click on the specified pixel location

  Send click(%Px%. %Py%)

	; Waits for two seconds, then print a message

  Sleep 2000

  MsgBox, Your enemy has been destroyed!

; Stops the script
Return
Copy
4. Now, reload the HelloWorld.ahk script to apply the changes.
5. Lastly, press Ctrl+K to run the script. You’ll see mouse cursor points to the specified pixel’s location and a message saying Your enemy has been destroyed!, as shown below.

Creating an Input Dialog Box with the InputBox Command
The most basic form of user input in AutoHotkey is the InputBox command. The InputBox command displays a simple dialog box on the screen and waits for the user‘s input.
You encounter the InputBox command all the time in everyday life. For example, your web browser probably uses another form of an input box, asking for your username and password.
The syntax of the InputBox command is below, where:
OutputVar– Stores the user’s input.Title– Sets the text in the title bar of the input dialog box.Prompt– Sets the message in the input dialog box.HIDE– Tells the script whether or not to hide the input area of the dialog box. If this parameter is set to True, the input is hidden, and the user will only see the masked text.WidthandHeight– Specify the size of the dialog box in pixels.XandY– Specify the location where the input dialog box should appear on the screen.Locale– Specifies the locale to use in displaying the dialog box. This parameter is optional and can be omitted if you don’t want to use it.Timeout– Specifies the amount of time (in seconds) that the input box will stay open. The input dialog box automatically closes past the specified time.Default– Specifies the default value displayed in the input field of the dialog box that the users can change.
InputBox, OutputVar, Title, Prompt, HIDE, Width, Height, X, Y, Locale, Timeout, Default
Copy
To create an input dialog box with a hotkey:
1. Replace the code in your HelloWorld.ahk file with the following lines, save the changes and close the file.
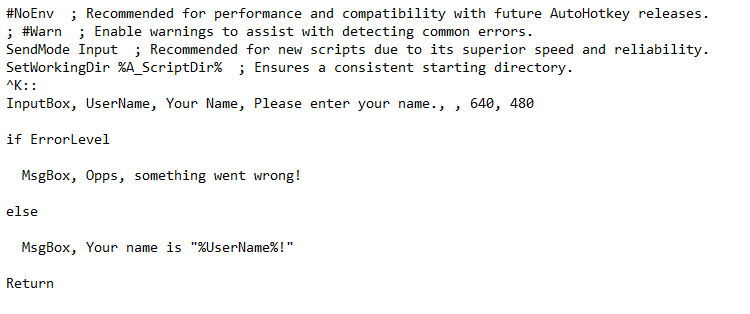
The code below displays a simple input dialog box that asks the user for their name that will be stored in the UserName variable.
; Sets Ctrl+K hotkey
^K::

; Creates an input box dialog
InputBox, UserName, Your Name, Please enter your name., , 640, 480

if ErrorLevel
; Prints a message if there's an error
  MsgBox, Opps, something went wrong!

else
; Prints a message with the username stored in the UserName variable
  MsgBox, Your name is "%UserName%!"

; Stops the script
Return
Copy
2. Reload the same HelloWorld.ahk script to apply the changes.
3. Finally, press the Ctrl+K keys to run the script. You’ll see an input dialog box that looks like the one below.
When you input your name and click OK, as shown below, you’ll get a message box showing a message with the name you entered. But if there is a problem with the user input, for example, if you enter an incorrect value, you’ll get a message saying Something is wrong!.

Sending Key Strokes with the Send Command
Have you ever felt tired of doing simple repetitive tasks? Like filling out forms or typing the same text many times over. If yes, the Send command is your friend.
The Send command sends simulated keystrokes to an active window. This command can be useful for automating tasks like filling out forms or typing text.
The syntax for the Send command is as follows, where keys is the keystrokes you want to send.
Send keys
Copy
The Send command can also send special keys like the Windows key or the Alt key.
1. Replace your code in the HelloWorld.ahk file with the following lines, save the changes and close the file.
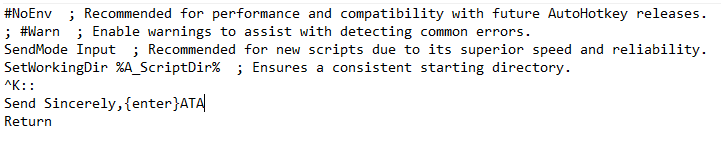
The code below sends the Sincerely, text, an ENTER {enter} keystroke, and the ATA text in sequence.
^K::
Send Sincerely, {enter} ATA
Return
Copy
2. Reload the HelloWorld.ahk script to apply the changes.
3. Finally, open your text editor and press Ctrl+K to run the script to see the Send command in action.
Automating Mouse Clicks and Keystrokes
You may be wondering how you can automate keystrokes using AHK. Automating keystrokes can speed up your work, saving you some time to complete tasks.
Suppose you need to click your app at a random position on the screen to keep your app active. Typically, you need to move your mouse to the desired location and click. But with AHK, you can automate this process by programing a keystroke sequence to perform the task for you.
1. Edit your HelloWorld script, replace the code with the following lines, save the changes and close the file. This code sends automated spam keystrokes (left-clicks) to your app at a random position on the screen.
; Sets Ctrl+K hotkey
^K::

; Runs your script for 1 million iterations
Loop 1000000
{
; Generates a random number between 869 and 1049, which determines the x-coordinate of the mouse click.
; You can change this number to adjust the position of the mouse click
Random, RandomX, 869, 1049

; Generates a random number between 135 and 241, which determines the y-coordinate
; of the mouse click.
; You can change this number to adjust the mouse click position.
Random, RandomY, 135, 241

; Sends a left-click to your app at the randomly generated x and y-coordinates.
MouseClick, Left, %RandomX%, %RandomY%
; To send keystrokes instead, write the Send command followed by the keys to send.
; For example: Send {enter}

; Pauses the script for 2000 milliseconds (two seconds) before continuing
; to the next loop iteration. You can change this value to something slower,
; making your clicks look more human-like.
Sleep 2000
}

; Stops the script
Return

; Sets hotkeys to pause this script. The + symbol before the ^K hotkey stands for
; the Shift key on your keyboard. To resume the script, press this hotkey again.
; By pausing the script, you can test the keystrokes sent to your app.
; Doing so helps you ensure the script is working properly.
+^K::Pause
Copy
2. Reload the script to apply the changes.
3. Lastly, press Ctrl+K on your keyboard to run the script.
As you see below, your script sends spam left-clicks to your app at a random position on the screen every two seconds. To stop the script, press the Shift+Ctrl+K keys.
In this example, when a left-click is sent, a red circle appears at the position of the mouse click.
Creating an AHK GUI
In computing, a graphical user interface (GUI) allows users to interact with electronic devices graphically (usually using images rather than text commands). A GUI can be created for almost any program or computing device.
Related:How to Build a PowerShell GUI for your Scripts
There are many reasons to use a GUI. One reason is to make a user-friendly interface for a program or device easier. A GUI also makes it easier to see what’s happening on the screen, which can be helpful when troubleshooting a problem.
The AHK GUI consists of several elements you can use to create and modify scripts. And the syntax for creating a GUI is below, where Value1, Value2, and Value3 parameters are dependent upon the SubCommand.
Gui, SubCommand, Value1, Value2, Value3
Copy
In this tutorial, you’ll use the Add SubCommand to add controls to the GUI window, and the syntax for the Add SubCommand is below, where:
Text– Adds a static control (labels).Edit– Adds an edit control (text field) where users can input data.Button– Adds a pushbutton control (button) to the GUI. Upon clicking, the button sends an event to the script.
Gui, Add, ControlType, Options, Text
Copy
1. Replace the code in your HelloWorld.ahk file with the code below, save the changes and close the file.
The following code creates a new GUI window with two input fields that ask for the user’s first and last name. The GUI window includes a button that, when clicked, displays a message box with the contents of the input fields.
Once the message box closes, the GUI window automatically closes, so the user can enter a new first and last name when they rerun the script.
; Sets the Ctrl+K hotkey
^K::

; Adds a static text control named "First name"
Gui, Add, Text,, First name:

; Adds another static text control named "Last name"
Gui, Add, Text,, Last name:

; Adds an edit control (text field) named "First name."
; The v option tells the control to store its input in the variable FirstName.
; The ym option starts a new column of controls.
Gui, Add, Edit, vFirstName ym

; Adds another edit control (text field) named "LastName" that
; stores its input in the LastName variable.
Gui, Add, Edit, vLastName

; Adds a pushbutton control named OK
; when pressed, runs the label ButtonOK.
Gui, Add, Button, default, OK

; Shows the GUI window with the title "Simple Input Example".
Gui, Show,, Simple Input Example

; Ends auto-execute section
Return

; Closes the GUI window.
GuiClose:
ButtonOK:

; Displays a message box with the contents of the FirstName and LastName variables.
Gui, Submit
MsgBox You entered "%FirstName% %LastName%".

; Exits the script
ExitApp
Copy
2. Reload the HelloWorld.ahk script to apply the new code.
3. Finally, press the Ctrl+K hotkey to test the GUI. If the code works, you’ll see a window appear that looks like the one below.
Type in your first and last name, and click the OK button. A message box appears containing the texts you entered in the input fields.

You can customize the script to fit your needs for your GUI. For example, you’re saving the user’s input to a text file instead of displaying it in a message box.
Conclusion
AutoHotkey is a powerful tool that can help automate your work and improve productivity. And in this guide, you’ve learned how to create custom hotkeys and scripts, sending automated keystrokes and mouse clicks. You’ve also touched on creating an interactive GUI with AHK scripts for the users.
At this point, you should be familiar with the basics of AutoHotkey to help you improve your productivity.
Why not create custom scripts to automate daily tasks without the tedious manual process? Be creative and experiment with different scripts to see what works best for you! Perhaps add more input fields, or make your GUI window larger or smaller?