Source: https://oliverkieselbach.com/2021/07/14/comprehensive-guide-to-managing-macos-with-intune/
Microsoft Intune is great when it comes to managing Windows devices and for sure it doesn’t need to hide when it comes to mobile phones like Android phones or Apple phones. Most companies I engage with do have the majority of devices running Windows, but there is always a certain amount of percentage running macOS. It could be the marketing department, developers and often seen in the C-level departments. The goal should be to have a common management strategy, using mostly the same tools and infrastructure components we are familiar with. This way we get synergy effects during day-by-day operations. So, I looked at ways to manage a macOS similar to Windows with Microsoft Intune. As Microsoft 365 customers already have Intune, an additional second management system for macOS introduces additional licenses fees, different operational efforts, and of course maintenance. I also need to build expertise for these tools and can’t use already existing management tool knowledge, which is something I really like to avoid to a certain degree. Especially if you already have a management system like Intune in place which is capable of managing macOS. The question is…
How well can a macOS device be managed via Intune?
Short answer, very well . Okay, we dive into this statement. Yes, I will come up with some tweaks here and there, but we will see an approach which works very well. In the following paragraphs I describe my findings and my decisions why I chose the architecture like this.
First of all, which components do we need in terms of management in general and which options do we have to fulfill the needs.
Let’s start with a short introduction what is necessary for macOS device management.
Everything starts with a user account within the enterprise. This user account is typically used for user logon and getting access to devices and resources. When we talk about management, we need a way to enroll the device into an MDM system, as MDM is the new golden standard for configuration management for all platforms. Next, a way to handle additional tasks outside of the MDM protocol like executing scripts via an additional management agent to accomplish all the left-over tasks we couldn’t solve with MDM and configuration profiles. And as last puzzle piece, we need a proper way of distributing software. For me these 5 areas are the essential parts to look at, to accomplish all typical device management tasks.
Following a small abstract for each of the areas to get a clearer picture what we can use with Microsoft Endpoint Manager and the cloud component Intune:
- User Logon
When we think of user logon it can mean different things. First, I have to say, I want to look at options in a cloud-only approach. I’m not going to consider a domain join; this is not the future of identity management for me. Next, I will differentiate between two scenarios here. Logon to the OS and logon to services like SaaS applications in the browser session. macOS does not provide the native support of a cloud identity provider (IDP) like Azure AD during OS logon (I’m hoping Apple decides to add this in the future). Meaning right now, you have to have a local account on the device for logon. This account can be the same as the centrally managed account, but again it has no real relationship. Password change of the local account will not change the account managed by the IDP and vice versa. On the other hand, if I’m logged on to the device with a local user and have to authenticate against my cloud resources with my IDP managed identity, my data is still protected very well. To make this scenario even easier we can support the user by configuring and providing the macOS Microsoft Azure AD single sign-on (how to configure link) experience within the Apple Desktop session for cloud resources. - Device Enrollment
Here it will become interesting. The latest additions to the Automated Device Enrollment (ADE) (formerly known as DEP) supports Apple Setup Assistant with modern authentication. That means during the enrollment process we have cloud IDP support and therefore can force the user to authenticate against Azure AD and do additional MFA for example. Microsoft Intune supports this enrollment experiences for the macOS devices. In addition, we have two options for enrollment with user affinity and an option without user affinity. Enrollment with user affinity is the common enrollment method used, meaning a one-to-one relationship of user to device. With ADE we have the most streamlined experience with minimal user input. In addition, we have the “user approved enrollment” scenario, driven by the Microsoft Company Portal, and a “direct enrollment” scenario for enrollment with no user affinity. - Configuration Management
Once enrolled we can configure the devices with MDM configuration profiles provided by Microsoft Intune. These are typically security configurations as well as configurations for usability or look and feel (wallpaper etc.). For Compliance policy processing we need the Company Portal here as well. The compliance policies are most important for the Conditional Access scenarios. - Management Agent
Special modifications (like configurations which can’t be done via configuration profile) are typically done via shell scripts, as they provide the maximum on flexibility. We can achieve basically everything we want, when it comes to special requirements. We can configure something (e.g., write to the defaults), we can run binaries, we can download something, we can read and report, and so on. All this is supported via the Microsoft Intune Management Agent which gets automatically deployed by Intune as soon as we assign shell scripts. - Software Distribution
Software distribution with Microsoft Intune can be achieved by utilizing the Company Portal and the distribution of applications wrapped as .intunemac packages so called line-of-business (LOB) apps. The Company Portal is the software center showing the available software to the user for installation. This needs re-packaging and is limited to .pkg apps (even though with some tricks we can get .dmg support here as well). But as this approach is limited and generates too much labor for maintaining packages, I will introduce Munki as an alternative here to support software distribution in an easier way, and with some tweaks, fully backed by cloud infrastructure.
To compare it a bit more easily if you are familiar with the Windows device management in Intune, here is a side-by-side comparison:
Feature
User Logon
.
.
Device Enrollment
.
.
.
Configuration Management
.
.
Management Agent
.
Software Distribution
.
macOS
• Local user logon
• Azure AD registered
• AAD SSO Extension
• ADE with Setup Assistant and modern authentication
• User approved enrollment via Company Portal
• MDM profiles
• Company Portal for Compliance processing
Windows
• Azure AD user logon
• Azure AD joined
.
• Windows Autopilot via OOBE
• Azure AD registered (aka Workplace join) via Windows Settings.
• MDM profiles
• Compliance processing is built into the Windows OS
• Company Portal
• Intune Management Extension
Let’s dive into each of the areas and have a look more closely.
User Logon
There is not very much to say for macOS. Without proper IDP support for Azure AD during logon, we have to keep the local user logon in my opinion, but we support the user by deploying the Microsoft Enterprise SSO plug-in for macOS. Cloud management is the way for the future, so we are not going to build some (legacy) local Active Directory and bind the macOS to a domain. Hopefully we get IDP support in future.
By keeping the local user account and using the SSO plug-in, we have a pretty good user experience when it comes to the sign-ins. Users will not be prompted too much and while Microsoft is building out the support for the SSO plug-in, we can expect even lower amount of prompts in future. The plug-in relies on the Apple Enterprise SSO framework and you have to use at min. macOS version 10.15 and the Company Portal must be deployed, as the plug-in will be delivered by the Company Portal. I expect to see more and more applications successfully working with SSO in future (with an exception if an application ships their own network layer implementation). Okay, we lose somehow the central management of the device login account, but in fact if we utilize more and more cloud services, we have the majority of our data in the cloud and the access to these services is managed centrally by Azure AD, protected by Conditional Access. In my opinion we have a pretty good trade-off, even if the device logon account is not a real logon with an Azure AD account.
There are solutions on the market to add some kind of IDP support to the logon like Jamf Connect. They are doing a kind of on-the-fly user provisioning and they try to keep IDP user password and local user password in sync etc., but still the base from macOS is using a local account for the logon, as Apple does not have logon support for IDPs. We get just an on-top layer of managing the local user. I’m not really convinced by this approach and it looks like bolt-on solution to me. If something changes, e.g. with updates from Apple for the macOS system you might face severe logon issues in your enterprise. Credentia is another approach for on-the-fly user provisioning at the logon screen. It utilizes the Open Directory Plug-in from macOS and looks therefore pretty stable and not so easy to break from architecture perspective. If someone is interested in one of the solutions, I recommend to check them out, but they come with a price tag and again I still think, nothing is perfect at the moment until we have native IDP support at logon, but I also think for the minority of devices a local user and SSO plug-in works quite well.
Device Enrollment
Clearly to say, the best user experience is to do an Automated Device Enrollment with user affinity using the Apple Setup Assistant with modern authentication. If you want to see how this looks like, I really recommend the following guide from Hubert Maslowski, he did a great run-through in his blog article macOS Setup Assistant with Modern Authentication in MEM/Intune. The process is very similar to the Windows Autopilot User-Driven deployment mode. We can skip dialogs and reduce the steps to take action for the user to a minimum.
Not everywhere in the world we have the option to buy devices with an assignment to your organization via Apple Business Manager. Or we simply face the problem that devices are already in the enterprise and are not registered in Apple Business Manager for usage with ADE. In that case we simply follow the user-approved enrollment by using the Company Portal. Use the simple URL to get the Company Portal app on the device to start the enrollment process.
Apple will address the problem of adding devices later to the Apple Business Manager soon by introducing a new Apple Configurator (WWDC 2021 announcement).
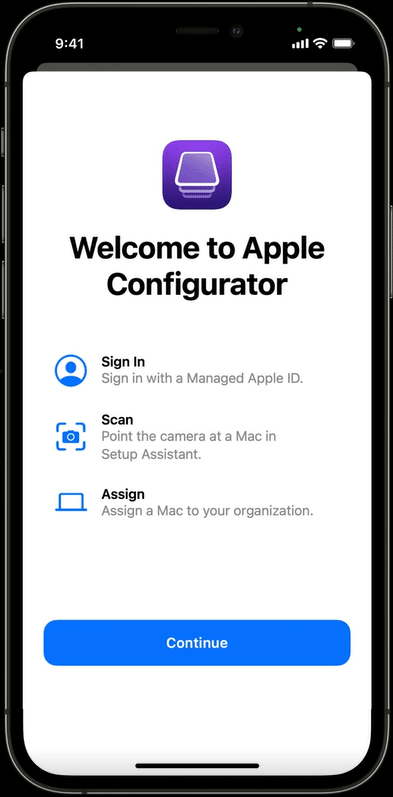
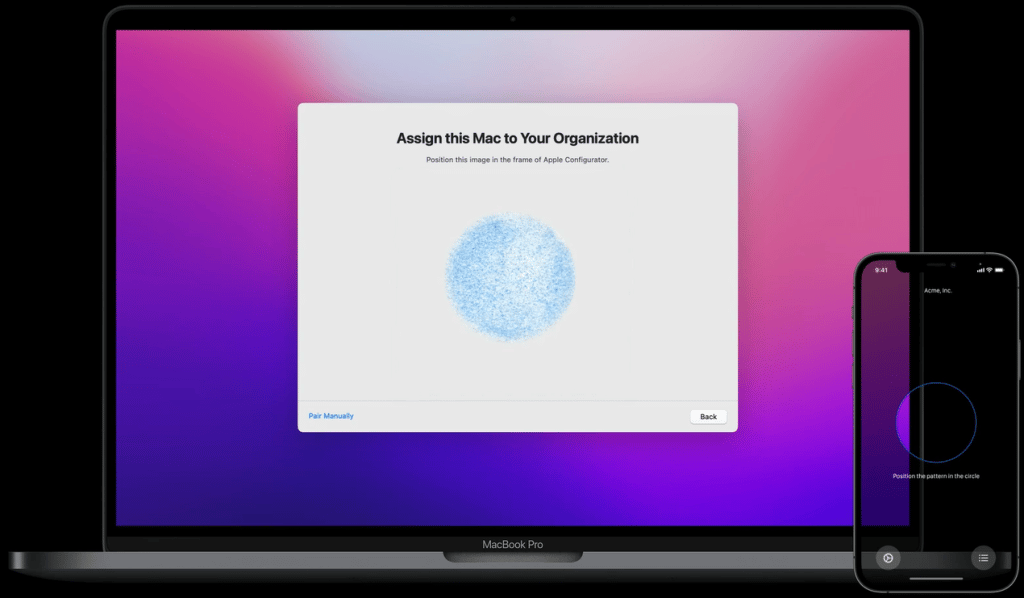
You can basically assign a macOS device by using the new Apple Configurator for iOS and add them to your organization. Yes, now we are on-par with Windows Autopilot, where you are able to manually register a device in Windows Autopilot as well  .
.
Configuration Management
Let’s have a look what macOS and Microsoft Intune can deliver, if we look at MDM and configuration profiles. Microsoft Intune is an MDM system and fulfills the requirements to do device channel MDM management for macOS. We can push profiles to the OS via pre-defined templates or custom ones (.mobileconfigs or preference files). Most of our configuration requirements should be solved with this.
It is straight forward to create some configuration settings and assign them to Azure AD groups. I will not go into detail here about the configurations, but I really want to recommend to check out the Intune based deployment guide for Microsoft Defender for Endpoint on macOS and the GitHub repo for macOS Defender configs. Deploying Defender involves the app (use the built-in one as it is maintained by MS and you don’t have to package anything Apps > All Apps > Add > App type: Microsoft Defender for Endpoint – macOS) and a few configuration profiles like system extensions, settings catalog, custom profiles etc. If you have successfully deployed Defender, you are already touched most of the profile variations. As I talked about synergy effects in the introduction, for me it is a natural thing to utilize the same security tools I implement for the Windows devices. This way we get a holistic view on our enterprise environment and are able to connect the dots in case of an incident. In regards to the configurations we have similar synergy effects, as we are already familiar with MDM profiles for Windows, we can do the same management for macOS. Of course, we have to learn about the macOS architecture and features, but as soon as you understand the macOS features and architecture the setup of the configuration profiles is straight forward. So, as a Windows admin, get familiar with the macOS principles to understand them to successful configure them for your needs. A good example might be FileVault, it is the encryption technology for macOS and honestly from management perspective it is not far away from the BitLocker approach. You can generate a recovery key, backup it to Intune, let it rotate etc.
And by the way, a proper naming convention for your configuration profiles are a real advantage. I follow the following naming scheme:
Platform – Set – Policy-Type – Name of the Setting(s) [(additional info)]
e.g. macOS – Default – Endpoint Protection – FileVault Settings (piloting)
I’m adding the policy-type as well as it is nice during search and during the listing on the device level, there is no column profile-type like we have on the configuration profile table.
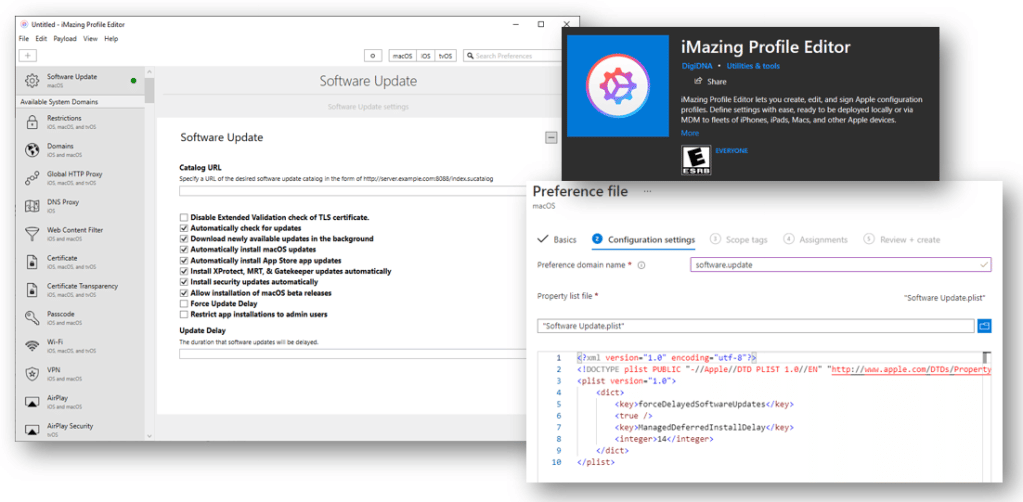
Another valuable resource for configurations is the iMazing Profile Editor. The tool can be found in the Mac App Store and Windows Store. It can be used to configure a variety of features/app settings. A must have tool for macOS MDM configurations management.
Management Agent
The Intune Management Agent is the workhorse for everything we can’t really achieve by utilizing configuration profiles. Typically, you run shell scripts to configure features or change settings. A very common task for example might be to rename the device via a shell script. But how is this all done? How does the management agent get on to the device? Let’s have a short look at this.
As soon as a macOS device is MDM enrolled a managed and you have a shell script assigned to it, Intune (the MDM system) will send via MDM protocol the command InstallEnterpriseApplication to install the Intune Management Agent. This is the same way we see it for Windows devices. For comparison I’m going to illustrate it a bit more via an architecture figure below.
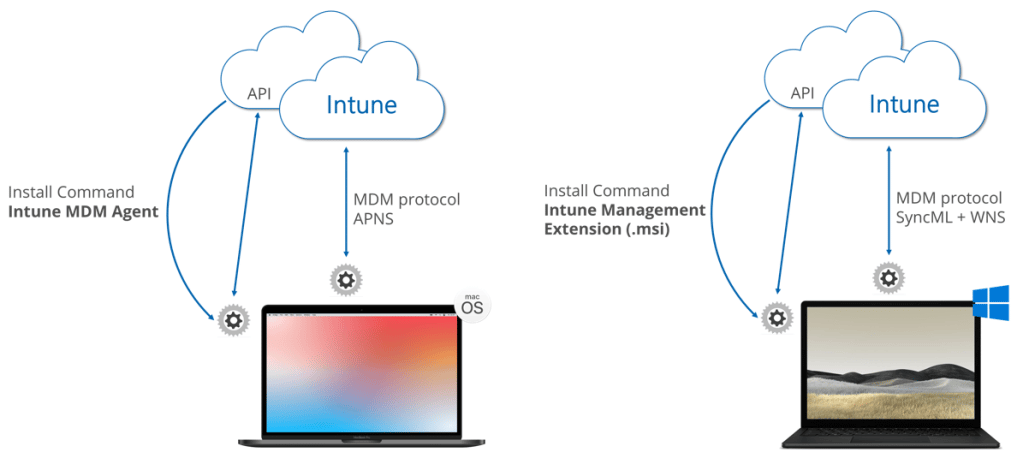
Clearly to see the similarities here, same approach, issue an Install Application command to get the additional management agent on the device. One thing to have a look at is the separate connection from the additional agent to a Intune Gateway (API) in addition to the connection via the MDM protocol. Every device Windows and macOS are keeping two connections one via MDM protocol and the other one via the additional agent. That means we have to keep in mind that there are different sync cycles for each of them and they are differently triggered. The macOS agent will check-in every 8h. An end-user can also force a check-in by request from the Company Portal (btw the Sync button in the MEM Admin Console will not initiate an agent check-in, just the MDM check-in). The agent itself is installed at:
/Library/Intune/Microsoft Intune Agent.app
The corresponding log files are here:
/Library/Logs/Microsoft/Intune
~/Library/Logs/Microsoft/Intune
The process will appear as IntuneMdmAgent in the Activity Monitor on macOS. An alternative check-in approach, instead of using the Company Portal to force a check-in, is to kill the agent. It will immediately restart and do a check-in. Use the command:
sudo killall IntuneMdmAgent
A very useful resource for production-ready built shell scripts is the GitHub repo for Intune macOS Shell Script Samples:
E.g. a DeviceRename script, Managed Accounts scripts (createLocalAdmin, downgradeToStandardUser, etc.), Rosetta 2 enablement, Wallpaper script or TimeZone setting and much more… Really if you plan a proper macOS management design you have to look at the options already available there!
Software Distribution
Finally, we reach the most interesting part. As already described, software distribution with Microsoft Intune can be achieved by utilizing the Company Portal. The application needs to be wrapped as .intunemac package via the Microsoft Intune App Wrapping Tool for macOS. The Company Portal acts as a software center showing the software available to the user for installation.
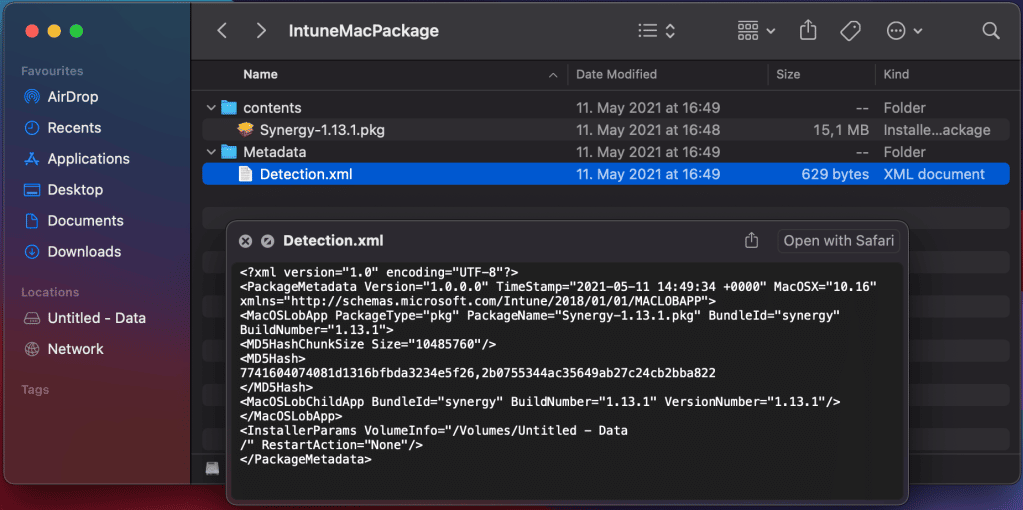
The issue with that approach is, this particular re-packaging is failure prone (the fact alone of re-packaging is not an issue, it is the reliability and flexibility of this approach). The wrapped packages are limited to .pkg apps (even though with some tricks we can get .dmg support here as well, check here “How to deploy DMG or APP-format apps to Intune-managed Macs“). Here some example issues during the re-packaging process you will typically face: support for multiple BundleIDs (check a workaround here), packages with missing version information (check here). On top of that, it doesn’t utilize the MDM agent, it utilized the MDM protocol with the InstallEnterpriseApplication command, which is not very responsive and not good enough in providing proper status in real world usage. The utilization of the MDM command is the reason why they support only .pkg files, as the MDM command can handle .pkg files only. If you unzip the .intunemac package you will find a similar structure like we have for .intunewin packages. Content and metadata folders containing the .pkg file and a Detection.xml which has all necessary information for Intune to parse, to handle the required parameters for deployment of the .pkg with the MDM command InstallEnterpriseApplication.
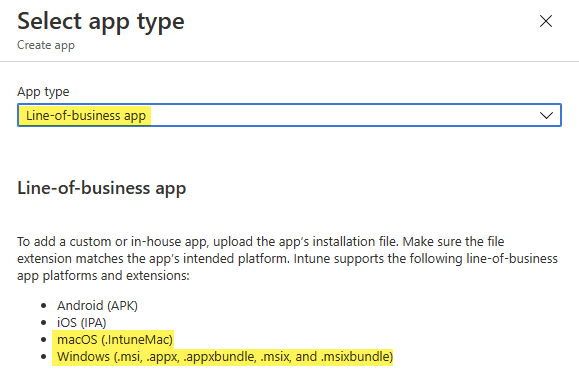
The lesson I learned is clear, it simply generates too much possible failures and labor for maintaining packages. If we compare that deployment approach with Windows LOB app management, it is exactly the same. Compare the App creation dialog in Intune. We utilize the MDM protocol via the app type entry “Line-of-business app”, the same way we do for Windows as well and Windows is also restricted when using this approach to single .msi installers.
On Windows we typically avoid the MDM protocol for Application deployment and choose “Windows app (Win32)” for reliability and extended deployment features:
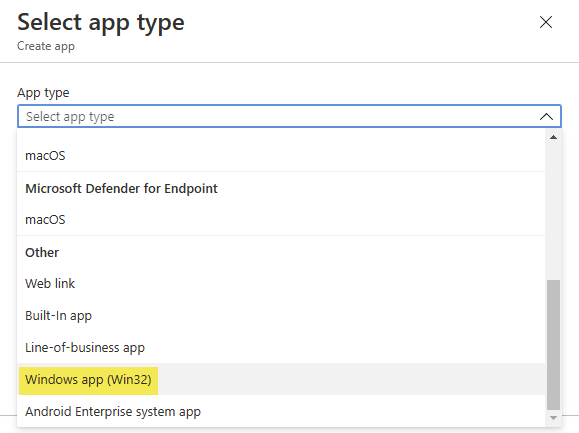
Using app type “Windows app (Win32)” switches from MDM protocol to the Intune Management Extension which utilizes a Gateway Service (API) in Intune to get its instructions for Win32 apps and also for PowerShell scripts. This way is far more reliable, responsive and provides proper user statuses. As we learned already (compare section MDM Agent) the Intune MDM Agent is using exact the same architecture for the shell scripts. It contacts a Gateway Service (API) in Intune to get its instructions, but currently only for shell scripts. Maybe we will see Intune MDM Agent enhancements for better macOS app deployment in future (idk)?! In fact, you can utilize the agent today to deploy applications by kicking of the install process via a shell script. This method is way more stable and reliable (see here “Deploying macOS apps with the Intune scripting agent“). Why do I not go for this approach? I do partly later for bootstrapping, but not primarily as it does not support a software center self-service scenario and it is also too much maintenance and labor. But definitely an option for more reliable required app deployments in the background.
Given these facts, I looked for reliability and easy maintenance/operations for macOS applications. Also, a very important aspect is good user feedback during the application install process, it is a must have, as these are the most user facing actions. Good feedback and install guidance drive user satisfaction when working with applications on macOS systems.

.
All this are reasons enough to look for an alternative. Therefore, I will introduce Munki – Managed software installation for OS X as an alternative software distribution agent here. It has all the simplicity in its architecture and packages can be maintained in an easier way, fully backed by a cloud infrastructure.
Munki is an open-source project from Walt Disney Animation Studios to manage software installation and configuration. It uses a webserver-based repository for the packages and metadata. It supports a variety of Apple package formats. It is used by organizations worldwide with tens of thousands of macOS devices. These organizations include Walt Disney Animation Studios as the inventor, Facebook (see here), Google (see here) and other large corporations (compare list here). This shows not only the reliability and the ability to execute, it also demonstrates a lively ecosystem and a good community around Munki. This builds trust for me.
Munki provides optional installs and managed installs (required installs). The ability to use a webserver-based repository provides super flexible architecture designs. The repository can be a local on-premises webserver (Nginx, Apache, IIS) or even some cloud-powered service like Amazon S3 or Azure Blob Storage.
For the later services Munki has a Middleware feature for web requests. Which is a wonderful idea of the creators. This way it is very easy to adapt to every webserver-based repository. The module intercepts the web requests, modifies them and sends the modified request to the service endpoint. This way you can include authentication or other required http headers for the service endpoint. There are already modules build for the Amazon Cloud (S3, CloudFront) and Google Cloud storage. Until now there was no Azure Cloud middleware module. As a person working mostly with Microsoft technologies, I took the time and wrote a Munki Middleware module in python according to the implementation specification of Munki, especially for Azure Blob Storage accounts. You can find it here:
So, let’s dive into the Munki architecture I’m using for this approach:
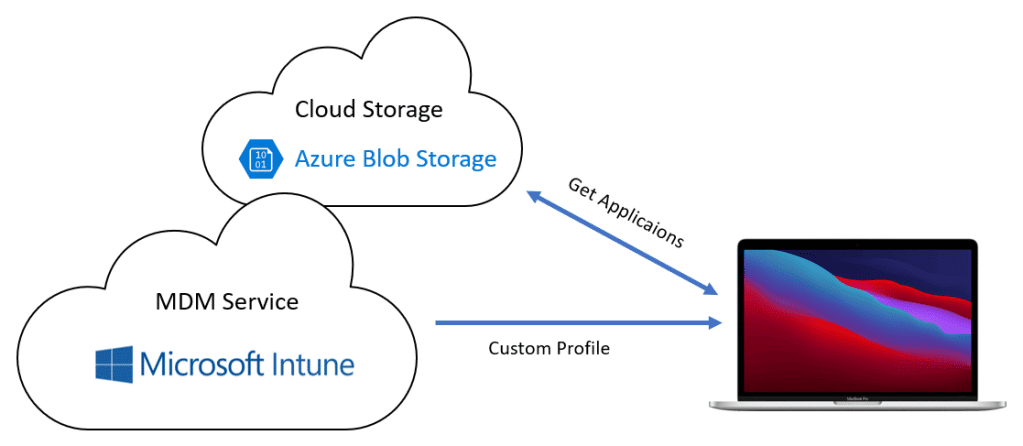
To bring everything to live I use a shell script to install Munki and the Middleware and a custom MDM profile to provide the Munki configuration for the repository URL and blob storage access.
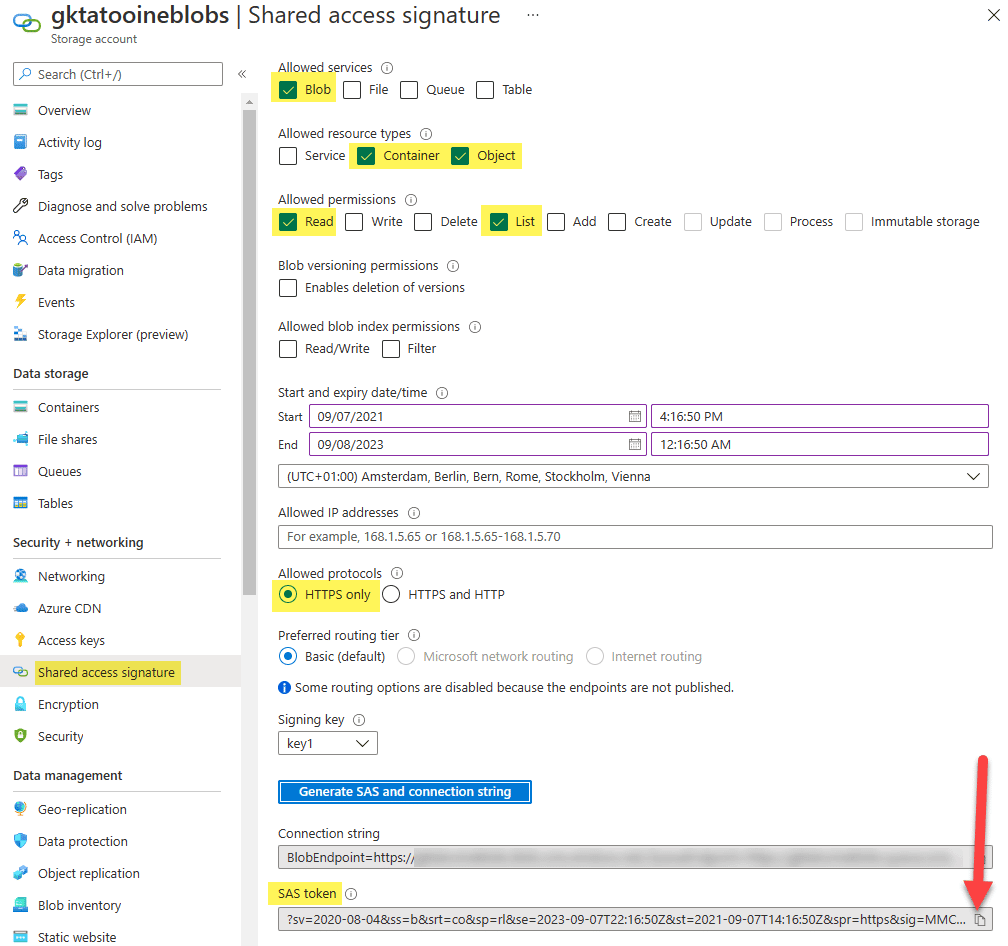
You should create a dedicated Azure Blob Storage for your macOS software distribution which has two containers, one called munki to host the Munki repository and one called public to bootstrap the munki-tools (basically the munki agent) and the middleware python script. A dedicated storage account makes sense to further restrict accidental leakage of other data. So, I would prevent other stuff lying around in the dedicated storage account. From security perspective the shared access signature is read-only, time bound and can be replaced from time to time and provided via update to the custom MDM profile with the new shared access signature. Many thanks to MaxXyzzy !!! for the trigger to evaluate using the SAS token. Initially my SAS token tests failed so I used the storage key in v1 of the script.
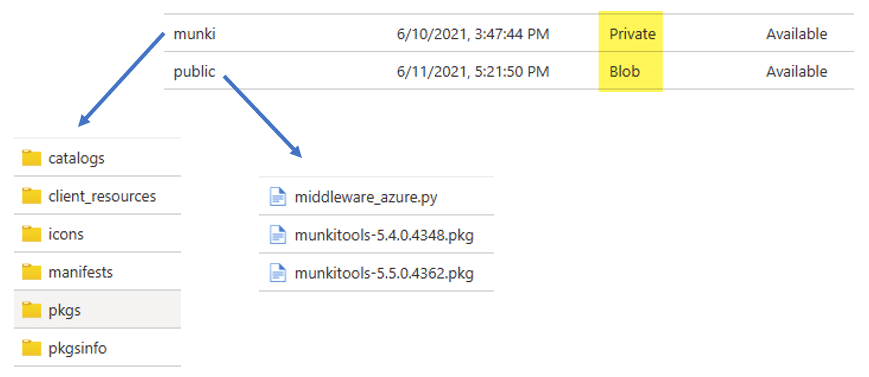
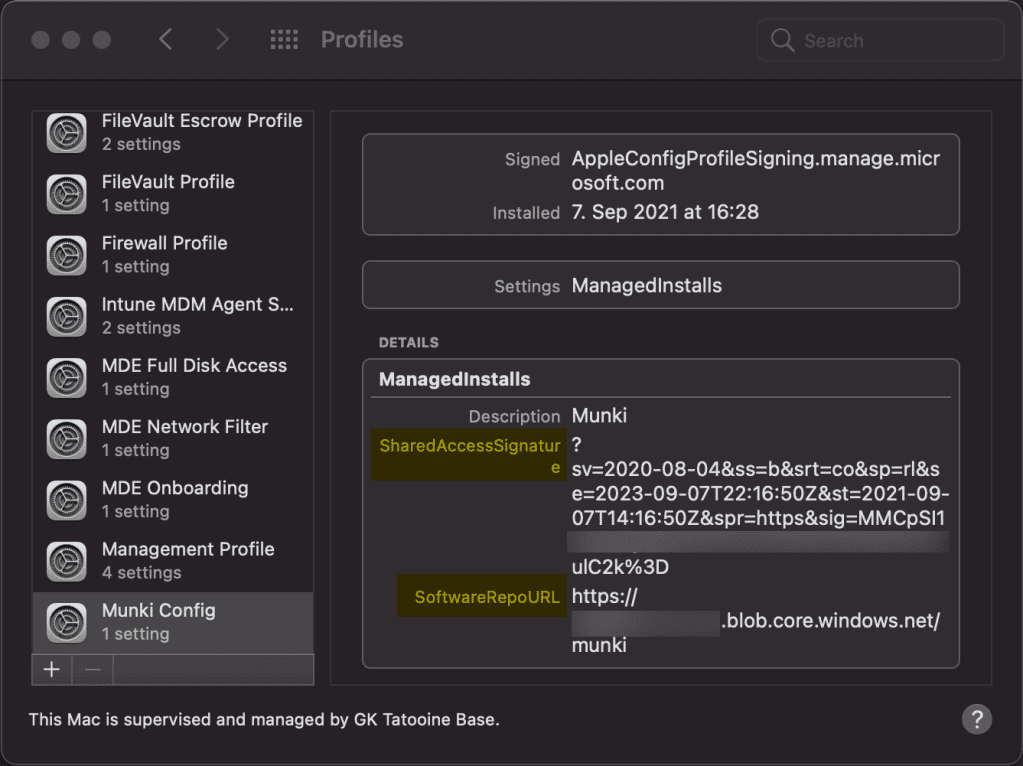
I highlighted the important facts in regards to the “Public access levels” for the containers. The container munki needs to be Private and we use the middleware to make sure to use the correct shared access signature for the Azure Blob Storage account. The public container needs to be public accessible and I’ve set the public access level to “Blob (anonymous read access for blobs only)“, seen in the picture as Blob. The public container is needed to bootstrap the munki-tools and the middleware (middleware_azure.py and munkitools-5.5.0.4362.pkg). The idea is to assign a macOS shell script, executed by the Intune Management Agent which downloads the munki-tools and the middleware script from the public container, installs both on the macOS device and then the Munki tools can connect via middleware to the private container to get the software published for the device. You can find the Munki install shell script on my GitHub repo here:
Keep in mind you have to adjust the download URLs in the script installMunki.sh to point it to your public Azure blob storage container. But how can we instruct the Munki Tools to look for our private Azure blob storage container munki? And how to provide the shared access signature for the blob storage, which is necessary for the middleware to generate the correct urls? I designed the middleware script to look for the preference value SharedAccessSignature. In addition, we have to configure Munki the preference value SoftwareRepoURL to point to our container. You find the corresponding sample file munki-repo-and-sas.mobileconfig in the GitHub repo as well. Adjust the SoftwareRepoURL to list your private Azure blob storage account URL and add the SharedAccessSignature. You can find the shared access signature here:
After copy to clipboard (make sure you have the question mark ‘?’ in the front of the SAS token), escape the string to be used in the XML MDM config. This can be accomplished by using this:
[Security.SecurityElement]::Escape("your-SAS-goes-here")
Here a demo of my escaped SAS token:

To summarize, create the containers, deploy the script to download and install munki and middleware, create custom MDM profile to configure the preference values (SoftwareRepoURL and SharedAccessSignature). Below you can see the sample .mobileconfig already deployed via MDM custom profile:
Et voilà you after a restart to make sure Munki agent initializes correctly, should be able to use Munki and interact successfully with the software repo on Azure.
No wait(!) there is one important missing part, you have to upload a working munki repo structure to the private container ‘munki’ on Azure. To initialize a new Munki repo, I really recommend to use Munki Admin as it will make your life super easy to interact with the Munki repository. Things like adding new packages etc. are super simple with this great little helper tool. I will not dive into the management of Munki and the usage of Munki Admin here. This is more a article to describe the approach and ideas. So, please read the Munki documentations and get familiar with the Munki way of distributing software. You should have a clear picture of catalogs and manifests and what they are used for. If you understand the principles, you shouldn’t have a problem to use Munki Admin. In fact, it makes your life in managing the repo super easy. Tip use “site_default” as manifest name for a simple global way of distributing optional and managed installs.

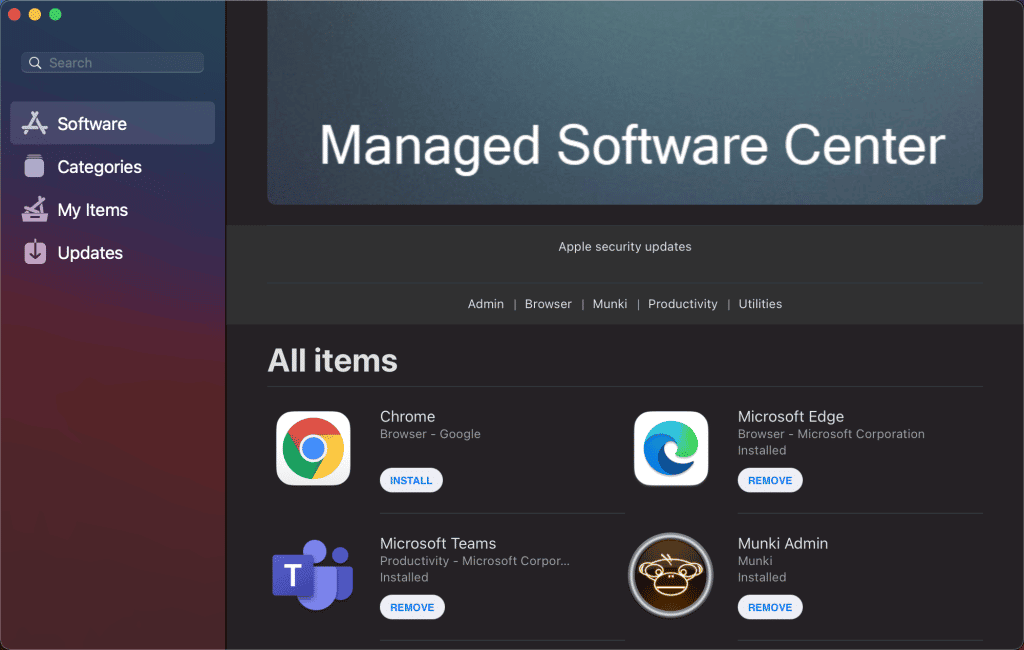
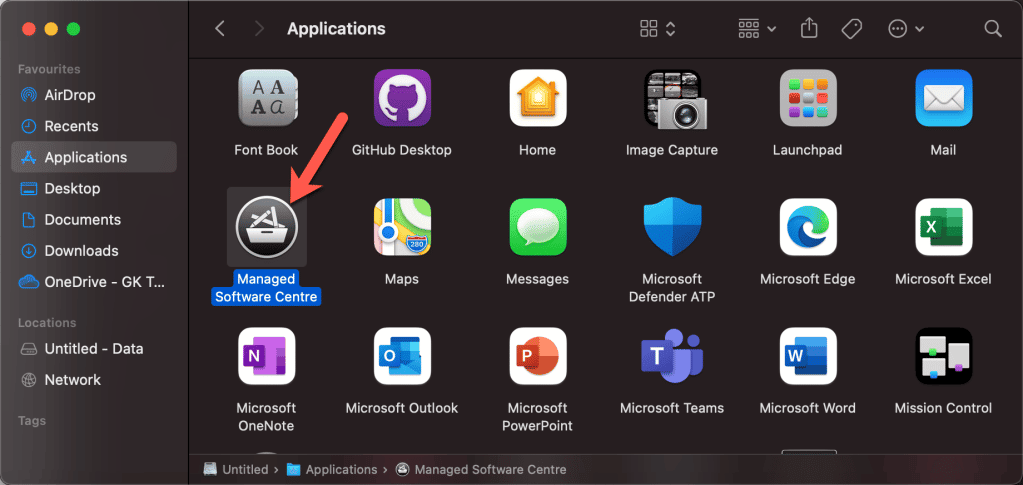
As soon as you have initialized the new repository and maybe added already some packages (see macadmins.software for Microsoft macOS apps) and created the manifest, you can upload the repository to the private container munki on Azure. An easy way of uploading mass files to Azure blob storage is to use the Azure Storage Explorer. Once uploaded you can start Munki Managed Software Centre from Applications:
After start you can manually check for updates (otherwise the default check interval is on average once an hour – it is randomized somewhat to prevent overload of repos):
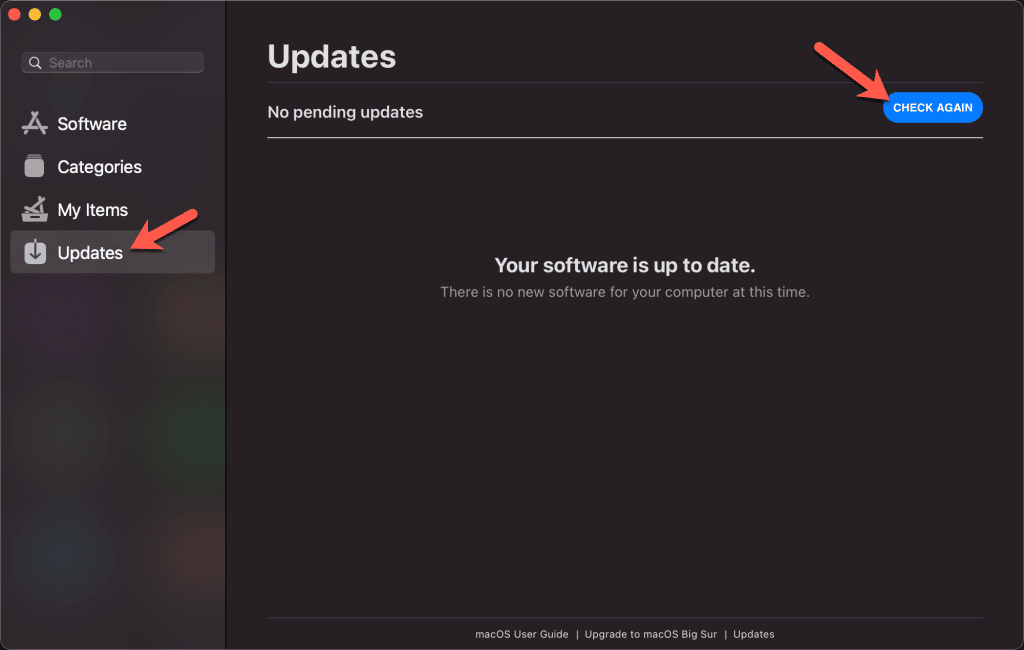
Your applications should be visible and ready for installation:

Some things to mention when working with Munki
- Keep in mind, after deployment of Munki via the shell script you need to reboot the macOS device as only then the munki tools are fully functional.
- Consider to use a Git repository for the munki repository and us a Continuous Integration (CI) job to publish the changes to the Azure blob storage after commits to the Git repository. This way you get proper auditing, rollback capabilities and the ability to let others in the enterprise take over in case of vacation replacement for example. Also, direct modifications on the blob storage in case of unwanted modifications can be easily reverted by just triggering the CI job.
- This is just one approach to access a cloud storage, there could be also different approaches like utilizing client certificates and interact with some cloud infrastructures etc. There are many possibilities to implement Munki. Look into the Munki documentation if you want to learn more.
Summarize
This approach shows the macOS can be managed pretty well with Intune and the helper Munki for software distribution. I hope I could convey the idea how to approach macOS management in a mainly Microsoft managed environment. If you watched the Intune releases lately you probably got aware of a lot of Intune macOS features released by Microsoft. Supporting macOS is a serious business and Microsoft invests into it. We will see a lot more coming in the future, this is the promise for Unified Endpoint Management by Microsoft. Personally, I think (or should I better say wish ), if Apple decides at some point in time to bring real IDP support during logon, everything is covered what is needed in Enterprise environments. Right now, we have to live with the local user, but with the SSO extension the user experience does not suffer from this approach. In fact, often the macOS devices are not even managed at all (if they are a minority in the company). For these companies this is a huge step forward and it provides a solid device management strategy. To make the concept complete, you have to work out each individual section, like which configurations to apply, security settings etc. Which scripts you need, to make necessary modifications, and which apps to deploy. For example, productivity apps and for sure some more infrastructure related apps like Microsoft Defender for Endpoints on macOS.
I hope this guide helps to get a kind of jump start into macOS management with Microsoft Intune and Munki. Nothing more to say as include your Macs into your management story.