Source: https://lazyadmin.nl/office-365/microsoft-flow-tutorial-part-2-using-custom-references/
In part 1 of this Microsoft Flow Tutorial, we created a pretty simple flow that allows you to pass data from one app to another. In this case a task from Planner to Github. In part 2 we are going work on closing the task in Planner automatically.
The challenge for this Flow is that there is no field to store the Planner task id in the Github Issue. So we are going to store the ID as a refencence somewhere in the description of the issue. When we close the issue in Github, we will use Flow to filter out the Task Id.
In the Flow Tutorial you are going to learn the following:
- Using variables
- Working with strings
Power Automate is receiving an update that improves the Expression Editor. Read this article on how to enable the new features. It will make working with Expressions a lot easier!
Step 1 – Adding the custom references
If we want to close a Planner task automatically from Github we need to have the ID of the task we want to close. Github doesn’t have a field where we can store the ID, so we will have to store it in the description somewhere and retrieve it later on.
This is something you will run into more often when you are connecting applications. Especailly if you are creating a two-way connection, when data is send and retrieved between the two, you will need an unique ID that can work in both applications.
So we start with our Flow that we created in part 1 of the Microsoft Flow Tutorial. The last action was Create an issue where we added the body to the issue.
Separation Markers
We want to add is the id of the task, value ID. But if you just add it somewhere in the body of the issue, you won’t be able to find it later on. The Task ID is a random alphanumeric string and we need a way to regonize it later on.
You can do that by adding a separation marker. That are a couple of unique characters that allow you to split to body content on later on. A commonly used separation marker is ###.
Take the following example, here we added the string just below the description. We are need to extract the string with Flow, we don’t have anything to split the string on.
Description:

Aenean at eros sollicitudin, interdum ante eget, mollis purus. Ut scelerisque pulvinar enim, in bibendum ipsum. Cras sed fermentum nisl. Mauris porta enim sit amet ante tristique, a scelerisque nisi maximus.

mFRKBfiiESmXGTOxkM3WJcAB9aO
But if we add a separation marker to it, we can split the string exactly where we want it:
Description:

Aenean at eros sollicitudin, interdum ante eget, mollis purus. Ut scelerisque pulvinar enim, in bibendum ipsum. Cras sed fermentum nisl. Mauris porta enim sit amet ante tristique, a scelerisque nisi maximus.

###mFRKBfiiESmXGTOxkM3WJcAB9aO###
Adding the reference to the issue body
Github uses the Markdown Language to format the issue description. A # is used the create a title, and three ### is used to create a subtitle. So we are going to use a different separation marker so we don’t conflict with the Markdown language.
- Open the Flow and go to the last action.
- In the body add the value TaskId
- Add <taskid> before and after it.
- Do the same for the value Created By Used ID, but then add <createdById> before and after it.
So the result of you body look like this:
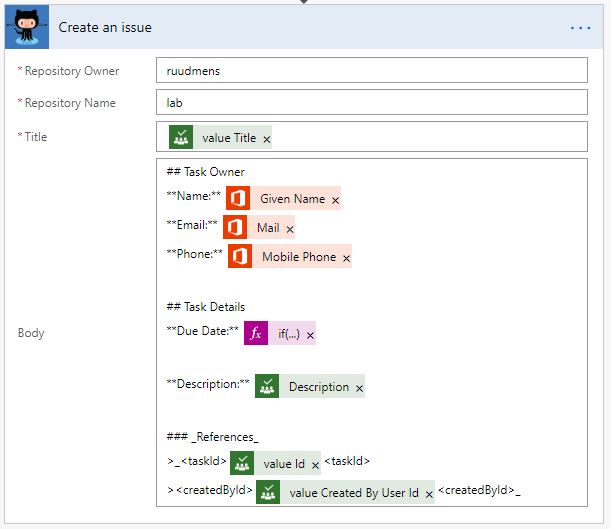
As you can see I added some Markdown styling to style the issue in GitHub. ** is bold, _ before text is italic and the hashtags are the heading styles.
Step 2 – Closing the Planner Task
Create a new Flow and search for the Github connector. You will see 3 triggers, so we are a bit limited in our options here. We can only use the Trigger: When an issue assigned to me is closed. So we are going to work with that.
This means that you will need to assign the issue in Github to yourself to trigger this Flow. But that is only a small handling and should be an issue.
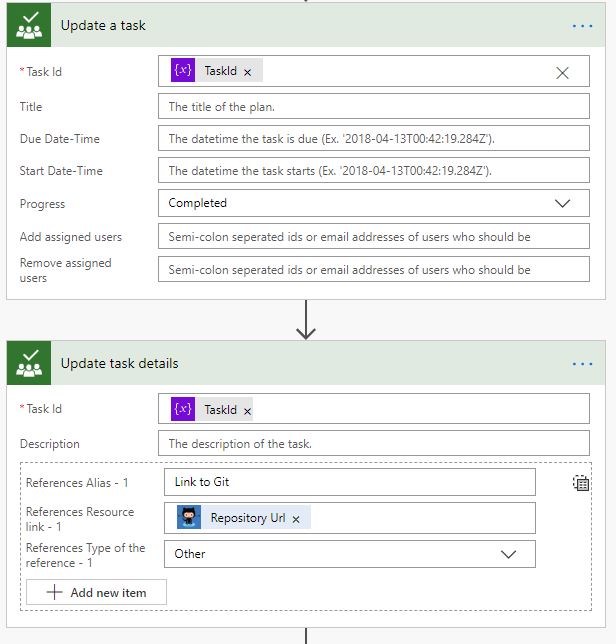
Add an action after the trigger, search for Planner and select the Update a Task action. To close a task we need to update the task progress to completed. But how are we going to fill in the task Id?
Splitting text in Microsoft Flow
To extract the task id out of our issue body we are going to split the content of the body. We are going to use an Expression for this:
split(triggerBody()['body'],'<taskId>')[1]
The split function requires two variables. The text to split and the separator. Our text is the body from our Github issue. So we can reference the triggerBody and select the field body.
As a separator, we added <taskId> before and after the task Id in our Github body. So we separate the text on <taskId>. (In the examples below I replaced the < with ( )
From the result that we get, we want the second part. (array’s start at 0 😉 ). So if we take our example from before, the split function will return the following result:
#Content of triggerBody()['body']

Description:

Aenean at eros sollicitudin, interdum ante eget, mollis purus. Ut scelerisque pulvinar enim, in bibendum ipsum. Cras sed fermentum nisl. Mauris porta enim sit amet ante tristique, a scelerisque nisi maximus.

(taskId)mFRKBfiiESmXGTOxkM3WJcAB9aO(taskId)
(createdById)92bee383-1880-48ae-aaf7-54a495b2970b(createdById)
#Result for the function split(triggerBody()['body'],'(taskId)')

#split(triggerBody()['body'],'(taskId)')[0]:
Description:

Aenean at eros sollicitudin, interdum ante eget, mollis purus. Ut scelerisque pulvinar enim, in bibendum ipsum. Cras sed fermentum nisl. Mauris porta enim sit amet ante tristique, a scelerisque nisi maximus.

#split(triggerBody()['body'],'(taskId)')[1]:
mFRKBfiiESmXGTOxkM3WJcAB9aO

#split(triggerBody()['body'],'(taskId)')[2]:
(createdById)92bee383-1880-48ae-aaf7-54a495b2970b(createdById)
Add the expression to the Task Id field in the action Update a Task and set the progress to completed.
Step 3 – Adding variables in your Flow
We can also update the task details and add a link back to the Github issue into it. This way we can always find the correct Github issue based on the completed Planner Task.
Add a new action from the Planner connector: Update task details. Again we need the taskId, we could add the same expression again, or we can use a variable.
- Add a new action after the Trigger.
- Search for Variables
- Select the Initialize variable action
- Enter a name: TaskId
- Type is a string
- And the value is our Expression: split(triggerBody()[‘body’],'<taskId>’)
Now we can change our Update a Task action, remove the expression from the Task Id field and add the variable TaskId instead. We can use the same variable now for the Update task details action.
By using variables we only have to make the expression ones. So if we ever need to change something in our expression, we only have to do that in one location.
Another advantage of variables is that you can label them with a meaning full name, making your Flow easier to read.
Step 4 – Sending an email
We have not only stored the taskId, but also the user that created the task in our Github issue body. This allows us to send the user who created the task an email that the task is completed.
With the UserId we can lookup the user details and find his or hers email address. Add the action Get user profile (v2) from the Office 365 connector.
For the user (UPN) we can use the createdById. So add an expression, or a new variable if you want, and split the triggerBody on the <createdById>.
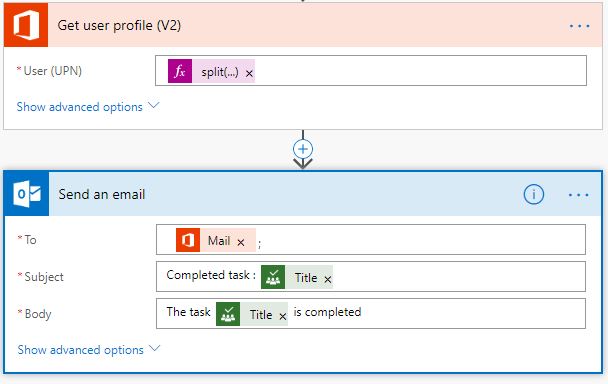
Add a new Action, search for Email and select the Send an email (V2) action. We are using Office 365 Outlook to send the email. Add the required fields to it and you are done.
Result
Use variables if you need to use the same expression more then once in your Flow. You can also use variables to temporary store data, increment or decrement numbers or create a array of data.